tonglin0325的个人主页

数据仓库建模的一些理论

1.数据分层

数据明细层:DWD(Data Warehouse Detail)

数据中间层:DWM(Data WareHouse Middle)

数据服务层:DWS(Data WareHouse Servce)

数据应用层:ADS(Application Data Service)

2.数仓建模方法

在数据仓库模型中,星型模型和雪花型模型是两个常用的设计模式。参考:数据仓库系列:星型模型和雪花型模型

1.星型模型

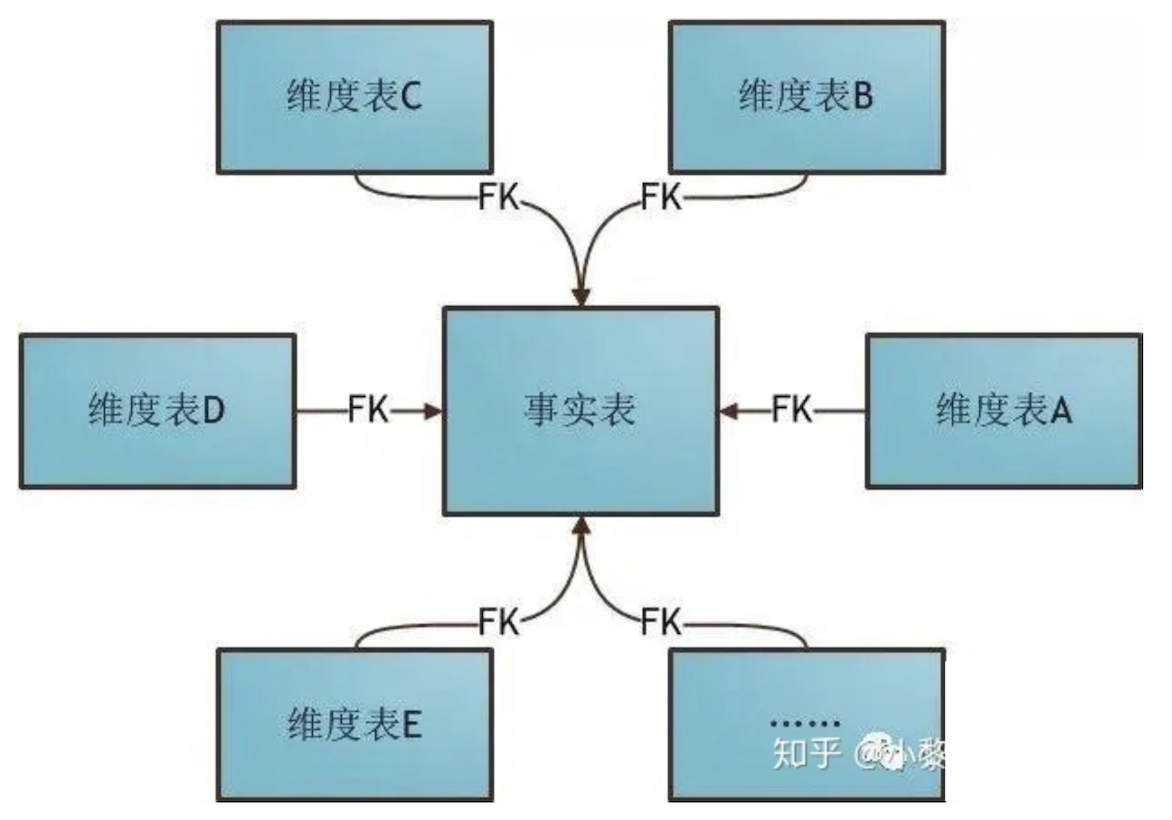
星型模型是一种简单的数据仓库模型,也是最常见的模型之一。在星型模型中,中心表(称为业务事实表)连接到几个维度表(称为业务维度表)。维度表中包含了业务的各个特征,如时间、区域、产品等。

在 SQL 中,我们可以使用以下语句来创建一个星型模型:

1
2
3
4
5
6
7
8
9
10
11
12
13
14
15
16
17
18
19
20
21
22
23
24
25
26
27
28
29
30
31
32
33
CREATE TABLE fact_sales ( # 都是key
sales_id INT PRIMARY KEY,
date_key INT,
product_key INT,
store_key INT,
sales_amount DECIMAL(15,2)
);

CREATE TABLE dim_date (
date_key INT PRIMARY KEY,
date_full DATE,
year INT,
quarter INT,
month INT,
day_of_week CHAR(9),
holiday VARCHAR(32)
);

CREATE TABLE dim_product (
product_key INT PRIMARY KEY,
product_name VARCHAR(128),
category VARCHAR(32),
subcategory VARCHAR(32)
);

CREATE TABLE dim_store (
store_key INT PRIMARY KEY,
store_name VARCHAR(128),
city VARCHAR(32),
state VARCHAR(2),
country VARCHAR(64)
);

2.雪花型模型

雪花型模型是在星型模型基础上的扩展,因其形似雪花而得名。这种模型在星型模型的基础上,将维度表拆分成更小的表形式,形成多层表的结构。

全文 >>
MySQL学习笔记——索引原理

1.索引(index)

可以通过在数据库中创建index来加速对表的查询,index可以避免对表的一个全面扫描。对于主键和唯一键,会自动在上面创建索引。

  • 通过使用快速路径访问方法快速定位数据,减少了磁盘的I/O
  • 与表独立存放,但不能独立存在,必须属于某个表
  • 由数据库自动维护,表被删除时,该表上的索引自动被删除

索引的原理:当以某个字段建立一个索引的时候,数据库就会生成一个索引页,索引页不单单保存索引的数据,还保存了索引在数据库的具体的物理地址。

1
2
3
4
5
6
7
8
9
10
11
# 手动创建索引
CREATE INDEX index_tb_dept_name
ON tb_dept(NAME);

# 使用索引,在where之后加上索引,提高查询效率
SELECT * FROM tb_dept WHERE NAME='Tom'

# 重建索引
drop index index_name;
create index index_name on table(column);

注意:如果表的列很少,不适合建立索引。当执行过很多次的insert、delete、update后,会出现索引碎片。影响查询速度,我们应该对索引进行重组。

**索引列最好设置为 NOT NULL**,这通常可以提升查询效率和简化索引操作。

索引失效的场景:

  • 当我们使用左或者左右模糊匹配的时候,也就是 like %xx 或者 like %xx%这两种方式都会造成索引失效;
  • 当我们在查询条件中对索引列做了计算、函数、类型转换操作,这些情况下都会造成索引失效;
  • 联合索引要能正确使用需要遵循最左匹配原则,也就是按照最左优先的方式进行索引的匹配,否则就会导致索引失效。
  • 在 WHERE 子句中,如果在 OR 前的条件列是索引列,而在 OR 后的条件列不是索引列,那么索引会失效。

参考:https://xiaolincoding.com/mysql/index/index_interview.html#有什么优化索引的方法?

https://xiaolincoding.com/mysql/index/index_lose.html#索引失效有哪些?

2.常见索引的种类

主键索引 PRIMARY、唯一索引 UNIQUE、普通索引 INDEX(多字段为组合索引)、全文索引 FULLTEXT、空间索引 SPATIAL

参考:深入理解MySQL索引原理和实现——为什么索引可以加速查询?

1、主键索引

即主索引,根据主键pk_clolum(length)建立索引,不允许重复,不允许空值;

1
2
ALTER TABLE 'table_name' ADD PRIMARY KEY pk_index('col');

全文 >>

Android学习笔记——SQLite

该工程的功能是实现关于数据库的操作,即creat、update、insert、query、delete

调试的时候请用模拟器,用真机调试的时候进入cmd-adb shell,再进入cd data/data的时候会显示permission denied


以下的代码是MainActivity.java中的代码

1
2
3
4
5
6
7
8
9
10
11
12
13
14
15
16
17
18
19
20
21
22
23
24
25
26
27
28
29
30
31
32
33
34
35
36
37
38
39
40
41
42
43
44
45
46
47
48
49
50
51
52
53
54
55
56
57
58
59
60
61
62
63
64
65
66
67
68
69
70
71
72
73
74
75
76
77
78
79
80
81
82
83
84
85
86
87
88
89
90
91
92
93
94
95
96
97
98
99
100
101
102
103
104
105
106
107
108
109
110
111
112
113
114
115
116
117
118
119
120
121
122
123
124
125
126
127
128
129
130
131
132
133
134
135
136
137
138
139
package com.example.sqlite;

import com.example.sqlite.db.DataBaseHelper;

import android.app.Activity;
import android.content.ContentValues;
import android.database.Cursor;
import android.database.sqlite.SQLiteDatabase;
import android.os.Bundle;
import android.view.Menu;
import android.view.MenuItem;
import android.view.View;
import android.view.View.OnClickListener;
import android.widget.Button;
import android.widget.EditText;
import android.widget.TextView;

public class MainActivity extends Activity {

private Button createDBButton ;
private Button insertDBButton ;
private Button updateDBButton ;
private Button queryDBButton ;
private Button deleteDBButton ;
private EditText input_id ;
private EditText input_name ;
private TextView test ;

@Override
protected void onCreate(Bundle savedInstanceState) {
super.onCreate(savedInstanceState);
setContentView(R.layout.activity_main);
//此处为创建数据库, 通过按钮监听器来实现
createDBButton = (Button) findViewById(R.id.creatDB);
createDBButton.setOnClickListener(new CreateDBListener());
//此处为插入数据到数据库中
insertDBButton = (Button) findViewById(R.id.insert);
insertDBButton.setOnClickListener(new InsertListener());
//此处为更新数据表
updateDBButton = (Button) findViewById(R.id.update);
updateDBButton.setOnClickListener(new updateListener());
//此处为更新数据表
queryDBButton = (Button) findViewById(R.id.query);
queryDBButton.setOnClickListener(new queryListener());
//此处为删除数据内容
deleteDBButton = (Button) findViewById(R.id.delete);
deleteDBButton.setOnClickListener(new deleteListener());
//此处为显示查询结果
test = (TextView) findViewById(R.id.result);
test.setText("name") ;
//此处为添加数据的选项
//input_id = (EditText) findViewById(R.id.input_id);
//input_name = (EditText) findViewById(R.id.input_name);
}

class CreateDBListener implements OnClickListener{
@Override
public void onClick(View v) {
// 此处为调用另外一个类中的方法来创建数据库, 或者直接来创建数据库

String db_name = "test_mars_db_one" ;
System.out.println("Create");
DataBaseHelper dbHelper = new DataBaseHelper(MainActivity.this, db_name) ;
SQLiteDatabase db = dbHelper.getReadableDatabase() ;
}
}

class InsertListener implements OnClickListener{

@Override
public void onClick(View v) {
//生成一个ContentValues对象
ContentValues values = new ContentValues() ;
//想该对象当中插入键值对,其中键是列名,值是希望插入到这列的值,值必须
values.put("id", 1) ;
values.put("name", "zhangsan") ;
System.out.println("Insert");
DataBaseHelper dbHelper = new DataBaseHelper(MainActivity.this, "test_mars_db_one") ;
SQLiteDatabase db = dbHelper.getWritableDatabase() ;
//调用insert方法, 就可以将数据插入到数据库中
db.insert("user", null, values) ;
}

}

class updateListener implements OnClickListener{
@Override
public void onClick(View arg0) {
// 此处为更新数据内容
System.out.println("Update");
DataBaseHelper dbHelper = new DataBaseHelper(MainActivity.this, "test_mars_db_one") ;
SQLiteDatabase db = dbHelper.getWritableDatabase() ;
ContentValues values = new ContentValues() ;
values.put("name", "zhangsanfeng") ;
//第一个参数为要更新的表名
//第二个参数为一个ContentValues对象
//第三个参数是where语句
db.update("user", values, "id=?", new String[]{"1"}) ;
}
}


class queryListener implements OnClickListener{
@Override
public void onClick(View v) {
// 此处为查询数据内容, 并用到cursor来实现
System.out.println("query");
DataBaseHelper dbHelper = new DataBaseHelper(MainActivity.this, "test_mars_db_one") ;
SQLiteDatabase db = dbHelper.getWritableDatabase() ;
Cursor cursor = db.query("user", new String[]{"id","name"}, "id=?", new String[]{"2"},null,null,null,null) ;
while(cursor.moveToNext()){
String name = cursor.getString(cursor.getColumnIndex("name")) ;
System.out.print("query---> " + name) ;
//name += name ;
test.setText(name) ;
}
}
}

class deleteListener implements OnClickListener{
public void onClick(View v) {

//此处为实现删除数据
System.out.println("delete");
DataBaseHelper dbHelper = new DataBaseHelper(MainActivity.this, "test_mars_db_one") ;
SQLiteDatabase db = dbHelper.getWritableDatabase() ;

//删除特定条件的数据
//db.delete("user","id=?",new String[]{"2"});
//删除所有数据
db.delete("user",null,null);

}
}

}


以下的代码是DataBaseHelper.java中的代码

1
2
3
4
5
6
7
8
9
10
11
12
13
14
15
16
17
18
19
20
21
22
23
24
25
26
27
28
29
30
31
32
33
34
35
36
37
38
39
40
41
42
43
44
45
46
47
package com.example.sqlite.db;

import android.content.Context;
import android.database.sqlite.SQLiteDatabase;
import android.database.sqlite.SQLiteDatabase.CursorFactory;
import android.database.sqlite.SQLiteOpenHelper;

//DatabaseHelper作为一个访问SQLite的助手类,提供两个方面的功能
//第一,getReadableDatabase(),getWriteableDatabase()可以获得SQLiteDatabase对象,通过该对象可以对数据库进行操作
//第二,提供了onCreate()和onUpgrade()两个回调函数,允许我们在创建和升级数据库时,进行自己的操作

public class DataBaseHelper extends SQLiteOpenHelper {

private static final int VERSION = 1;
//在SQLiteOpenHelper的子类当中,必须有该构造函数
public DataBaseHelper(Context context, String name, CursorFactory factory,
int version) {
//必须通过super调用父类当中的构造函数
super(context, name, factory, version);
// TODO Auto-generated constructor stub
}

public DataBaseHelper(Context context,String name){
this(context,name,VERSION);
}

public DataBaseHelper(Context context,String name,int version){
this(context,name,null,version);
}

//该函数是在第一次创建数据库的时候执行,实际上是在第一次得到SQLiteDatabase对象的时候,才会调用该方法
@Override
public void onCreate(SQLiteDatabase db) {
// TODO Auto-generated method stub
System.out.println("Create a Database");
//execSQL函数用于执行SQL语句
db.execSQL("create table user(id int,name varchar(20))");
System.out.println("Create a Database successful");
}

@Override
public void onUpgrade(SQLiteDatabase db, int oldVersion, int newVersion) {
// TODO Auto-generated method stub
System.out.println("update a DataBase");
}

}


以下的代码是activity_main.xml中的代码

全文 >>

Android学习笔记——Layout

下面列举了Android中Layout,Table,Menu,Checkbox,Listview,Button,Bundle的基本使用和demo

1.Layout:该工程的功能是实现LinearLayout

Android Layout有多种,比如:Layout,MixLayout,TableLayout等

以下的代码是MainActivity.java中的代码

1
2
3
4
5
6
7
8
9
10
11
12
13
14
15
16
17
18
19
20
21
22
23
24
25
26
package com.example.linearlayout;

import android.app.Activity;
import android.os.Bundle;
import android.view.Menu;
import android.view.MenuItem;
import android.widget.TextView;


public class MainActivity extends Activity {

private TextView firstText;
private TextView secondText;

@Override
protected void onCreate(Bundle savedInstanceState) {
super.onCreate(savedInstanceState);
setContentView(R.layout.activity_main);

firstText = (TextView)findViewById(R.id.firstText);
secondText = (TextView)findViewById(R.id.secondText);

firstText.setText(R.string.firstText);
secondText.setText(R.string.secondText);
}
}


以下的代码是activity_main.xml中的代码

1
2
3
4
5
6
7
8
9
10
11
12
13
14
15
16
17
18
19
20
21
22
23
24
25
26
27
28
29
30
31
32
33
34
35
36
37
38
39
40
41
42
43
44
45
46
47
48
49
50
51
52
53
54
<LinearLayout xmlns:android="http://schemas.android.com/apk/res/android"
xmlns:tools="http://schemas.android.com/tools"
android:id="@+id/LinearLayout1"
android:layout_width="fill_parent"
android:layout_height="match_parent"
android:orientation="vertical"
tools:context="${relativePackage}.${activityClass}" >

<!--
android:id 为控件制定相应的ID
android:text 指定控件当中显示的文字
android:gravity 指定控件的基本位置/居中居右等
android:textSize 指定控件的基本位置/居中居右等
android:background 指定该控件所使用的背景色,RGB命名法
android:width 指定控件的宽度
android:height 指定控件的高度
android:padding 指定控件的内边距
android:weight 数字为相应的比例
android:singleLine 设定true为同一行显示
-->


<TextView
android:id="@+id/firstText"
android:gravity="center_vertical"
android:textSize="20pt"
android:background="#0000ff"
android:layout_width="fill_parent"
android:layout_height="0.0dip"
android:paddingLeft="10dip"
android:paddingTop="20dip"
android:paddingRight="30dip"
android:paddingBottom="40dip"
android:layout_weight="1"
android:singleLine="true"
/>

<TextView
android:id="@+id/secondText"
android:gravity="center_vertical"
android:textSize="15pt"
android:background="#00ff00"
android:layout_width="fill_parent"
android:layout_height="0.0dip"
android:paddingLeft="10dip"
android:paddingTop="20dip"
android:paddingRight="30dip"
android:paddingBottom="40dip"
android:layout_weight="2"
android:singleLine="true"
/>

</LinearLayout>


以下的代码是string.xml中的代码

1
2
3
4
5
6
7
8
<?xml version="1.0" encoding="utf-8"?>
<resources>

<string name="app_name">LinearLayout</string>
<string name="hello_world">Hello world!</string>
<string name="firstText">第一行</string>
<string name="secondText">第二行</string>
</resources>

全文 >>

Flink学习笔记——Broadcast State

使用broadcast state实现动态配置更新,即双流:一个数据流,一个配置流

1
2
https://flink.apache.org/2019/06/26/broadcast-state.html

可以参考官方文档

1
2
https://ci.apache.org/projects/flink/flink-docs-release-1.13/docs/dev/datastream/fault-tolerance/broadcast_state/

例子:Flink使用Broadcast State实现流处理配置实时更新


Mac下安装minikube

1.安装kubectl命令

1
2
brew install kubectl

如果想安装指定版本的kubectl

1
2
3
4
5
curl -LO "https://dl.k8s.io/release/v1.20.0/bin/darwin/amd64/kubectl"
chmod +x ./kubectl
sudo mv ./kubectl /usr/local/bin/kubectl
sudo chown root: /usr/local/bin/kubectl

验证版本,会打印出client端和server端的版本,官方建议2个版本直接版本相差不要大于+/-1

1
2
3
4
kubectl version
Client Version: version.Info{Major:"1", Minor:"20", GitVersion:"v1.20.0", GitCommit:"af46c47ce925f4c4ad5cc8d1fca46c7b77d13b38", GitTreeState:"clean", BuildDate:"2020-12-08T17:59:43Z", GoVersion:"go1.15.5", Compiler:"gc", Platform:"darwin/amd64"}
Server Version: version.Info{Major:"1", Minor:"20", GitVersion:"v1.20.7", GitCommit:"132a687512d7fb058d0f5890f07d4121b3f0a2e2", GitTreeState:"clean", BuildDate:"2021-05-12T12:32:49Z", GoVersion:"go1.15.12", Compiler:"gc", Platform:"linux/amd64"}


2.下载和安装minikube

1
2
3
4
5
6
7
8
9
➜  /Users/lintong/Downloads $ curl -LO https://storage.googleapis.com/minikube/releases/latest/minikube-darwin-amd64

% Total % Received % Xferd Average Speed Time Time Time Current
Dload Upload Total Spent Left Speed
100 68.6M 100 68.6M 0 0 9365k 0 0:00:07 0:00:07 --:--:-- 11.0M
➜ /Users/lintong/Downloads $ sudo install minikube-darwin-amd64 /usr/local/bin/minikube

Password:

参考

1
2
https://minikube.sigs.k8s.io/docs/start/

如果要安装指定版本的话,请到下面的地址下载

1
2
https://github.com/kubernetes/minikube/releases

全文 >>

Mac下安装mongodb

1.添加mongo的仓库

1
brew tap mongodb/brew

2.安装mongodb

1
brew install mongodb-community@4.4

参考:Mac OSX 平台安装 MongoDB

安装成功

3.打开mongo shell

1
2
/usr/local/opt/mongodb-community@4.4/bin/mongo xxx:27017/your_db

如果是mongo 6.0的话,是没有mongo命令的,需要额外安装mongosh,下载地址

1
2
https://www.mongodb.com/try/download/shell

4.查询数据

查看db

1
2
show dbs

全文 >>

Spark学习笔记——rdd,dataframe和dataset转换

1.生成RDD

1
2
val rdd: RDD[(String, Int)] = sc.parallelize(Seq(("cat", 30), ("fox", 40)))

2.生成case class RDD

1
2
3
case class WordCount(word: String, count: Long)
val rdd: RDD[WordCount] = sc.parallelize(Seq(WordCount("dog", 50), WordCount("cow", 60)))

3.rdd转df,注意这里需要隐式转换

1
2
3
4
import spark.implicits._

val df = rdd.toDF()

4.rdd转ds,注意 WordCount 需要写在主函数之外

1
2
3
4
import spark.implicits._

val ds: Dataset[WordCount]= rdd.toDS()

5.df转ds

1
2
val ds: Dataset[WordCount]= df.as[WordCount]

6.thrift class rdd转df

1
2
val df = spark.createDataFrame(rdd, classOf[MyBean])

7.thrift class df转ds,需要为thrift class指定encoder

1
2
val ds = df.as[MyBean](Encoders.bean(classOf[MyBean]))

或者

1
2
3
4
implicit val mapEncoder = Encoders.bean(classOf[MyBean])

val ds = df.as[MyBean]

8.avro class rdd转df,参考

1
2
https://stackoverflow.com/questions/47264701/how-to-convert-rddgenericrecord-to-dataframe-in-scala

全文 >>