下面列举了Android中Layout,Table,Menu,Checkbox,Listview,Button,Bundle的基本使用和demo
1.Layout:该工程的功能是实现LinearLayout Android Layout有多种,比如:Layout,MixLayout,TableLayout等
以下的代码是MainActivity.java中的代码
1
2
3
4
5
6
7
8
9
10
11
12
13
14
15
16
17
18
19
20
21
22
23
24
25
26
package com.example.linearlayout; import android.app.Activity; import android.os.Bundle; import android.view.Menu; import android.view.MenuItem; import android.widget.TextView; public class MainActivity extends Activity { private TextView firstText; private TextView secondText; @Override protected void onCreate(Bundle savedInstanceState) { super.onCreate(savedInstanceState); setContentView(R.layout.activity_main); firstText = (TextView)findViewById(R.id.firstText); secondText = (TextView)findViewById(R.id.secondText); firstText.setText(R.string.firstText); secondText.setText(R.string.secondText); } }
以下的代码是activity_main.xml中的代码
1
2
3
4
5
6
7
8
9
10
11
12
13
14
15
16
17
18
19
20
21
22
23
24
25
26
27
28
29
30
31
32
33
34
35
36
37
38
39
40
41
42
43
44
45
46
47
48
49
50
51
52
53
54
<LinearLayout xmlns:android="http://schemas.android.com/apk/res/android" xmlns:tools="http://schemas.android.com/tools" android:id="@+id/LinearLayout1" android:layout_width="fill_parent" android:layout_height="match_parent" android:orientation="vertical" tools:context="${relativePackage}.${activityClass}" > <!-- android:id 为控件制定相应的ID android:text 指定控件当中显示的文字 android:gravity 指定控件的基本位置/居中居右等 android:textSize 指定控件的基本位置/居中居右等 android:background 指定该控件所使用的背景色,RGB命名法 android:width 指定控件的宽度 android:height 指定控件的高度 android:padding 指定控件的内边距 android:weight 数字为相应的比例 android:singleLine 设定true为同一行显示 --> <TextView android:id="@+id/firstText" android:gravity="center_vertical" android:textSize="20pt" android:background="#0000ff" android:layout_width="fill_parent" android:layout_height="0.0dip" android:paddingLeft="10dip" android:paddingTop="20dip" android:paddingRight="30dip" android:paddingBottom="40dip" android:layout_weight="1" android:singleLine="true" /> <TextView android:id="@+id/secondText" android:gravity="center_vertical" android:textSize="15pt" android:background="#00ff00" android:layout_width="fill_parent" android:layout_height="0.0dip" android:paddingLeft="10dip" android:paddingTop="20dip" android:paddingRight="30dip" android:paddingBottom="40dip" android:layout_weight="2" android:singleLine="true" /> </LinearLayout>
以下的代码是string.xml中的代码
1
2
3
4
5
6
7
8
<?xml version="1.0" encoding="utf-8"?> <resources> <string name="app_name">LinearLayout</string> <string name="hello_world">Hello world!</string> <string name="firstText">第一行</string> <string name="secondText">第二行</string> </resources>
2.Layout:该工程的功能是实现LinearLayout+TableLayout 以下代码是MainActivity.java中的代码
1
2
3
4
5
6
7
8
9
10
11
12
13
14
15
16
17
18
package com.example.mixlayout; import android.app.Activity; import android.os.Bundle; import android.view.Menu; import android.view.MenuItem; import android.widget.TextView; public class MainActivity extends Activity { private TextView firstText; @Override protected void onCreate(Bundle savedInstanceState) { super.onCreate(savedInstanceState); setContentView(R.layout.activity_main); } }
以下代码是activity_main.xml中的代码
1
2
3
4
5
6
7
8
9
10
11
12
13
14
15
16
17
18
19
20
21
22
23
24
25
26
27
28
29
30
31
32
33
34
35
36
37
38
39
40
41
42
43
44
45
46
47
48
49
50
51
52
53
54
55
56
57
58
59
60
61
62
63
64
65
66
67
68
69
70
71
72
73
74
75
76
77
78
79
80
81
82
83
84
85
86
87
<LinearLayout xmlns:android="http://schemas.android.com/apk/res/android" xmlns:tools="http://schemas.android.com/tools" android:id="@+id/LinearLayout1" android:layout_width="fill_parent" android:layout_height="fill_parent" android:orientation="vertical" tools:context="${relativePackage}.${activityClass}" > <LinearLayout android:layout_width="fill_parent" android:layout_height="fill_parent" android:layout_weight="1" android:orientation="horizontal" > <TextView android:layout_width="wrap_content" android:layout_height="fill_parent" android:layout_weight="1" android:background="#aa0000" android:gravity="center_horizontal" android:text="red" /> <TextView android:layout_width="wrap_content" android:layout_height="fill_parent" android:layout_weight="1" android:background="#00aa00" android:gravity="center_horizontal" android:text="green" /> <TextView android:layout_width="wrap_content" android:layout_height="fill_parent" android:layout_weight="1" android:background="#0000aa" android:gravity="center_horizontal" android:text="blue" /> </LinearLayout> <LinearLayout android:layout_width="fill_parent" android:layout_height="fill_parent" android:layout_weight="1" android:orientation="horizontal" > <TableLayout xmlns:android="http://schemas.android.com/apk/res/android" android:layout_width="fill_parent" android:layout_height="fill_parent" android:stretchColumns="1"> <TableRow> <TextView android:padding="3dip" android:text="row1_column1" /> <TextView android:gravity="center_horizontal" android:padding="3dip" android:text="row1_column2" /> <TextView android:gravity="right" android:padding="3dip" android:text="row1_column3" /> </TableRow> <TableRow> <TextView android:padding="3dip" android:text="row2_column1" /> <TextView android:gravity="center_horizontal" android:padding="3dip" android:text="row2_column2" /> <TextView android:gravity="right" android:padding="3dip" android:text="row2_column3" /> </TableRow> </TableLayout> </LinearLayout> </LinearLayout>
3.Table:该工程的功能是实现在一个activity中显示一个表格 以下代码是MainActivity.java中的代码
1
2
3
4
5
6
7
8
9
10
11
12
13
14
15
package com.example.tablelayout; import android.app.Activity; import android.os.Bundle; import android.view.Menu; import android.view.MenuItem; public class MainActivity extends Activity { @Override protected void onCreate(Bundle savedInstanceState) { super.onCreate(savedInstanceState); setContentView(R.layout.activity_main); } }
以下的代码是activity_main.xml中的代码
1
2
3
4
5
6
7
8
9
10
11
12
13
14
15
16
17
18
19
20
21
22
23
24
25
26
27
28
29
30
31
32
33
34
35
36
37
38
39
40
41
<TableLayout xmlns:android="http://schemas.android.com/apk/res/android" xmlns:tools="http://schemas.android.com/tools" android:id="@+id/TableLayout1" android:layout_width="fill_parent" android:layout_height="fill_parent" android:stretchColumns="1" tools:context="${relativePackage}.${activityClass}" > <!-- 由于fill_parent不能填满,所以stretchColumns指定列拉伸 --> <TableRow> <TextView android:text="@string/hello_world" android:padding="3dip" android:background="#aa0000" /> <TextView android:text="@string/hello_world" android:padding="3dip" android:background="#00aa00" android:gravity="center_horizontal" /> <TextView android:text="@string/hello_world" android:padding="3dip" android:background="#0000aa" android:gravity="right" /> </TableRow> <TableRow> <TextView android:text="@string/hello_world" android:padding="3dip" /> <TextView android:text="@string/hello_world" android:padding="3dip" android:gravity="right" /> </TableRow> </TableLayout>
以下的代码是MainActivity.java中的代码
1
2
3
4
5
6
7
8
9
10
11
12
13
14
15
16
17
18
19
20
21
22
23
24
25
26
27
28
29
30
31
32
33
34
35
36
37
38
39
40
41
42
43
44
45
46
47
48
49
50
51
52
53
54
55
56
57
58
59
60
61
62
63
64
65
66
67
68
69
70
71
72
73
74
75
76
77
78
79
80
81
package com.example.menu; import android.app.Activity; import android.content.Intent; import android.os.Bundle; import android.view.Menu; import android.view.MenuItem; import android.view.View; import android.view.View.OnClickListener; import android.widget.Button; import android.widget.EditText; import android.widget.TextView; public class MainActivity extends Activity { private EditText factorOne; private EditText factorTwo; private TextView symbol; private Button calculate; @Override protected void onCreate(Bundle savedInstanceState) { super.onCreate(savedInstanceState); setContentView(R.layout.activity_main); factorOne = (EditText)findViewById(R.id.factorOne); factorTwo = (EditText)findViewById(R.id.factorTwo); symbol = (TextView)findViewById(R.id.symbol); calculate = (Button)findViewById(R.id.calculate); //symbol.setText("乘以"); //calculate.setText("计算"); //为symbol和calculate设置显示的值 symbol.setText(R.string.symbol); calculate.setText(R.string.calculate); //将监听器的对象绑定到按钮对象上面 calculate.setOnClickListener(new CalculateListener()); } @Override public boolean onCreateOptionsMenu(Menu menu) { // TODO Auto-generated method stub menu.add(0,1,1,R.string.exit); menu.add(0,2,2,R.string.about); return super.onCreateOptionsMenu(menu); } //当客户点击MENU按钮的时候,调用该方法 @Override public boolean onOptionsItemSelected(MenuItem item) { // TODO Auto-generated method stub if(item.getItemId() == 1){ finish(); } return super.onOptionsItemSelected(item); } class CalculateListener implements OnClickListener{ @Override public void onClick(View v) { // TODO Auto-generated method stub //取得两个EditText控件的值 String factorOneStr = factorOne.getText().toString(); String factorTwoStr = factorTwo.getText().toString(); //将这两个值存放到Intent对象当中 Intent intent = new Intent(); intent.putExtra("one",factorOneStr); intent.putExtra("two",factorTwoStr); intent.setClass(MainActivity.this,ResultActivity.class ); //使用这个Intent对象来启动ResultActivity MainActivity.this.startActivity(intent); } } }
以下的代码是ResultActivity.java中的代码
1
2
3
4
5
6
7
8
9
10
11
12
13
14
15
16
17
18
19
20
21
22
23
24
25
26
27
package com.example.menu; import android.app.Activity; import android.content.Intent; import android.os.Bundle; import android.widget.TextView; public class ResultActivity extends Activity{ private TextView resultView; @Override protected void onCreate(Bundle savedInstanceState) { super.onCreate(savedInstanceState); setContentView(R.layout.activity_result); resultView = (TextView)findViewById(R.id.result); //得到Intent对象当中的值 Intent intent = getIntent(); String factorOneStr = intent.getStringExtra("one"); String factorTwoStr = intent.getStringExtra("two"); int factorOneInt = Integer.parseInt(factorOneStr); int factorTwoInt = Integer.parseInt(factorTwoStr); //计算两个值的积 int result = factorOneInt * factorTwoInt; resultView.setText(result + ""); } }
以下的代码是activity_main.xml中的代码
1
2
3
4
5
6
7
8
9
10
11
12
13
14
15
16
17
18
19
20
21
22
23
24
25
26
27
28
29
30
31
<?xml version="1.0" encoding="utf-8"?> <LinearLayout xmlns:android="http://schemas.android.com/apk/res/android" android:layout_width="fill_parent" android:layout_height="fill_parent" android:orientation="vertical" > <EditText android:id="@+id/factorOne" android:layout_width="fill_parent" android:layout_height="wrap_content" /> <TextView android:id="@+id/symbol" android:layout_width="fill_parent" android:layout_height="wrap_content" /> <EditText android:id="@+id/factorTwo" android:layout_width="fill_parent" android:layout_height="wrap_content" /> <Button android:id="@+id/calculate" android:layout_width="fill_parent" android:layout_height="wrap_content" /> </LinearLayout>
以下的代码是activity_result.xml中的代码
1
2
3
4
5
6
7
8
9
10
11
12
13
14
15
16
<?xml version="1.0" encoding="utf-8"?> <LinearLayout xmlns:android="http://schemas.android.com/apk/res/android" android:orientation="vertical" android:layout_width="fill_parent" android:layout_height="fill_parent" > <TextView android:id="@+id/result" android:layout_width="fill_parent" android:layout_height="wrap_content" /> </LinearLayout>
以下的代码是string.xml中的代码
1
2
3
4
5
6
7
8
9
10
11
<?xml version="1.0" encoding="utf-8"?> <resources> <string name="app_name">menu</string> <string name="hello_world">Hello world!</string> <string name="resultLabel">result</string> <string name="symbol">乘法</string> <string name="calculate">计算</string> <string name="exit">退出</string> <string name="about">关于</string> </resources>
以下的代码是AndroidManifest.xml中的代码
1
2
3
4
5
6
7
8
9
10
11
12
13
14
15
16
17
18
19
20
21
22
23
24
25
26
27
28
29
30
<?xml version="1.0" encoding="utf-8"?> <manifest xmlns:android="http://schemas.android.com/apk/res/android" package="com.example.menu" android:versionCode="1" android:versionName="1.0" > <uses-sdk android:minSdkVersion="8" android:targetSdkVersion="21" /> <application android:allowBackup="true" android:icon="@drawable/ic_launcher" android:label="@string/app_name" android:theme="@style/AppTheme" > <activity android:name=".MainActivity" android:label="@string/app_name" > <intent-filter> <action android:name="android.intent.action.MAIN" /> <category android:name="android.intent.category.LAUNCHER" /> </intent-filter> </activity> <activity android:name = ".ResultActivity"> </activity> </application> </manifest>
5.checkbox:该工程的功能实现在一个activity中显示一个单选框和一个多选框 以下代码是MainActivity.java文件中的代码
1
2
3
4
5
6
7
8
9
10
11
12
13
14
15
16
17
18
19
20
21
22
23
24
25
26
27
28
29
30
31
32
33
34
35
36
37
38
39
40
41
42
43
44
45
46
47
48
49
50
51
52
53
54
55
56
57
58
59
60
61
62
63
64
65
66
67
68
69
70
71
72
73
74
75
76
77
78
79
80
81
82
83
84
85
86
87
88
89
90
91
92
93
94
95
96
97
package com.example.checkbox; import android.app.Activity; import android.os.Bundle; import android.view.Menu; import android.view.MenuItem; import android.widget.CheckBox; import android.widget.CompoundButton; import android.widget.RadioButton; import android.widget.RadioGroup; import android.widget.Toast; public class MainActivity extends Activity { //对控件对象进行声明 private RadioGroup gendergroup = null; private RadioButton femaleButton = null; private RadioButton maleButton = null; private CheckBox swimBox = null; private CheckBox runBox = null; private CheckBox readBox = null; @Override protected void onCreate(Bundle savedInstanceState) { super.onCreate(savedInstanceState); setContentView(R.layout.activity_main); //通过控件的ID来得到代表控件的对象 gendergroup = (RadioGroup)findViewById(R.id.genderGroup); femaleButton = (RadioButton)findViewById(R.id.femaleButton); maleButton = (RadioButton)findViewById(R.id.maleButton); swimBox = (CheckBox)findViewById(R.id.swim); runBox = (CheckBox)findViewById(R.id.run); readBox = (CheckBox)findViewById(R.id.read); //设置监听器 gendergroup.setOnCheckedChangeListener(new RadioGroup.OnCheckedChangeListener() { @Override public void onCheckedChanged(RadioGroup group, int checkedId) { // TODO Auto-generated method stub if(femaleButton.getId() == checkedId){ System.out.println("female"); Toast.makeText(MainActivity.this, "female", Toast.LENGTH_SHORT).show(); } else if(maleButton.getId() == checkedId) { System.out.println("male"); Toast.makeText(MainActivity.this, "male", Toast.LENGTH_SHORT).show(); } } }); //为多选按钮添加监听器 swimBox.setOnCheckedChangeListener(new CompoundButton.OnCheckedChangeListener() { @Override public void onCheckedChanged(CompoundButton buttonView, boolean isChecked) { // TODO Auto-generated method stub if(isChecked) { System.out.println("swim is checked"); } else { System.out.println("swim is unchecked"); } } }); runBox.setOnCheckedChangeListener(new CompoundButton.OnCheckedChangeListener() { @Override public void onCheckedChanged(CompoundButton buttonView, boolean isChecked) { // TODO Auto-generated method stub if(isChecked) { System.out.println("run is checked"); } else { System.out.println("run is unchecked"); } } }); readBox.setOnCheckedChangeListener(new CompoundButton.OnCheckedChangeListener() { @Override public void onCheckedChanged(CompoundButton buttonView, boolean isChecked) { // TODO Auto-generated method stub if(isChecked) { System.out.println("read is checked"); } else { System.out.println("read is unchecked"); } } }); } }
以下代码是activity_main.xml文件中的代码
1
2
3
4
5
6
7
8
9
10
11
12
13
14
15
16
17
18
19
20
21
22
23
24
25
26
27
28
29
30
31
32
33
34
35
36
37
38
39
40
41
42
43
44
45
46
47
48
49
50
51
52
53
54
55
56
<LinearLayout xmlns:android="http://schemas.android.com/apk/res/android" xmlns:tools="http://schemas.android.com/tools" android:id="@+id/LinearLayout1" android:layout_width="fill_parent" android:layout_height="fill_parent" android:orientation="vertical" tools:context="${relativePackage}.${activityClass}" > <TextView android:id="@+id/textView1" android:layout_width="fill_parent" android:layout_height="wrap_content" android:text="@string/hello_world" /> <RadioGroup android:id="@+id/genderGroup" android:layout_width="wrap_content" android:layout_height="wrap_content" android:orientation="vertical" > <RadioButton android:id="@+id/femaleButton" android:layout_width="wrap_content" android:layout_height="wrap_content" android:text="@string/female" /> <RadioButton android:id="@+id/maleButton" android:layout_width="wrap_content" android:layout_height="wrap_content" android:text="@string/male" /> </RadioGroup> <CheckBox android:id="@+id/swim" android:layout_width="wrap_content" android:layout_height="wrap_content" android:text="@string/swim" /> <CheckBox android:id="@+id/run" android:layout_width="wrap_content" android:layout_height="wrap_content" android:text="@string/run" /> <CheckBox android:id="@+id/read" android:layout_width="wrap_content" android:layout_height="wrap_content" android:text="@string/read" /> </LinearLayout>
以下代码是string.xml文件中的代码
1
2
3
4
5
6
7
8
9
10
11
<?xml version="1.0" encoding="utf-8"?> <resources> <string name="app_name">CheckBox</string> <string name="hello_world">Hello world!</string> <string name="female">女</string> <string name="male">男</string> <string name="swim">游泳</string> <string name="run">跑步</string> <string name="read">读书</string> </resources>
6.listview:该工程的功能是实现在一个activity中显示一个列表 以下代码是MainActivity.java中的代码
1
2
3
4
5
6
7
8
9
10
11
12
13
14
15
16
17
18
19
20
21
22
23
24
25
26
27
28
29
30
31
32
33
34
35
36
37
38
39
40
41
42
43
package com.example.listview; import java.util.ArrayList; import java.util.HashMap; import android.app.ListActivity; import android.os.Bundle; import android.view.Menu; import android.view.MenuItem; import android.widget.SimpleAdapter; public class MainActivity extends ListActivity { @Override public void onCreate(Bundle savedInstanceState) { super.onCreate(savedInstanceState); setContentView(R.layout.activity_main); ArrayList<HashMap<String, String>> list = new ArrayList<HashMap<String, String>>(); HashMap<String, String> map1 = new HashMap<String,String>(); HashMap<String, String> map2 = new HashMap<String,String>(); HashMap<String, String> map3 = new HashMap<String,String>(); map1.put("user_name","zhangsan"); map1.put("user_ip","192.168.0.1"); map2.put("user_name","lisi"); map2.put("user_ip","192.168.0.2"); map3.put("user_name","wangwu"); map3.put("user_ip","192.168.0.3"); list.add(map1); list.add(map2); list.add(map3); SimpleAdapter listAdapter = new SimpleAdapter(this, list, R.layout.activity_user, new String[] {"user_name", "user_ip"}, new int[] {R.id.user_name, R.id.user_ip}); setListAdapter(listAdapter); } }
以下的代码是activity_main.xml中的代码
1
2
3
4
5
6
7
8
9
10
11
12
13
14
15
16
17
18
19
20
21
22
23
24
<LinearLayout xmlns:android="http://schemas.android.com/apk/res/android" xmlns:tools="http://schemas.android.com/tools" android:id="@+id/LinearLayout1" android:layout_width="fill_parent" android:layout_height="fill_parent" android:orientation="vertical" tools:context="${relativePackage}.${activityClass}" > <LinearLayout android:id="@+id/listLinearLayout" android:orientation="vertical" android:layout_width="fill_parent" android:layout_height="wrap_content" > <ListView android:id="@id/android:list" android:scrollbars="vertical" android:layout_width="fill_parent" android:layout_height="wrap_content" android:drawSelectorOnTop="false" /> </LinearLayout> </LinearLayout>
以下代码是activity_user.xml中的代码
1
2
3
4
5
6
7
8
9
10
11
12
13
14
15
16
17
18
19
20
21
22
23
24
25
26
27
28
29
<LinearLayout xmlns:android="http://schemas.android.com/apk/res/android" xmlns:tools="http://schemas.android.com/tools" android:id="@+id/LinearLayout2" android:layout_width="fill_parent" android:layout_height="fill_parent" android:orientation="horizontal" android:paddingLeft="10dip" android:paddingRight="10dip" android:paddingTop="1dip" android:paddingBottom="1dip" tools:context="${relativePackage}.${activityClass}" > <TextView android:id="@+id/user_name" android:layout_width="180dip" android:layout_height="30dip" android:textSize="10pt" android:singleLine="true" /> <TextView android:id="@+id/user_ip" android:layout_width="fill_parent" android:layout_height="fill_parent" android:gravity="right" android:textSize="10pt" /> </LinearLayout>
以下代码为MainActivity.java中的代码
1
2
3
4
5
6
7
8
9
10
11
12
13
14
15
16
17
18
19
20
21
22
23
24
25
26
27
28
29
30
31
32
33
34
35
36
package com.example.button_activity; import android.app.Activity; import android.content.Intent; import android.os.Bundle; import android.view.Menu; import android.view.MenuItem; import android.view.View; import android.view.View.OnClickListener; import android.widget.Button; public class MainActivity extends Activity { private Button myButton = null; @Override protected void onCreate(Bundle savedInstanceState) { super.onCreate(savedInstanceState); setContentView(R.layout.activity_main); myButton = (Button)findViewById(R.id.myButton); myButton.setOnClickListener(new MyButtonListener()); } class MyButtonListener implements OnClickListener{ @Override public void onClick(View v) { // TODO Auto-generated method stub Intent intent = new Intent(); intent.setClass(MainActivity.this, OtherActivity.class); MainActivity.this.startActivity(intent); } } }
以下代码为OtherActivity.java中的代码
1
2
3
4
5
6
7
8
9
10
11
12
13
14
15
16
17
18
19
20
package com.example.button_activity; import android.app.Activity; import android.os.Bundle; import android.widget.TextView; public class OtherActivity extends Activity{ private TextView myTextView = null; @Override protected void onCreate(Bundle savedInstanceState) { // TODO Auto-generated method stub super.onCreate(savedInstanceState); setContentView(R.layout.activity_other); myTextView = (TextView)findViewById(R.id.myTextView); myTextView.setText(R.string.other); } }
以下代码为activity_main.xml中的代码
1
2
3
4
5
6
7
8
9
10
11
12
13
14
15
16
17
18
19
<RelativeLayout xmlns:android="http://schemas.android.com/apk/res/android" xmlns:tools="http://schemas.android.com/tools" android:layout_width="match_parent" android:layout_height="match_parent" tools:context="${relativePackage}.${activityClass}" > <TextView android:layout_width="wrap_content" android:layout_height="wrap_content" android:text="@string/hello_world" /> <Button android:id="@+id/myButton" android:layout_width="fill_parent" android:layout_height="wrap_content" /> </RelativeLayout>
以下代码为activity_other.xml中的代码
1
2
3
4
5
6
7
8
9
10
11
12
13
14
<RelativeLayout xmlns:android="http://schemas.android.com/apk/res/android" xmlns:tools="http://schemas.android.com/tools" android:layout_width="match_parent" android:layout_height="match_parent" tools:context="${relativePackage}.${activityClass}" > <TextView android:id="@+id/myTextView" android:layout_width="fill_parent" android:layout_height="wrap_content" android:text="@string/hello_world" /> </RelativeLayout>
以下代码为string.xml中的代码
1
2
3
4
5
6
7
<?xml version="1.0" encoding="utf-8"?> <resources> <string name="app_name">button_activity</string> <string name="hello_world">Hello world!</string> <string name="other">OtherActivity</string> </resources>
以下代码为AndroidManifest.xml中的代码
注意修改package的名称
1
2
3
4
5
6
7
8
9
10
11
12
13
14
15
16
17
18
19
20
21
22
23
24
25
26
27
28
29
30
31
<?xml version="1.0" encoding="utf-8"?> <manifest xmlns:android="http://schemas.android.com/apk/res/android" package="com.example.button_activity" android:versionCode="1" android:versionName="1.0" > <uses-sdk android:minSdkVersion="8" android:targetSdkVersion="21" /> <application android:allowBackup="true" android:icon="@drawable/ic_launcher" android:label="@string/app_name" android:theme="@style/AppTheme" > <activity android:name=".MainActivity" android:label="@string/app_name" > <intent-filter> <action android:name="android.intent.action.MAIN" /> <category android:name="android.intent.category.LAUNCHER" /> </intent-filter> </activity> <activity android:name=".OtherActivity" android:label="@string/other" > </activity> </application> </manifest>
如果不能运行请kill-adb和start-adb并重新启动eclipse
8.Button:该工程的功能是实现在activity中显示一个TextView和一个Button 以下代码是MainActivity中的代码
1
2
3
4
5
6
7
8
9
10
11
12
13
14
15
16
17
18
19
20
21
22
package com.example.button; import android.app.Activity; import android.os.Bundle; import android.view.Menu; import android.view.MenuItem; import android.widget.Button; import android.widget.TextView; public class MainActivity extends Activity { @Override protected void onCreate(Bundle savedInstanceState) { super.onCreate(savedInstanceState); setContentView(R.layout.activity_main); TextView myTextView = (TextView)findViewById(R.id.myTextView); Button myButton = (Button)findViewById(R.id.myButton); myTextView.setText("我的第一个TextView"); myButton.setText("我的第一个Button"); } }
以下代码是activity_main中的代码
1
2
3
4
5
6
7
8
9
10
11
12
13
14
15
16
17
18
19
<RelativeLayout xmlns:android="http://schemas.android.com/apk/res/android" xmlns:tools="http://schemas.android.com/tools" android:layout_width="match_parent" android:layout_height="match_parent" tools:context="${relativePackage}.${activityClass}" > <TextView android:id="@+id/myTextView" android:layout_width="wrap_content" android:layout_height="wrap_content" android:text="@string/hello_world" /> <Button android:id="@+id/myButton" android:layout_width="fill_parent" android:layout_height="wrap_content" /> </RelativeLayout>
该工程的功能是实现进度条的显示,按以下按钮进度条增加10%
以下代码是MainActivity.java中的代码
1
2
3
4
5
6
7
8
9
10
11
12
13
14
15
16
17
18
19
20
21
22
23
24
25
26
27
28
29
30
31
32
33
34
35
36
37
38
39
40
41
42
43
44
45
46
47
48
49
50
51
52
53
54
55
56
57
58
59
60
61
62
63
package com.example.progressbar; import android.app.Activity; import android.os.Bundle; import android.view.Menu; import android.view.MenuItem; import android.view.View; import android.view.View.OnClickListener; import android.widget.Button; import android.widget.ProgressBar; public class MainActivity extends Activity { //申明限量 private ProgressBar firstBar = null; private ProgressBar secondBar = null; private Button myButton = null; private int i = 0; @Override protected void onCreate(Bundle savedInstanceState) { super.onCreate(savedInstanceState); setContentView(R.layout.activity_main); //根据控件的ID来取得代表控件的对象 firstBar = (ProgressBar)findViewById(R.id.firstBar); secondBar = (ProgressBar)findViewById(R.id.secondBar); myButton = (Button)findViewById(R.id.myButton); myButton.setOnClickListener(new ButtonListener()); System.out.print(firstBar.getMax()); } class ButtonListener implements OnClickListener{ @Override public void onClick(View v) { // TODO Auto-generated method stub if(i == 0) { //设置进度条处于可见的状态 firstBar.setVisibility(View.VISIBLE); secondBar.setVisibility(View.VISIBLE); } else if(i < firstBar.getMax()) { //设置主进度条的当前值 firstBar.setProgress(i); //设置第二进度条的当前值 firstBar.setSecondaryProgress(i + 10); //因为默认的进度条无法显示进行的状态 //secondBar.setProgress(i); } else { //设置进度条处于不可见状态 firstBar.setVisibility(View.GONE); secondBar.setVisibility(View.GONE); } i = i + 10; } } }
以下代码是activity_main.xml中的代码
1
2
3
4
5
6
7
8
9
10
11
12
13
14
15
16
17
18
19
20
21
22
23
24
25
26
27
28
29
30
31
32
33
34
35
36
37
38
39
<LinearLayout xmlns:android="http://schemas.android.com/apk/res/android" xmlns:tools="http://schemas.android.com/tools" android:id="@+id/LinearLayout1" android:layout_width="fill_parent" android:layout_height="fill_parent" android:orientation="vertical" tools:context="${relativePackage}.${activityClass}" > <TextView android:layout_width="fill_parent" android:layout_height="wrap_content" android:text="@string/hello_world" /> <ProgressBar android:id="@+id/firstBar" style="?android:attr/progressBarStyleHorizontal" android:layout_width="200dp" android:layout_height="wrap_content" android:visibility="gone" /> <ProgressBar android:id="@+id/secondBar" style="?android:attr/progressBarStyle" android:layout_width="wrap_content" android:layout_height="wrap_content" android:visibility="gone" android:max="200" /> <Button android:id="@+id/myButton" android:layout_width="wrap_content" android:layout_height="wrap_content" android:text="begin" /> </LinearLayout>
9.Bundle:该工程的功能是实现不同线程之间数据的传递 以下代码是MainActivity.java中的代码
1
2
3
4
5
6
7
8
9
10
11
12
13
14
15
16
17
18
19
20
21
22
23
24
25
26
27
28
29
30
31
32
33
34
35
36
37
38
39
40
41
42
43
44
45
46
47
48
49
50
51
52
53
package com.example.bundle; import android.app.Activity; import android.os.Bundle; import android.os.Handler; import android.os.HandlerThread; import android.os.Looper; import android.os.Message; import android.view.Menu; import android.view.MenuItem; public class MainActivity extends Activity { @Override protected void onCreate(Bundle savedInstanceState) { super.onCreate(savedInstanceState); setContentView(R.layout.activity_main); //打印了当前线程的ID System.out.println("Activity-->" + Thread.currentThread().getId()); //生成一个HandleThread对象,实现了使用Looper来处理消息队列的功能,这个类由android程序框架提供 HandlerThread handlerThread = new HandlerThread("handler_thread"); //在使用HandlerThread的getLooper()方法之前,必须先调用该类的start() handlerThread.start(); MyHandler myHandler = new MyHandler(handlerThread.getLooper()); Message msg = myHandler.obtainMessage(); //msg.obj="abc"; //将msg发送到目标对象,所谓的目标对象,就是生成该msg对象的handler对象 Bundle b = new Bundle(); b.putInt("age", 20); b.putString("name", "John"); msg.setData(b); msg.sendToTarget(); } class MyHandler extends Handler{ public MyHandler(){ } public MyHandler(Looper looper){ //super调用父类 super(looper); } public void handleMessage(Message msg){ //String s = (String)msg.obj; Bundle b = msg.getData(); int age = b.getInt("age"); String name = b.getString("name"); System.out.println("age is " + age +", name is " + name); System.out.println("Handler-->" + Thread.currentThread().getId()); System.out.println("handlerMessage"); } } }
1
2
3
4
5
6
7
8
9
10
11
12
13
14
<LinearLayout xmlns:android="http://schemas.android.com/apk/res/android" xmlns:tools="http://schemas.android.com/tools" android:id="@+id/LinearLayout1" android:layout_width="match_parent" android:layout_height="match_parent" android:orientation="vertical" tools:context="${relativePackage}.${activityClass}" > <TextView android:layout_width="wrap_content" android:layout_height="wrap_content" android:text="@string/hello_world" /> </LinearLayout>
10.ProcessBar:该工程的功能是实现点击按钮进度条按10%递增,使用的方式是Handler 以下的代码是MainActivity.java中的代码
1
2
3
4
5
6
7
8
9
10
11
12
13
14
15
16
17
18
19
20
21
22
23
24
25
26
27
28
29
30
31
32
33
34
35
36
37
38
39
40
41
42
43
44
45
46
47
48
49
50
51
52
53
54
55
56
57
58
59
60
61
62
63
64
65
66
67
68
69
package com.example.progressbarhandler; import android.app.Activity; import android.os.Bundle; import android.os.Handler; import android.os.Message; import android.view.View; import android.view.View.OnClickListener; import android.widget.Button; import android.widget.ProgressBar; public class MainActivity extends Activity { //申明变量 ProgressBar bar = null; Button startButton = null; @Override protected void onCreate(Bundle savedInstanceState) { super.onCreate(savedInstanceState); setContentView(R.layout.activity_main); //根据空间的ID得到代表控件的对象,并未按钮去设置监听器 bar = (ProgressBar)findViewById(R.id.bar); startButton = (Button)findViewById(R.id.startButton); startButton.setOnClickListener(new ButtonListener()); } class ButtonListener implements OnClickListener{ @Override public void onClick(View v) { // TODO Auto-generated method stub bar.setVisibility(View.VISIBLE); updateBarHandler.post(updateThread); } } //使用匿名内部类来复写Handler当中的handMessage方法 Handler updateBarHandler = new Handler(){ public void handleMessage(Message msg){ bar.setProgress(msg.arg1); //线程队列 updateBarHandler.post(updateThread); } }; //线程类,该类使用匿名内部类的方式进行声明 Runnable updateThread = new Runnable(){ int i = 0; public void run(){ System.out.println("Begin Thread"); i = i + 10; //得到一个消息对象,message类是由android操作系统提供 Message msg = updateBarHandler.obtainMessage(); //将msg对象的arg1参数的值设置为i,用arg1和arg2这两个成员传递消息 msg.arg1 = i; try{ //设置当前显示睡眠1秒 Thread.sleep(1000); } catch (InterruptedException e){ e.printStackTrace(); } //将msg对象加入到消息队列当中 updateBarHandler.sendMessage(msg); if(i == 100){ //如果当i的值为100时,就将线程对象从handle当中移除 updateBarHandler.removeCallbacks(updateThread); } } }; }
以下的代码是activity_main.xml中的代码
1
2
3
4
5
6
7
8
9
10
11
12
13
14
15
16
17
18
19
20
21
22
23
<LinearLayout xmlns:android="http://schemas.android.com/apk/res/android" xmlns:tools="http://schemas.android.com/tools" android:id="@+id/LinearLayout1" android:layout_width="match_parent" android:layout_height="match_parent" android:orientation="vertical" tools:context="${relativePackage}.${activityClass}" > <ProgressBar android:id="@+id/bar" style="?android:attr/progressBarStyleHorizontal" android:layout_width="200dp" android:layout_height="wrap_content" android:visibility="gone" /> <Button android:id="@+id/startButton" android:layout_width="fill_parent" android:layout_height="wrap_content" android:text="start" /> </LinearLayout>
11.Handler:线程管理 步骤:
1
2
3
4
5
6
7
8
9
10
11
12
13
14
15
16
17
18
19
20
21
1. 申请一个Handler对象 Handler handler = new Handler(); 2. 创建一个线程 {继承Thread类或者实现Runnable这个接口} 使用Runnable创建一个内部匿名类对象updateThread(要复写run方法) 3. 使用handler的post方法将线程加入到线程队列中 handler.post(updateThread); 4. 使用handler的removeCallbacks方法移出updateThread线程 注意:如果线程从线程队列中出来被执行后,则队列中就不在有线程 因此如果线程在被执行后没有方法将其再次加入到队列中,则无需使用removeCallbacks 线程走出线程队列有两种情况: 一种是被执行,此时要执行run方法 一种是使用removeCallbacks方法,此时线程不被执行,因此不调用run 5. 使用handler的postDelayed方法延时将线程加入到队列中 handler.postDelayed(updateThread,3000)
以下代码是MainActivity.java中的代码
1
2
3
4
5
6
7
8
9
10
11
12
13
14
15
16
17
18
19
20
21
22
23
24
25
26
27
28
29
30
31
32
33
34
35
36
37
38
39
40
41
42
43
44
45
46
47
48
49
50
51
52
53
54
package com.example.handler; import android.app.Activity; import android.os.Bundle; import android.os.Handler; import android.view.View; import android.view.View.OnClickListener; import android.widget.Button; public class MainActivity extends Activity { //声明两个按钮控件 private Button StartButton = null; private Button EndButton = null; @Override protected void onCreate(Bundle savedInstanceState) { super.onCreate(savedInstanceState); setContentView(R.layout.activity_main); //根据控件的ID得到代表控件的对象,并为这两个按钮设置相应的监听器 StartButton = (Button)findViewById(R.id.StartButton); StartButton.setOnClickListener(new StartButotnListener()); EndButton = (Button)findViewById(R.id.EndButton); EndButton.setOnClickListener(new EndButtonListener()); } class StartButotnListener implements OnClickListener{ @Override public void onClick(View v) { // TODO Auto-generated method stub handler.post(updateThread); } } class EndButtonListener implements OnClickListener{ @Override public void onClick(View v) { // TODO Auto-generated method stub handler.removeCallbacks(updateThread); } } //创建一个Handler对象 Handler handler = new Handler(); //将要执行的操作下载线程对象的run方法当中 Runnable updateThread = new Runnable(){ public void run(){ System.out.println("UpdateThread"); //在run方法内部,执行postDelayed或者是post方法 handler.postDelayed(updateThread,3000); } }; }
以下代码是activity_main.xml中的代码
1
2
3
4
5
6
7
8
9
10
11
12
13
14
15
16
17
18
19
20
21
22
23
24
25
<LinearLayout xmlns:android="http://schemas.android.com/apk/res/android" xmlns:tools="http://schemas.android.com/tools" android:id="@+id/LinearLayout1" android:layout_width="fill_parent" android:layout_height="fill_parent" android:orientation="vertical" tools:context="${relativePackage}.${activityClass}" > <Button android:id="@+id/StartButton" android:layout_width="fill_parent" android:layout_height="wrap_content" android:text="Start" /> <Button android:id="@+id/EndButton" android:layout_width="fill_parent" android:layout_height="wrap_content" android:text="End" /> </LinearLayout>
以下代码是MainActivity.java中的代码
1
2
3
4
5
6
7
8
9
10
11
12
13
14
15
16
17
18
19
20
21
22
23
24
25
26
27
28
29
30
31
32
33
34
35
36
37
package com.example.handlertest; import android.app.Activity; import android.os.Bundle; import android.os.Handler; public class MainActivity extends Activity { private Handler handler = new Handler(); @Override protected void onCreate(Bundle savedInstanceState) { super.onCreate(savedInstanceState); setContentView(R.layout.activity_main); handler.post(r); //Thread t = new Thread(r); //t.start(); System.out.println("activity--->"+ Thread.currentThread().getId()); System.out.println("activityname--->"+ Thread.currentThread().getName()); } Runnable r = new Runnable(){ public void run() { System.out.println("handler--->"+ Thread.currentThread().getId()); System.out.println("handlername--->"+ Thread.currentThread().getName()); try{ Thread.sleep(10000); } catch (InterruptedException e) { e.printStackTrace(); } } }; }
以下代码是activity_main.xml中的代码
1
2
3
4
5
6
7
8
9
10
11
12
13
14
<LinearLayout xmlns:android="http://schemas.android.com/apk/res/android" xmlns:tools="http://schemas.android.com/tools" android:id="@+id/LinearLayout1" android:layout_width="match_parent" android:layout_height="match_parent" android:orientation="vertical" tools:context="${relativePackage}.${activityClass}" > <TextView android:layout_width="wrap_content" android:layout_height="wrap_content" android:text="@string/hello_world" /> </LinearLayout>
12.Download:该工程的功能是实现Download 1.该工程的功能是实现从网上的链接下载一个lrc文件和一个mp3文件
以下代码是MainActivity.java中的代码
1
2
3
4
5
6
7
8
9
10
11
12
13
14
15
16
17
18
19
20
21
22
23
24
25
26
27
28
29
30
31
32
33
34
35
36
37
38
39
40
41
42
43
package com.example.download; import com.example.utils.HttpDownloader; import android.app.Activity; import android.os.Bundle; import android.view.View; import android.view.View.OnClickListener; import android.widget.Button; public class MainActivity extends Activity { /** Called when the activity is first created. */ private Button downloadTxtButton; private Button downloadMp3Button; @Override public void onCreate(Bundle savedInstanceState) { super.onCreate(savedInstanceState); setContentView(R.layout.activity_main); downloadTxtButton = (Button)findViewById(R.id.downloadTxt); downloadTxtButton.setOnClickListener(new DownloadTxtListener()); downloadMp3Button = (Button)findViewById(R.id.downloadMp3); downloadMp3Button.setOnClickListener(new DownloadMp3Listener()); } class DownloadTxtListener implements OnClickListener{ public void onClick(View v) { HttpDownloader httpDownloader = new HttpDownloader(); int lrc = httpDownloader.downFile("http://play.baidu.com/data2/lrc/121017633/121017633.lrc", "voa/", "1201250291414036861128.lrc"); System.out.println(lrc); } } class DownloadMp3Listener implements OnClickListener{ public void onClick(View v) { // TODO Auto-generated method stub HttpDownloader httpDownloader = new HttpDownloader(); int result = httpDownloader.downFile("http://cdn.y.baidu.com/yinyueren/532bfdb43a336a584533ff61a7289503.mp3", "voa/", "江南.mp3"); System.out.println(result); } } }
以下代码是FileUtils.java中的代码
1
2
3
4
5
6
7
8
9
10
11
12
13
14
15
16
17
18
19
20
21
22
23
24
25
26
27
28
29
30
31
32
33
34
35
36
37
38
39
40
41
42
43
44
45
46
47
48
49
50
51
52
53
54
55
56
57
58
59
60
61
62
63
64
65
66
67
68
69
70
71
72
73
74
75
76
77
78
79
80
81
82
83
package com.example.utils; import java.io.File; import java.io.FileOutputStream; import java.io.IOException; import java.io.InputStream; import java.io.OutputStream; import android.os.Environment; public class FileUtils { private String SDPATH; public String getSDPATH() { return SDPATH; } public FileUtils() { //得到当前外部存储设备的目录 // /SDCARD SDPATH = Environment.getExternalStorageDirectory() + "/"; } /** * 在SD卡上创建文件 * * @throws IOException */ public File creatSDFile(String fileName) throws IOException { File file = new File(SDPATH + fileName); file.createNewFile(); return file; } /** * 在SD卡上创建目录 * * @param dirName */ public File creatSDDir(String dirName) { File dir = new File(SDPATH + dirName); dir.mkdirs(); return dir; } /** * 判断SD卡上的文件夹是否存在 */ public boolean isFileExist(String fileName){ File file = new File(SDPATH + fileName); return file.exists(); } /** * 将一个InputStream里面的数据写入到SD卡中 */ public File write2SDFromInput(String path,String fileName,InputStream input){ File file = null; OutputStream output = null; try{ creatSDDir(path); file = creatSDFile(path + fileName); output = new FileOutputStream(file); byte buffer [] = new byte[4 * 1024]; int len=-1; while((len=input.read(buffer)) != -1){ //在这里使用另一个重载,防止流写入的问题. output.write(buffer,0,len); } output.flush(); } catch(Exception e){ e.printStackTrace(); } finally{ try{ output.close(); } catch(Exception e){ e.printStackTrace(); } } return file; } }
以下代码是HttpDownloader.java中的代码
1
2
3
4
5
6
7
8
9
10
11
12
13
14
15
16
17
18
19
20
21
22
23
24
25
26
27
28
29
30
31
32
33
34
35
36
37
38
39
40
41
42
43
44
45
46
47
48
49
50
51
52
53
54
55
56
57
58
59
60
61
62
63
64
65
66
67
68
69
70
71
72
73
74
75
76
77
78
79
80
81
82
83
84
85
86
87
88
89
90
91
92
93
94
95
96
97
98
99
100
101
102
103
104
package com.example.utils; import java.io.BufferedReader; import java.io.File; import java.io.IOException; import java.io.InputStream; import java.io.InputStreamReader; import java.net.HttpURLConnection; import java.net.MalformedURLException; import java.net.URL; public class HttpDownloader { private URL url = null; /** * 根据URL下载文件,前提是这个文件当中的内容是文本,函数的返回值就是文件当中的内容 * 1.创建一个URL对象 * 2.通过URL对象,创建一个HttpURLConnection对象 * 3.得到InputStram * 4.从InputStream当中读取数据 * @param urlStr * @return */ public String download(String urlStr) { StringBuffer sb = new StringBuffer(); String line = null; BufferedReader buffer = null; try { // 创建一个URL对象 url = new URL(urlStr); // 创建一个Http连接 HttpURLConnection urlConn = (HttpURLConnection) url .openConnection(); // 使用IO流读取数据 buffer = new BufferedReader(new InputStreamReader(urlConn .getInputStream())); while ((line = buffer.readLine()) != null) { sb.append(line); } } catch (Exception e) { e.printStackTrace(); } finally { try { buffer.close(); } catch (Exception e) { e.printStackTrace(); } } return sb.toString(); } /** * 该函数返回整形 -1:代表下载文件出错 0:代表下载文件成功 1:代表文件已经存在 */ public int downFile(String urlStr, String path, String fileName) { InputStream inputStream = null; try { FileUtils fileUtils = new FileUtils(); if (fileUtils.isFileExist(path + fileName)) { return 1; } else { inputStream = getInputStreamFromUrl(urlStr); File resultFile = fileUtils.write2SDFromInput(path,fileName, inputStream); if (resultFile == null) { return -1; } } } catch (Exception e) { e.printStackTrace(); return -1; } finally { try { inputStream.close(); } catch (Exception e) { e.printStackTrace(); } } return 0; } /** * 根据URL得到输入流 * * @param urlStr * @return * @throws MalformedURLException * @throws IOException */ public InputStream getInputStreamFromUrl(String urlStr) throws MalformedURLException, IOException { url = new URL(urlStr); HttpURLConnection urlConn = (HttpURLConnection) url.openConnection(); InputStream inputStream = urlConn.getInputStream(); return inputStream; } }
以下代码是activity_main.xml中的代码
1
2
3
4
5
6
7
8
9
10
11
12
13
14
15
16
17
18
19
20
21
22
23
24
25
26
27
28
<LinearLayout xmlns:android="http://schemas.android.com/apk/res/android" xmlns:tools="http://schemas.android.com/tools" android:id="@+id/LinearLayout1" android:layout_width="fill_parent" android:layout_height="fill_parent" android:orientation="vertical" tools:context="${relativePackage}.${activityClass}" > <TextView android:layout_width="fill_parent" android:layout_height="wrap_content" android:text="@string/hello_world" /> <Button android:id="@+id/downloadTxt" android:layout_width="fill_parent" android:layout_height="wrap_content" android:text="downloadTxt" /> <Button android:id="@+id/downloadMp3" android:layout_width="fill_parent" android:layout_height="wrap_content" android:text="downloadMp3" /> </LinearLayout>
以下代码是AndroidManifest.xml中的代码
1
2
3
4
5
6
7
8
9
10
11
12
13
14
15
16
17
18
19
20
21
22
23
24
25
26
27
28
29
30
31
<?xml version="1.0" encoding="utf-8"?> <manifest xmlns:android="http://schemas.android.com/apk/res/android" package="com.example.download" android:versionCode="1" android:versionName="1.0" > <uses-sdk android:minSdkVersion="8" android:targetSdkVersion="21" /> <application android:allowBackup="true" android:icon="@drawable/ic_launcher" android:label="@string/app_name" android:theme="@style/AppTheme" > <activity android:name=".MainActivity" android:label="@string/app_name" > <intent-filter> <action android:name="android.intent.action.MAIN" /> <category android:name="android.intent.category.LAUNCHER" /> </intent-filter> </activity> </application> <uses-sdk android:minSdkVersion="8" /> <!-- 访问网络和操作SD卡 加入的两个权限配置--> <uses-permission android:name="android.permission.INTERNET"/> <uses-permission android:name="android.permission.WRITE_EXTERNAL_STORAGE"/> </manifest>
2.该工程实现下载一个xml文件,并解析
转自http://blog.csdn.net/sam_zhang1984
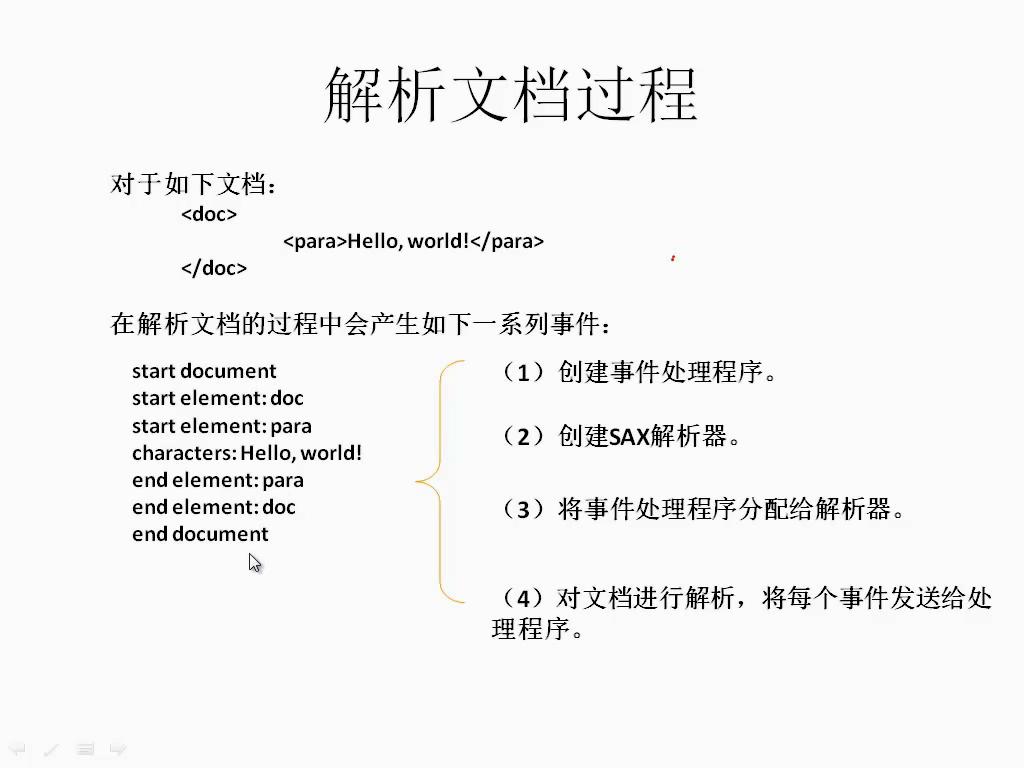
XML 解析主要需要进行下列步骤:
1. 创建事件处理程序
2. 创建 SAX 解析器
3. 将事件处理程序分配给解析器
4. 对文档进行解析,将每个事件发送给处理程序。
以下的代码是MainActivity.java中的代码
1
2
3
4
5
6
7
8
9
10
11
12
13
14
15
16
17
18
19
20
21
22
23
24
25
26
27
28
29
30
31
32
33
34
35
36
37
38
39
40
41
42
43
44
45
46
47
48
49
50
package com.example.xml; import java.io.StringReader; import javax.xml.parsers.SAXParserFactory; import com.example.utils.HttpDownloader; import org.xml.sax.InputSource; import org.xml.sax.XMLReader; import android.app.Activity; import android.os.Bundle; import android.view.View; import android.view.View.OnClickListener; import android.widget.Button; public class MainActivity extends Activity { /** Called when the activity is first created. */ private Button parseButton ; @Override public void onCreate(Bundle savedInstanceState) { super.onCreate(savedInstanceState); setContentView(R.layout.activity_main); parseButton = (Button)findViewById(R.id.parseButton); parseButton.setOnClickListener(new ParseButtonListener()); } class ParseButtonListener implements OnClickListener{ public void onClick(View v) { HttpDownloader hd = new HttpDownloader(); String resultStr = hd.download("http://192.168.1.107:8081/voa1500/test.xml"); System.out.println(resultStr); try{ //创建一个SAXParserFactory SAXParserFactory factory = SAXParserFactory.newInstance(); XMLReader reader = factory.newSAXParser().getXMLReader(); //为XMLReader设置内容处理器 reader.setContentHandler(new MyContentHandler()); //开始解析文件 reader.parse(new InputSource(new StringReader(resultStr))); } catch(Exception e){ e.printStackTrace(); } } } }
以下的代码是MyContentHandler.java中的代码
1
2
3
4
5
6
7
8
9
10
11
12
13
14
15
16
17
18
19
20
21
22
23
24
25
26
27
28
29
30
31
32
33
34
35
36
37
38
39
40
41
42
43
44
45
46
47
48
49
50
51
52
53
54
55
56
57
58
59
60
61
62
63
64
65
66
package com.example.xml; import org.xml.sax.Attributes; import org.xml.sax.SAXException; import org.xml.sax.helpers.DefaultHandler; public class MyContentHandler extends DefaultHandler { String hisname, address, money, sex, status; String tagName; public void startDocument() throws SAXException { System.out.println("````````begin````````"); } public void endDocument() throws SAXException { System.out.println("````````end````````"); } public void startElement(String namespaceURI, String localName, String qName, Attributes attr) throws SAXException { tagName = localName; if (localName.equals("worker")) { //获取标签的全部属性 for (int i = 0; i < attr.getLength(); i++) { System.out.println(attr.getLocalName(i) + "=" + attr.getValue(i)); } } } public void endElement(String namespaceURI, String localName, String qName) throws SAXException { //在workr标签解析完之后,会打印出所有得到的数据 tagName = ""; if (localName.equals("worker")) { this.printout(); } } public void characters(char[] ch, int start, int length) throws SAXException { if (tagName.equals("name")) hisname = new String(ch, start, length); else if (tagName.equals("sex")) sex = new String(ch, start, length); else if (tagName.equals("status")) status = new String(ch, start, length); else if (tagName.equals("address")) address = new String(ch, start, length); else if (tagName.equals("money")) money = new String(ch, start, length); } private void printout() { System.out.print("name: "); System.out.println(hisname); System.out.print("sex: "); System.out.println(sex); System.out.print("status: "); System.out.println(status); System.out.print("address: "); System.out.println(address); System.out.print("money: "); System.out.println(money); System.out.println(); } }
以下的代码是FileUtils.java中的代码
1
2
3
4
5
6
7
8
9
10
11
12
13
14
15
16
17
18
19
20
21
22
23
24
25
26
27
28
29
30
31
32
33
34
35
36
37
38
39
40
41
42
43
44
45
46
47
48
49
50
51
52
53
54
55
56
57
58
59
60
61
62
63
64
65
66
67
68
69
70
71
72
73
74
75
76
77
78
79
80
81
82
83
package com.example.utils; import java.io.File; import java.io.FileOutputStream; import java.io.IOException; import java.io.InputStream; import java.io.OutputStream; import android.os.Environment; public class FileUtils { private String SDPATH; public String getSDPATH() { return SDPATH; } public FileUtils() { //得到当前外部存储设备的目录 // /SDCARD SDPATH = Environment.getExternalStorageDirectory() + "/"; } /** * 在SD卡上创建文件 * * @throws IOException */ public File creatSDFile(String fileName) throws IOException { File file = new File(SDPATH + fileName); file.createNewFile(); return file; } /** * 在SD卡上创建目录 * * @param dirName */ public File creatSDDir(String dirName) { File dir = new File(SDPATH + dirName); dir.mkdirs(); return dir; } /** * 判断SD卡上的文件夹是否存在 */ public boolean isFileExist(String fileName){ File file = new File(SDPATH + fileName); return file.exists(); } /** * 将一个InputStream里面的数据写入到SD卡中 */ public File write2SDFromInput(String path,String fileName,InputStream input){ File file = null; OutputStream output = null; try{ creatSDDir(path); file = creatSDFile(path + fileName); output = new FileOutputStream(file); byte buffer [] = new byte[4 * 1024]; int len=-1; while((len=input.read(buffer)) != -1){ //在这里使用另一个重载,防止流写入的问题. output.write(buffer,0,len); } output.flush(); } catch(Exception e){ e.printStackTrace(); } finally{ try{ output.close(); } catch(Exception e){ e.printStackTrace(); } } return file; } }
以下的代码是HttpDownloader.java中的代码
1
2
3
4
5
6
7
8
9
10
11
12
13
14
15
16
17
18
19
20
21
22
23
24
25
26
27
28
29
30
31
32
33
34
35
36
37
38
39
40
41
42
43
44
45
46
47
48
49
50
51
52
53
54
55
56
57
58
59
60
61
62
63
64
65
66
67
68
69
70
71
72
73
74
75
76
77
78
79
80
81
82
83
84
85
86
87
88
89
90
91
92
93
94
95
96
97
98
99
100
101
102
103
104
package com.example.utils; import java.io.BufferedReader; import java.io.File; import java.io.IOException; import java.io.InputStream; import java.io.InputStreamReader; import java.net.HttpURLConnection; import java.net.MalformedURLException; import java.net.URL; public class HttpDownloader { private URL url = null; /** * 根据URL下载文件,前提是这个文件当中的内容是文本,函数的返回值就是文件当中的内容 * 1.创建一个URL对象 * 2.通过URL对象,创建一个HttpURLConnection对象 * 3.得到InputStram * 4.从InputStream当中读取数据 * @param urlStr * @return */ public String download(String urlStr) { StringBuffer sb = new StringBuffer(); String line = null; BufferedReader buffer = null; try { // 创建一个URL对象 url = new URL(urlStr); // 创建一个Http连接 HttpURLConnection urlConn = (HttpURLConnection) url .openConnection(); // 使用IO流读取数据 buffer = new BufferedReader(new InputStreamReader(urlConn .getInputStream())); while ((line = buffer.readLine()) != null) { sb.append(line); } } catch (Exception e) { e.printStackTrace(); } finally { try { buffer.close(); } catch (Exception e) { e.printStackTrace(); } } return sb.toString(); } /** * 该函数返回整形 -1:代表下载文件出错 0:代表下载文件成功 1:代表文件已经存在 */ public int downFile(String urlStr, String path, String fileName) { InputStream inputStream = null; try { FileUtils fileUtils = new FileUtils(); if (fileUtils.isFileExist(path + fileName)) { return 1; } else { inputStream = getInputStreamFromUrl(urlStr); File resultFile = fileUtils.write2SDFromInput(path,fileName, inputStream); if (resultFile == null) { return -1; } } } catch (Exception e) { e.printStackTrace(); return -1; } finally { try { inputStream.close(); } catch (Exception e) { e.printStackTrace(); } } return 0; } /** * 根据URL得到输入流 * * @param urlStr * @return * @throws MalformedURLException * @throws IOException */ public InputStream getInputStreamFromUrl(String urlStr) throws MalformedURLException, IOException { url = new URL(urlStr); HttpURLConnection urlConn = (HttpURLConnection) url.openConnection(); InputStream inputStream = urlConn.getInputStream(); return inputStream; } }
以下的代码是activity_main.xml中的代码
1
2
3
4
5
6
7
8
9
10
11
12
13
14
15
16
17
18
<?xml version="1.0" encoding="utf-8"?> <LinearLayout xmlns:android="http://schemas.android.com/apk/res/android" android:orientation="vertical" android:layout_width="fill_parent" android:layout_height="fill_parent" > <TextView android:layout_width="fill_parent" android:layout_height="wrap_content" android:text="@string/hello_world" /> <Button android:id="@+id/parseButton" android:layout_width="fill_parent" android:layout_height="wrap_content" android:text="开始解析XML"/> </LinearLayout>