tonglin0325的个人主页

Ubuntu16.04安装CDH 5.16.2

CDH安装官方参考文档:

1
2
https://www.cloudera.com/documentation/enterprise/5-16-x/topics/configure_cm_repo.html

如果是在生产环境进行安装,建议查看cloudera官方提供的机型建议

1
2
https://docs.cloudera.com/documentation/enterprise/release-notes/topics/hardware_requirements_guide.html

同时还在CDH的角色分布建议,参考:如何给Hadoop集群划分角色 

1
2
https://docs.cloudera.com/documentation/enterprise/latest/topics/cm_ig_host_allocations.html


安装cdh前如果安装过其他版本的,记得删除各种目录残留文件,比如/run下面的

如果误删了log4j/properties文件,文件内容在这

1
2
3
4
5
6
7
8
9
10
11
12
13
14
15
16
17
18
19
20
21
22
23
24
25
26
27
28
29
30
31
cmf.root.logger=INFO,CONSOLE
cmf.log.dir=.
cmf.log.file=cmf-server.log

# Define the root logger to the system property "cmf.root.logger".
log4j.rootLogger=${cmf.root.logger}

# Logging Threshold
log4j.threshhold=ALL

# Disable most JDBC tracing by default.
log4j.logger.org.jdbcdslog=FATAL

# Disable overly loud Avro IPC logging
log4j.logger.org.apache.avro.ipc.NettyTransceiver=FATAL

# Disable overly loud Flume config validation logging
log4j.logger.org.apache.flume.conf.FlumeConfiguration=ERROR

log4j.appender.CONSOLE=org.apache.log4j.ConsoleAppender
log4j.appender.CONSOLE.target=System.err
log4j.appender.CONSOLE.layout=org.apache.log4j.PatternLayout
log4j.appender.CONSOLE.layout.ConversionPattern=%d{ISO8601} %5p [%t:%c{2}@%L] %m%n

log4j.appender.LOGFILE=org.apache.log4j.RollingFileAppender
log4j.appender.LOGFILE.MaxFileSize=10MB
log4j.appender.LOGFILE.MaxBackupIndex=10
log4j.appender.LOGFILE.File=${cmf.log.dir}/${cmf.log.file}
log4j.appender.LOGFILE.layout=org.apache.log4j.PatternLayout
log4j.appender.LOGFILE.layout.ConversionPattern=%d{ISO8601} %5p [%t:%c{2}@%L] %m%n


全文 >>

docker安装和使用

1.安装的docker版本

1
2
3
docker -v
Docker version 17.03.2-ce

2.查看本地的镜像

1
2
docker images

3.拉取镜像

1
2
docker pull centos:7

4.编写Dockerfile

1
2
3
FROM nginx
RUN echo '<h1>Hello, Docker!</h1>' > /usr/share/nginx/html/index.html

5.build Dockerfile

1
2
docker build -t . xxx # 镜像的名字

全文 >>

Thrift关键字

在编译thrift文件的时候发现报了如下的错误

1
2
Cannot use reserved language keyword: "class"

后来查了一下,发现class是thrift的关键字之一,变量起名的时候不能和关键字重复

thrift的全部关键字可以查看thrift的源码

1
2
https://github.com/apache/thrift/blob/master/compiler/cpp/src/thrift/generate/t_py_generator.cc

搜索keywords,下面这些都是thrift关键字,在起名的时候需要注意

 以及

1
2
https://github.com/apache/thrift/tree/master/compiler/cpp/src/thrift/generate/t_generator.cc

关键字

全文 >>

Parquet格式解析

parquet是列式存储格式,官方文档

1
2
https://parquet.apache.org/documentation/latest/

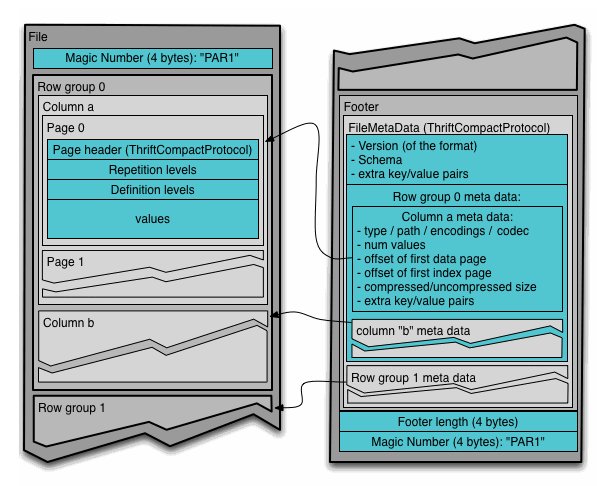
 一个Parquet文件是由一个header以及一个或多个block块组成,以一个footer结尾

header中只包含一个4个字节的数字PAR1用来识别整个Parquet文件格式,PAR1的ASCII码是[80, 65, 82, 49],所以如果使用读取parquet文件的时候,如果magic number不对的话,会报如下错误

1
2
expected magic number at tail [80, 65, 82, 49] but found [xx, xx, xx, xx]


文件中所有的metadata都存在于footer中footer中的metadata包含了格式的版本信息,schema信息、key-value paris以及所有block中的metadata信息。footer中最后两个字段为一个以4个字节长度的footer的metadata,以及同header中包含的一样的PAR1。

在Parquet文件中,每一个block都具有一组Row group,它们是由一组Column chunk组成的列数据。继续往下,每一个column chunk中又包含了它具有的pages。每个page就包含了来自于相同列的值

Parquet 文件在磁盘上的分布情况如下图所示:

全文 >>

ubuntu安装thrift

ubuntu环境下安装thrift-0.10.0

1.解压

2.编译安装

1
2
3
4
./configure -with-cpp -with-boost -without-python -without-csharp -with-java -without-erlang -without-perl -without-php -without-php_extension -without-ruby -without-haskell -without-go
make
sudo make install

3.是否安装成功

1
2
3
thrift -version
Thrift version 0.10.0


xxl-job安装教程

xxl-job是一个开源的分布式调度框架,其他类似的框架还有airflow,oozie等等,需要进行对比

1
2
https://github.com/xuxueli/xxl-job

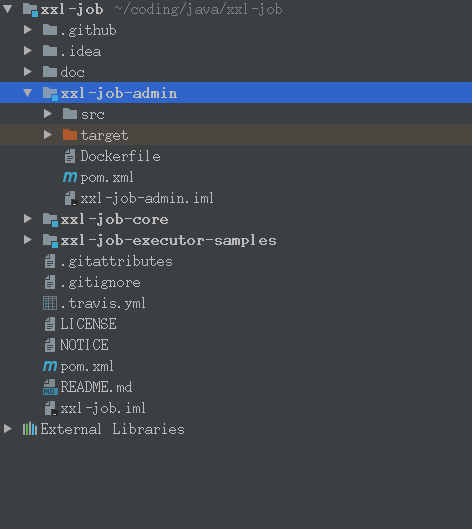
1.首先git clone工程

1
2
git clone git@github.com:xuxueli/xxl-job.git

打包工程,打包的过程中会下载所需要的jar包

1
2
mvn package


2.在idea中打开工程

需要修改一下logback.xml和properties中日志路径,然后运行工程

3.初始化数据库

1
2
source /home/lintong/coding/java/xxl-job/doc/db/tables_xxl_job.sql

并修改application.properties中的数据库的用户密码

4.运行web工程

全文 >>

Elasticsearch学习笔记——常用命令

1.创建索引,名字为index

1
2
curl -XPUT http://localhost:9200/index

2.创建一个mapping

1
2
3
4
5
6
7
8
9
10
11
12
curl -XPOST http://localhost:9200/index/fulltext/_mapping -H 'Content-Type:application/json' -d'
{
"properties": {
"content": {
"type": "text",
"analyzer": "ik_max_word",
"search_analyzer": "ik_max_word"
}
}

}'

3.查看mapping

1
2
curl -XPUT http://localhost:9200/xxx/yyy/_mapping

4.删除一个文档,按照id来删除

1
2
curl -XDELETE 'http://localhost:9200/index3/fulltext3/272'

5.通过query来删除文档

不同版本之间的es不太一样,6.2的参考

全文 >>

Elasticsearch学习笔记——分词

1.测试Elasticsearch的分词

Elasticsearch有多种分词器(参考:https://www.jianshu.com/p/d57935ba514b)

Set the shape to semi-transparent by calling set_trans(5)

(1)standard analyzer:标准分词器(默认是这种)

set,the,shape,to,semi,transparent by,calling,set_trans,5

(2)simple analyzer:简单分词器

set, the, shape, to, semi, transparent, by, calling, set, trans

(3)whitespace analyzer:空白分词器。大小写,下划线等都不会转换

Set, the, shape, to, semi-transparent, by, calling, set_trans(5)

(4)language analyzer:(特定语言分词器,比如说English英语分词器)

set, shape, semi, transpar, call, set_tran, 5


2.为Elasticsearch的index设置分词

这样就将这个index里面的所有type的分词设置成了simple

1
2
3
4
5
6
7
8
9
PUT my_index
{
"settings": {
"analysis": {
"analyzer": {"default":{"type":"simple"}}
}
}
}


全文 >>

Ubuntu下安装antlr-4.7.1

简介:antlr工具将语法文件转换成可以识别该语法文件所描述的语言的程序.

例如:给定一个识别json的语法,antlr工具将会根据该语法生成一个程序,该程序可以通过antlr运行库来识别输入的json.


1.下载jar包,antlr-4.7.1-complete.jar

1
2
http://www.antlr.org/download/


2.将这个jar包移动到 /usr/local/lib 目录下

3.修改 ~.bashrc 文件

1
2
3
4
5
6
7
8
#Java
export JAVA_HOME=/usr/local/jdk1.8.0_121
export JRE_HOME=${JAVA_HOME}/jre
export CLASSPATH=.:${JAVA_HOME}/lib:${JRE_HOME}/lib:/usr/local/lib/antlr-4.7.1-complete.jar
export PATH=${JAVA_HOME}/bin:$PATH
alias antlr4='java -Xmx500M -cp "/usr/local/lib/antlr-4.7.1-complete.jar:$CLASSPATH" org.antlr.v4.Tool'
alias grun='java org.antlr.v4.runtime.misc.TestRig'

全文 >>

Flink学习笔记——读写hudi

使用flink来读写hudi有2种API,一个是Flink SQL API,另一个是DataStream API,参考

1
https://hudi.apache.org/cn/docs/flink-quick-start-guide

首先启动yarn session

1
2
/usr/lib/flink/bin/yarn-session.sh -n 3 -s 5 -jm 1024 -tm 4096 -d

使用SQL API提交任务到YARN上的方式有以下几种:

1.使用交互式的sql client

不过由于sql client目前处于beta版本,所以建议用于原型验证,不建议在生产环境中使用,参考:Apache Flink 零基础入门(四):客户端操作的 5 种模式

1
2
https://nightlies.apache.org/flink/flink-docs-release-1.13/docs/dev/table/sqlclient/

启动

1
2
/usr/lib/flink/bin/sql-client.sh

全文 >>