下面列举了Android中Layout,Table,Menu,Checkbox,Listview,Button,Bundle的基本使用和demo
1.Layout:该工程的功能是实现LinearLayout Android Layout有多种,比如:Layout,MixLayout,TableLayout等
以下的代码是MainActivity.java中的代码
1
2
3
4
5
6
7
8
9
10
11
12
13
14
15
16
17
18
19
20
21
22
23
24
25
26
package com.example.linearlayout; import android.app.Activity; import android.os.Bundle; import android.view.Menu; import android.view.MenuItem; import android.widget.TextView; public class MainActivity extends Activity { private TextView firstText; private TextView secondText; @Override protected void onCreate(Bundle savedInstanceState) { super.onCreate(savedInstanceState); setContentView(R.layout.activity_main); firstText = (TextView)findViewById(R.id.firstText); secondText = (TextView)findViewById(R.id.secondText); firstText.setText(R.string.firstText); secondText.setText(R.string.secondText); } }
以下的代码是activity_main.xml中的代码
1
2
3
4
5
6
7
8
9
10
11
12
13
14
15
16
17
18
19
20
21
22
23
24
25
26
27
28
29
30
31
32
33
34
35
36
37
38
39
40
41
42
43
44
45
46
47
48
49
50
51
52
53
54
<LinearLayout xmlns:android="http://schemas.android.com/apk/res/android" xmlns:tools="http://schemas.android.com/tools" android:id="@+id/LinearLayout1" android:layout_width="fill_parent" android:layout_height="match_parent" android:orientation="vertical" tools:context="${relativePackage}.${activityClass}" > <!-- android:id 为控件制定相应的ID android:text 指定控件当中显示的文字 android:gravity 指定控件的基本位置/居中居右等 android:textSize 指定控件的基本位置/居中居右等 android:background 指定该控件所使用的背景色,RGB命名法 android:width 指定控件的宽度 android:height 指定控件的高度 android:padding 指定控件的内边距 android:weight 数字为相应的比例 android:singleLine 设定true为同一行显示 --> <TextView android:id="@+id/firstText" android:gravity="center_vertical" android:textSize="20pt" android:background="#0000ff" android:layout_width="fill_parent" android:layout_height="0.0dip" android:paddingLeft="10dip" android:paddingTop="20dip" android:paddingRight="30dip" android:paddingBottom="40dip" android:layout_weight="1" android:singleLine="true" /> <TextView android:id="@+id/secondText" android:gravity="center_vertical" android:textSize="15pt" android:background="#00ff00" android:layout_width="fill_parent" android:layout_height="0.0dip" android:paddingLeft="10dip" android:paddingTop="20dip" android:paddingRight="30dip" android:paddingBottom="40dip" android:layout_weight="2" android:singleLine="true" /> </LinearLayout>
以下的代码是string.xml中的代码
1
2
3
4
5
6
7
8
<?xml version="1.0" encoding="utf-8"?> <resources> <string name="app_name">LinearLayout</string> <string name="hello_world">Hello world!</string> <string name="firstText">第一行</string> <string name="secondText">第二行</string> </resources>
2.Layout:该工程的功能是实现LinearLayout+TableLayout 以下代码是MainActivity.java中的代码
1
2
3
4
5
6
7
8
9
10
11
12
13
14
15
16
17
18
package com.example.mixlayout; import android.app.Activity; import android.os.Bundle; import android.view.Menu; import android.view.MenuItem; import android.widget.TextView; public class MainActivity extends Activity { private TextView firstText; @Override protected void onCreate(Bundle savedInstanceState) { super.onCreate(savedInstanceState); setContentView(R.layout.activity_main); } }
以下代码是activity_main.xml中的代码
1
2
3
4
5
6
7
8
9
10
11
12
13
14
15
16
17
18
19
20
21
22
23
24
25
26
27
28
29
30
31
32
33
34
35
36
37
38
39
40
41
42
43
44
45
46
47
48
49
50
51
52
53
54
55
56
57
58
59
60
61
62
63
64
65
66
67
68
69
70
71
72
73
74
75
76
77
78
79
80
81
82
83
84
85
86
87
<LinearLayout xmlns:android="http://schemas.android.com/apk/res/android" xmlns:tools="http://schemas.android.com/tools" android:id="@+id/LinearLayout1" android:layout_width="fill_parent" android:layout_height="fill_parent" android:orientation="vertical" tools:context="${relativePackage}.${activityClass}" > <LinearLayout android:layout_width="fill_parent" android:layout_height="fill_parent" android:layout_weight="1" android:orientation="horizontal" > <TextView android:layout_width="wrap_content" android:layout_height="fill_parent" android:layout_weight="1" android:background="#aa0000" android:gravity="center_horizontal" android:text="red" /> <TextView android:layout_width="wrap_content" android:layout_height="fill_parent" android:layout_weight="1" android:background="#00aa00" android:gravity="center_horizontal" android:text="green" /> <TextView android:layout_width="wrap_content" android:layout_height="fill_parent" android:layout_weight="1" android:background="#0000aa" android:gravity="center_horizontal" android:text="blue" /> </LinearLayout> <LinearLayout android:layout_width="fill_parent" android:layout_height="fill_parent" android:layout_weight="1" android:orientation="horizontal" > <TableLayout xmlns:android="http://schemas.android.com/apk/res/android" android:layout_width="fill_parent" android:layout_height="fill_parent" android:stretchColumns="1"> <TableRow> <TextView android:padding="3dip" android:text="row1_column1" /> <TextView android:gravity="center_horizontal" android:padding="3dip" android:text="row1_column2" /> <TextView android:gravity="right" android:padding="3dip" android:text="row1_column3" /> </TableRow> <TableRow> <TextView android:padding="3dip" android:text="row2_column1" /> <TextView android:gravity="center_horizontal" android:padding="3dip" android:text="row2_column2" /> <TextView android:gravity="right" android:padding="3dip" android:text="row2_column3" /> </TableRow> </TableLayout> </LinearLayout> </LinearLayout>
3.Table:该工程的功能是实现在一个activity中显示一个表格 以下代码是MainActivity.java中的代码
1
2
3
4
5
6
7
8
9
10
11
12
13
14
15
package com.example.tablelayout; import android.app.Activity; import android.os.Bundle; import android.view.Menu; import android.view.MenuItem; public class MainActivity extends Activity { @Override protected void onCreate(Bundle savedInstanceState) { super.onCreate(savedInstanceState); setContentView(R.layout.activity_main); } }
以下的代码是activity_main.xml中的代码
1
2
3
4
5
6
7
8
9
10
11
12
13
14
15
16
17
18
19
20
21
22
23
24
25
26
27
28
29
30
31
32
33
34
35
36
37
38
39
40
41
<TableLayout xmlns:android="http://schemas.android.com/apk/res/android" xmlns:tools="http://schemas.android.com/tools" android:id="@+id/TableLayout1" android:layout_width="fill_parent" android:layout_height="fill_parent" android:stretchColumns="1" tools:context="${relativePackage}.${activityClass}" > <!-- 由于fill_parent不能填满,所以stretchColumns指定列拉伸 --> <TableRow> <TextView android:text="@string/hello_world" android:padding="3dip" android:background="#aa0000" /> <TextView android:text="@string/hello_world" android:padding="3dip" android:background="#00aa00" android:gravity="center_horizontal" /> <TextView android:text="@string/hello_world" android:padding="3dip" android:background="#0000aa" android:gravity="right" /> </TableRow> <TableRow> <TextView android:text="@string/hello_world" android:padding="3dip" /> <TextView android:text="@string/hello_world" android:padding="3dip" android:gravity="right" /> </TableRow> </TableLayout>
以下的代码是MainActivity.java中的代码
1
2
3
4
5
6
7
8
9
10
11
12
13
14
15
16
17
18
19
20
21
22
23
24
25
26
27
28
29
30
31
32
33
34
35
36
37
38
39
40
41
42
43
44
45
46
47
48
49
50
51
52
53
54
55
56
57
58
59
60
61
62
63
64
65
66
67
68
69
70
71
72
73
74
75
76
77
78
79
80
81
package com.example.menu; import android.app.Activity; import android.content.Intent; import android.os.Bundle; import android.view.Menu; import android.view.MenuItem; import android.view.View; import android.view.View.OnClickListener; import android.widget.Button; import android.widget.EditText; import android.widget.TextView; public class MainActivity extends Activity { private EditText factorOne; private EditText factorTwo; private TextView symbol; private Button calculate; @Override protected void onCreate(Bundle savedInstanceState) { super.onCreate(savedInstanceState); setContentView(R.layout.activity_main); factorOne = (EditText)findViewById(R.id.factorOne); factorTwo = (EditText)findViewById(R.id.factorTwo); symbol = (TextView)findViewById(R.id.symbol); calculate = (Button)findViewById(R.id.calculate); //symbol.setText("乘以"); //calculate.setText("计算"); //为symbol和calculate设置显示的值 symbol.setText(R.string.symbol); calculate.setText(R.string.calculate); //将监听器的对象绑定到按钮对象上面 calculate.setOnClickListener(new CalculateListener()); } @Override public boolean onCreateOptionsMenu(Menu menu) { // TODO Auto-generated method stub menu.add(0,1,1,R.string.exit); menu.add(0,2,2,R.string.about); return super.onCreateOptionsMenu(menu); } //当客户点击MENU按钮的时候,调用该方法 @Override public boolean onOptionsItemSelected(MenuItem item) { // TODO Auto-generated method stub if(item.getItemId() == 1){ finish(); } return super.onOptionsItemSelected(item); } class CalculateListener implements OnClickListener{ @Override public void onClick(View v) { // TODO Auto-generated method stub //取得两个EditText控件的值 String factorOneStr = factorOne.getText().toString(); String factorTwoStr = factorTwo.getText().toString(); //将这两个值存放到Intent对象当中 Intent intent = new Intent(); intent.putExtra("one",factorOneStr); intent.putExtra("two",factorTwoStr); intent.setClass(MainActivity.this,ResultActivity.class ); //使用这个Intent对象来启动ResultActivity MainActivity.this.startActivity(intent); } } }
以下的代码是ResultActivity.java中的代码
1
2
3
4
5
6
7
8
9
10
11
12
13
14
15
16
17
18
19
20
21
22
23
24
25
26
27
package com.example.menu; import android.app.Activity; import android.content.Intent; import android.os.Bundle; import android.widget.TextView; public class ResultActivity extends Activity{ private TextView resultView; @Override protected void onCreate(Bundle savedInstanceState) { super.onCreate(savedInstanceState); setContentView(R.layout.activity_result); resultView = (TextView)findViewById(R.id.result); //得到Intent对象当中的值 Intent intent = getIntent(); String factorOneStr = intent.getStringExtra("one"); String factorTwoStr = intent.getStringExtra("two"); int factorOneInt = Integer.parseInt(factorOneStr); int factorTwoInt = Integer.parseInt(factorTwoStr); //计算两个值的积 int result = factorOneInt * factorTwoInt; resultView.setText(result + ""); } }
以下的代码是activity_main.xml中的代码
1
2
3
4
5
6
7
8
9
10
11
12
13
14
15
16
17
18
19
20
21
22
23
24
25
26
27
28
29
30
31
<?xml version="1.0" encoding="utf-8"?> <LinearLayout xmlns:android="http://schemas.android.com/apk/res/android" android:layout_width="fill_parent" android:layout_height="fill_parent" android:orientation="vertical" > <EditText android:id="@+id/factorOne" android:layout_width="fill_parent" android:layout_height="wrap_content" /> <TextView android:id="@+id/symbol" android:layout_width="fill_parent" android:layout_height="wrap_content" /> <EditText android:id="@+id/factorTwo" android:layout_width="fill_parent" android:layout_height="wrap_content" /> <Button android:id="@+id/calculate" android:layout_width="fill_parent" android:layout_height="wrap_content" /> </LinearLayout>
以下的代码是activity_result.xml中的代码
1
2
3
4
5
6
7
8
9
10
11
12
13
14
15
16
<?xml version="1.0" encoding="utf-8"?> <LinearLayout xmlns:android="http://schemas.android.com/apk/res/android" android:orientation="vertical" android:layout_width="fill_parent" android:layout_height="fill_parent" > <TextView android:id="@+id/result" android:layout_width="fill_parent" android:layout_height="wrap_content" /> </LinearLayout>
以下的代码是string.xml中的代码
1
2
3
4
5
6
7
8
9
10
11
<?xml version="1.0" encoding="utf-8"?> <resources> <string name="app_name">menu</string> <string name="hello_world">Hello world!</string> <string name="resultLabel">result</string> <string name="symbol">乘法</string> <string name="calculate">计算</string> <string name="exit">退出</string> <string name="about">关于</string> </resources>
以下的代码是AndroidManifest.xml中的代码
1
2
3
4
5
6
7
8
9
10
11
12
13
14
15
16
17
18
19
20
21
22
23
24
25
26
27
28
29
30
<?xml version="1.0" encoding="utf-8"?> <manifest xmlns:android="http://schemas.android.com/apk/res/android" package="com.example.menu" android:versionCode="1" android:versionName="1.0" > <uses-sdk android:minSdkVersion="8" android:targetSdkVersion="21" /> <application android:allowBackup="true" android:icon="@drawable/ic_launcher" android:label="@string/app_name" android:theme="@style/AppTheme" > <activity android:name=".MainActivity" android:label="@string/app_name" > <intent-filter> <action android:name="android.intent.action.MAIN" /> <category android:name="android.intent.category.LAUNCHER" /> </intent-filter> </activity> <activity android:name = ".ResultActivity"> </activity> </application> </manifest>
5.checkbox:该工程的功能实现在一个activity中显示一个单选框和一个多选框 以下代码是MainActivity.java文件中的代码
1
2
3
4
5
6
7
8
9
10
11
12
13
14
15
16
17
18
19
20
21
22
23
24
25
26
27
28
29
30
31
32
33
34
35
36
37
38
39
40
41
42
43
44
45
46
47
48
49
50
51
52
53
54
55
56
57
58
59
60
61
62
63
64
65
66
67
68
69
70
71
72
73
74
75
76
77
78
79
80
81
82
83
84
85
86
87
88
89
90
91
92
93
94
95
96
97
package com.example.checkbox; import android.app.Activity; import android.os.Bundle; import android.view.Menu; import android.view.MenuItem; import android.widget.CheckBox; import android.widget.CompoundButton; import android.widget.RadioButton; import android.widget.RadioGroup; import android.widget.Toast; public class MainActivity extends Activity { //对控件对象进行声明 private RadioGroup gendergroup = null; private RadioButton femaleButton = null; private RadioButton maleButton = null; private CheckBox swimBox = null; private CheckBox runBox = null; private CheckBox readBox = null; @Override protected void onCreate(Bundle savedInstanceState) { super.onCreate(savedInstanceState); setContentView(R.layout.activity_main); //通过控件的ID来得到代表控件的对象 gendergroup = (RadioGroup)findViewById(R.id.genderGroup); femaleButton = (RadioButton)findViewById(R.id.femaleButton); maleButton = (RadioButton)findViewById(R.id.maleButton); swimBox = (CheckBox)findViewById(R.id.swim); runBox = (CheckBox)findViewById(R.id.run); readBox = (CheckBox)findViewById(R.id.read); //设置监听器 gendergroup.setOnCheckedChangeListener(new RadioGroup.OnCheckedChangeListener() { @Override public void onCheckedChanged(RadioGroup group, int checkedId) { // TODO Auto-generated method stub if(femaleButton.getId() == checkedId){ System.out.println("female"); Toast.makeText(MainActivity.this, "female", Toast.LENGTH_SHORT).show(); } else if(maleButton.getId() == checkedId) { System.out.println("male"); Toast.makeText(MainActivity.this, "male", Toast.LENGTH_SHORT).show(); } } }); //为多选按钮添加监听器 swimBox.setOnCheckedChangeListener(new CompoundButton.OnCheckedChangeListener() { @Override public void onCheckedChanged(CompoundButton buttonView, boolean isChecked) { // TODO Auto-generated method stub if(isChecked) { System.out.println("swim is checked"); } else { System.out.println("swim is unchecked"); } } }); runBox.setOnCheckedChangeListener(new CompoundButton.OnCheckedChangeListener() { @Override public void onCheckedChanged(CompoundButton buttonView, boolean isChecked) { // TODO Auto-generated method stub if(isChecked) { System.out.println("run is checked"); } else { System.out.println("run is unchecked"); } } }); readBox.setOnCheckedChangeListener(new CompoundButton.OnCheckedChangeListener() { @Override public void onCheckedChanged(CompoundButton buttonView, boolean isChecked) { // TODO Auto-generated method stub if(isChecked) { System.out.println("read is checked"); } else { System.out.println("read is unchecked"); } } }); } }
以下代码是activity_main.xml文件中的代码
1
2
3
4
5
6
7
8
9
10
11
12
13
14
15
16
17
18
19
20
21
22
23
24
25
26
27
28
29
30
31
32
33
34
35
36
37
38
39
40
41
42
43
44
45
46
47
48
49
50
51
52
53
54
55
56
<LinearLayout xmlns:android="http://schemas.android.com/apk/res/android" xmlns:tools="http://schemas.android.com/tools" android:id="@+id/LinearLayout1" android:layout_width="fill_parent" android:layout_height="fill_parent" android:orientation="vertical" tools:context="${relativePackage}.${activityClass}" > <TextView android:id="@+id/textView1" android:layout_width="fill_parent" android:layout_height="wrap_content" android:text="@string/hello_world" /> <RadioGroup android:id="@+id/genderGroup" android:layout_width="wrap_content" android:layout_height="wrap_content" android:orientation="vertical" > <RadioButton android:id="@+id/femaleButton" android:layout_width="wrap_content" android:layout_height="wrap_content" android:text="@string/female" /> <RadioButton android:id="@+id/maleButton" android:layout_width="wrap_content" android:layout_height="wrap_content" android:text="@string/male" /> </RadioGroup> <CheckBox android:id="@+id/swim" android:layout_width="wrap_content" android:layout_height="wrap_content" android:text="@string/swim" /> <CheckBox android:id="@+id/run" android:layout_width="wrap_content" android:layout_height="wrap_content" android:text="@string/run" /> <CheckBox android:id="@+id/read" android:layout_width="wrap_content" android:layout_height="wrap_content" android:text="@string/read" /> </LinearLayout>
以下代码是string.xml文件中的代码
1
2
3
4
5
6
7
8
9
10
11
<?xml version="1.0" encoding="utf-8"?> <resources> <string name="app_name">CheckBox</string> <string name="hello_world">Hello world!</string> <string name="female">女</string> <string name="male">男</string> <string name="swim">游泳</string> <string name="run">跑步</string> <string name="read">读书</string> </resources>
6.listview:该工程的功能是实现在一个activity中显示一个列表 以下代码是MainActivity.java中的代码
1
2
3
4
5
6
7
8
9
10
11
12
13
14
15
16
17
18
19
20
21
22
23
24
25
26
27
28
29
30
31
32
33
34
35
36
37
38
39
40
41
42
43
package com.example.listview; import java.util.ArrayList; import java.util.HashMap; import android.app.ListActivity; import android.os.Bundle; import android.view.Menu; import android.view.MenuItem; import android.widget.SimpleAdapter; public class MainActivity extends ListActivity { @Override public void onCreate(Bundle savedInstanceState) { super.onCreate(savedInstanceState); setContentView(R.layout.activity_main); ArrayList<HashMap<String, String>> list = new ArrayList<HashMap<String, String>>(); HashMap<String, String> map1 = new HashMap<String,String>(); HashMap<String, String> map2 = new HashMap<String,String>(); HashMap<String, String> map3 = new HashMap<String,String>(); map1.put("user_name","zhangsan"); map1.put("user_ip","192.168.0.1"); map2.put("user_name","lisi"); map2.put("user_ip","192.168.0.2"); map3.put("user_name","wangwu"); map3.put("user_ip","192.168.0.3"); list.add(map1); list.add(map2); list.add(map3); SimpleAdapter listAdapter = new SimpleAdapter(this, list, R.layout.activity_user, new String[] {"user_name", "user_ip"}, new int[] {R.id.user_name, R.id.user_ip}); setListAdapter(listAdapter); } }
以下的代码是activity_main.xml中的代码
1
2
3
4
5
6
7
8
9
10
11
12
13
14
15
16
17
18
19
20
21
22
23
24
<LinearLayout xmlns:android="http://schemas.android.com/apk/res/android" xmlns:tools="http://schemas.android.com/tools" android:id="@+id/LinearLayout1" android:layout_width="fill_parent" android:layout_height="fill_parent" android:orientation="vertical" tools:context="${relativePackage}.${activityClass}" > <LinearLayout android:id="@+id/listLinearLayout" android:orientation="vertical" android:layout_width="fill_parent" android:layout_height="wrap_content" > <ListView android:id="@id/android:list" android:scrollbars="vertical" android:layout_width="fill_parent" android:layout_height="wrap_content" android:drawSelectorOnTop="false" /> </LinearLayout> </LinearLayout>
以下代码是activity_user.xml中的代码
1
2
3
4
5
6
7
8
9
10
11
12
13
14
15
16
17
18
19
20
21
22
23
24
25
26
27
28
29
<LinearLayout xmlns:android="http://schemas.android.com/apk/res/android" xmlns:tools="http://schemas.android.com/tools" android:id="@+id/LinearLayout2" android:layout_width="fill_parent" android:layout_height="fill_parent" android:orientation="horizontal" android:paddingLeft="10dip" android:paddingRight="10dip" android:paddingTop="1dip" android:paddingBottom="1dip" tools:context="${relativePackage}.${activityClass}" > <TextView android:id="@+id/user_name" android:layout_width="180dip" android:layout_height="30dip" android:textSize="10pt" android:singleLine="true" /> <TextView android:id="@+id/user_ip" android:layout_width="fill_parent" android:layout_height="fill_parent" android:gravity="right" android:textSize="10pt" /> </LinearLayout>
以下代码为MainActivity.java中的代码
1
2
3
4
5
6
7
8
9
10
11
12
13
14
15
16
17
18
19
20
21
22
23
24
25
26
27
28
29
30
31
32
33
34
35
36
package com.example.button_activity; import android.app.Activity; import android.content.Intent; import android.os.Bundle; import android.view.Menu; import android.view.MenuItem; import android.view.View; import android.view.View.OnClickListener; import android.widget.Button; public class MainActivity extends Activity { private Button myButton = null; @Override protected void onCreate(Bundle savedInstanceState) { super.onCreate(savedInstanceState); setContentView(R.layout.activity_main); myButton = (Button)findViewById(R.id.myButton); myButton.setOnClickListener(new MyButtonListener()); } class MyButtonListener implements OnClickListener{ @Override public void onClick(View v) { // TODO Auto-generated method stub Intent intent = new Intent(); intent.setClass(MainActivity.this, OtherActivity.class); MainActivity.this.startActivity(intent); } } }
以下代码为OtherActivity.java中的代码
1
2
3
4
5
6
7
8
9
10
11
12
13
14
15
16
17
18
19
20
package com.example.button_activity; import android.app.Activity; import android.os.Bundle; import android.widget.TextView; public class OtherActivity extends Activity{ private TextView myTextView = null; @Override protected void onCreate(Bundle savedInstanceState) { // TODO Auto-generated method stub super.onCreate(savedInstanceState); setContentView(R.layout.activity_other); myTextView = (TextView)findViewById(R.id.myTextView); myTextView.setText(R.string.other); } }
以下代码为activity_main.xml中的代码
1
2
3
4
5
6
7
8
9
10
11
12
13
14
15
16
17
18
19
<RelativeLayout xmlns:android="http://schemas.android.com/apk/res/android" xmlns:tools="http://schemas.android.com/tools" android:layout_width="match_parent" android:layout_height="match_parent" tools:context="${relativePackage}.${activityClass}" > <TextView android:layout_width="wrap_content" android:layout_height="wrap_content" android:text="@string/hello_world" /> <Button android:id="@+id/myButton" android:layout_width="fill_parent" android:layout_height="wrap_content" /> </RelativeLayout>
以下代码为activity_other.xml中的代码
1
2
3
4
5
6
7
8
9
10
11
12
13
14
<RelativeLayout xmlns:android="http://schemas.android.com/apk/res/android" xmlns:tools="http://schemas.android.com/tools" android:layout_width="match_parent" android:layout_height="match_parent" tools:context="${relativePackage}.${activityClass}" > <TextView android:id="@+id/myTextView" android:layout_width="fill_parent" android:layout_height="wrap_content" android:text="@string/hello_world" /> </RelativeLayout>
以下代码为string.xml中的代码
1
2
3
4
5
6
7
<?xml version="1.0" encoding="utf-8"?> <resources> <string name="app_name">button_activity</string> <string name="hello_world">Hello world!</string> <string name="other">OtherActivity</string> </resources>
以下代码为AndroidManifest.xml中的代码
注意修改package的名称
1
2
3
4
5
6
7
8
9
10
11
12
13
14
15
16
17
18
19
20
21
22
23
24
25
26
27
28
29
30
31
<?xml version="1.0" encoding="utf-8"?> <manifest xmlns:android="http://schemas.android.com/apk/res/android" package="com.example.button_activity" android:versionCode="1" android:versionName="1.0" > <uses-sdk android:minSdkVersion="8" android:targetSdkVersion="21" /> <application android:allowBackup="true" android:icon="@drawable/ic_launcher" android:label="@string/app_name" android:theme="@style/AppTheme" > <activity android:name=".MainActivity" android:label="@string/app_name" > <intent-filter> <action android:name="android.intent.action.MAIN" /> <category android:name="android.intent.category.LAUNCHER" /> </intent-filter> </activity> <activity android:name=".OtherActivity" android:label="@string/other" > </activity> </application> </manifest>
如果不能运行请kill-adb和start-adb并重新启动eclipse
8.Button:该工程的功能是实现在activity中显示一个TextView和一个Button 以下代码是MainActivity中的代码
1
2
3
4
5
6
7
8
9
10
11
12
13
14
15
16
17
18
19
20
21
22
package com.example.button; import android.app.Activity; import android.os.Bundle; import android.view.Menu; import android.view.MenuItem; import android.widget.Button; import android.widget.TextView; public class MainActivity extends Activity { @Override protected void onCreate(Bundle savedInstanceState) { super.onCreate(savedInstanceState); setContentView(R.layout.activity_main); TextView myTextView = (TextView)findViewById(R.id.myTextView); Button myButton = (Button)findViewById(R.id.myButton); myTextView.setText("我的第一个TextView"); myButton.setText("我的第一个Button"); } }
以下代码是activity_main中的代码
1
2
3
4
5
6
7
8
9
10
11
12
13
14
15
16
17
18
19
<RelativeLayout xmlns:android="http://schemas.android.com/apk/res/android" xmlns:tools="http://schemas.android.com/tools" android:layout_width="match_parent" android:layout_height="match_parent" tools:context="${relativePackage}.${activityClass}" > <TextView android:id="@+id/myTextView" android:layout_width="wrap_content" android:layout_height="wrap_content" android:text="@string/hello_world" /> <Button android:id="@+id/myButton" android:layout_width="fill_parent" android:layout_height="wrap_content" /> </RelativeLayout>
该工程的功能是实现进度条的显示,按以下按钮进度条增加10%
以下代码是MainActivity.java中的代码
1
2
3
4
5
6
7
8
9
10
11
12
13
14
15
16
17
18
19
20
21
22
23
24
25
26
27
28
29
30
31
32
33
34
35
36
37
38
39
40
41
42
43
44
45
46
47
48
49
50
51
52
53
54
55
56
57
58
59
60
61
62
63
package com.example.progressbar; import android.app.Activity; import android.os.Bundle; import android.view.Menu; import android.view.MenuItem; import android.view.View; import android.view.View.OnClickListener; import android.widget.Button; import android.widget.ProgressBar; public class MainActivity extends Activity { //申明限量 private ProgressBar firstBar = null; private ProgressBar secondBar = null; private Button myButton = null; private int i = 0; @Override protected void onCreate(Bundle savedInstanceState) { super.onCreate(savedInstanceState); setContentView(R.layout.activity_main); //根据控件的ID来取得代表控件的对象 firstBar = (ProgressBar)findViewById(R.id.firstBar); secondBar = (ProgressBar)findViewById(R.id.secondBar); myButton = (Button)findViewById(R.id.myButton); myButton.setOnClickListener(new ButtonListener()); System.out.print(firstBar.getMax()); } class ButtonListener implements OnClickListener{ @Override public void onClick(View v) { // TODO Auto-generated method stub if(i == 0) { //设置进度条处于可见的状态 firstBar.setVisibility(View.VISIBLE); secondBar.setVisibility(View.VISIBLE); } else if(i < firstBar.getMax()) { //设置主进度条的当前值 firstBar.setProgress(i); //设置第二进度条的当前值 firstBar.setSecondaryProgress(i + 10); //因为默认的进度条无法显示进行的状态 //secondBar.setProgress(i); } else { //设置进度条处于不可见状态 firstBar.setVisibility(View.GONE); secondBar.setVisibility(View.GONE); } i = i + 10; } } }
以下代码是activity_main.xml中的代码
1
2
3
4
5
6
7
8
9
10
11
12
13
14
15
16
17
18
19
20
21
22
23
24
25
26
27
28
29
30
31
32
33
34
35
36
37
38
39
<LinearLayout xmlns:android="http://schemas.android.com/apk/res/android" xmlns:tools="http://schemas.android.com/tools" android:id="@+id/LinearLayout1" android:layout_width="fill_parent" android:layout_height="fill_parent" android:orientation="vertical" tools:context="${relativePackage}.${activityClass}" > <TextView android:layout_width="fill_parent" android:layout_height="wrap_content" android:text="@string/hello_world" /> <ProgressBar android:id="@+id/firstBar" style="?android:attr/progressBarStyleHorizontal" android:layout_width="200dp" android:layout_height="wrap_content" android:visibility="gone" /> <ProgressBar android:id="@+id/secondBar" style="?android:attr/progressBarStyle" android:layout_width="wrap_content" android:layout_height="wrap_content" android:visibility="gone" android:max="200" /> <Button android:id="@+id/myButton" android:layout_width="wrap_content" android:layout_height="wrap_content" android:text="begin" /> </LinearLayout>
9.Bundle:该工程的功能是实现不同线程之间数据的传递 以下代码是MainActivity.java中的代码
1
2
3
4
5
6
7
8
9
10
11
12
13
14
15
16
17
18
19
20
21
22
23
24
25
26
27
28
29
30
31
32
33
34
35
36
37
38
39
40
41
42
43
44
45
46
47
48
49
50
51
52
53
package com.example.bundle; import android.app.Activity; import android.os.Bundle; import android.os.Handler; import android.os.HandlerThread; import android.os.Looper; import android.os.Message; import android.view.Menu; import android.view.MenuItem; public class MainActivity extends Activity { @Override protected void onCreate(Bundle savedInstanceState) { super.onCreate(savedInstanceState); setContentView(R.layout.activity_main); //打印了当前线程的ID System.out.println("Activity-->" + Thread.currentThread().getId()); //生成一个HandleThread对象,实现了使用Looper来处理消息队列的功能,这个类由android程序框架提供 HandlerThread handlerThread = new HandlerThread("handler_thread"); //在使用HandlerThread的getLooper()方法之前,必须先调用该类的start() handlerThread.start(); MyHandler myHandler = new MyHandler(handlerThread.getLooper()); Message msg = myHandler.obtainMessage(); //msg.obj="abc"; //将msg发送到目标对象,所谓的目标对象,就是生成该msg对象的handler对象 Bundle b = new Bundle(); b.putInt("age", 20); b.putString("name", "John"); msg.setData(b); msg.sendToTarget(); } class MyHandler extends Handler{ public MyHandler(){ } public MyHandler(Looper looper){ //super调用父类 super(looper); } public void handleMessage(Message msg){ //String s = (String)msg.obj; Bundle b = msg.getData(); int age = b.getInt("age"); String name = b.getString("name"); System.out.println("age is " + age +", name is " + name); System.out.println("Handler-->" + Thread.currentThread().getId()); System.out.println("handlerMessage"); } } }
1
2
3
4
5
6
7
8
9
10
11
12
13
14
<LinearLayout xmlns:android="http://schemas.android.com/apk/res/android" xmlns:tools="http://schemas.android.com/tools" android:id="@+id/LinearLayout1" android:layout_width="match_parent" android:layout_height="match_parent" android:orientation="vertical" tools:context="${relativePackage}.${activityClass}" > <TextView android:layout_width="wrap_content" android:layout_height="wrap_content" android:text="@string/hello_world" /> </LinearLayout>
10.ProcessBar:该工程的功能是实现点击按钮进度条按10%递增,使用的方式是Handler 以下的代码是MainActivity.java中的代码
1
2
3
4
5
6
7
8
9
10
11
12
13
14
15
16
17
18
19
20
21
22
23
24
25
26
27
28
29
30
31
32
33
34
35
36
37
38
39
40
41
42
43
44
45
46
47
48
49
50
51
52
53
54
55
56
57
58
59
60
61
62
63
64
65
66
67
68
69
package com.example.progressbarhandler; import android.app.Activity; import android.os.Bundle; import android.os.Handler; import android.os.Message; import android.view.View; import android.view.View.OnClickListener; import android.widget.Button; import android.widget.ProgressBar; public class MainActivity extends Activity { //申明变量 ProgressBar bar = null; Button startButton = null; @Override protected void onCreate(Bundle savedInstanceState) { super.onCreate(savedInstanceState); setContentView(R.layout.activity_main); //根据空间的ID得到代表控件的对象,并未按钮去设置监听器 bar = (ProgressBar)findViewById(R.id.bar); startButton = (Button)findViewById(R.id.startButton); startButton.setOnClickListener(new ButtonListener()); } class ButtonListener implements OnClickListener{ @Override public void onClick(View v) { // TODO Auto-generated method stub bar.setVisibility(View.VISIBLE); updateBarHandler.post(updateThread); } } //使用匿名内部类来复写Handler当中的handMessage方法 Handler updateBarHandler = new Handler(){ public void handleMessage(Message msg){ bar.setProgress(msg.arg1); //线程队列 updateBarHandler.post(updateThread); } }; //线程类,该类使用匿名内部类的方式进行声明 Runnable updateThread = new Runnable(){ int i = 0; public void run(){ System.out.println("Begin Thread"); i = i + 10; //得到一个消息对象,message类是由android操作系统提供 Message msg = updateBarHandler.obtainMessage(); //将msg对象的arg1参数的值设置为i,用arg1和arg2这两个成员传递消息 msg.arg1 = i; try{ //设置当前显示睡眠1秒 Thread.sleep(1000); } catch (InterruptedException e){ e.printStackTrace(); } //将msg对象加入到消息队列当中 updateBarHandler.sendMessage(msg); if(i == 100){ //如果当i的值为100时,就将线程对象从handle当中移除 updateBarHandler.removeCallbacks(updateThread); } } }; }
以下的代码是activity_main.xml中的代码
1
2
3
4
5
6
7
8
9
10
11
12
13
14
15
16
17
18
19
20
21
22
23
<LinearLayout xmlns:android="http://schemas.android.com/apk/res/android" xmlns:tools="http://schemas.android.com/tools" android:id="@+id/LinearLayout1" android:layout_width="match_parent" android:layout_height="match_parent" android:orientation="vertical" tools:context="${relativePackage}.${activityClass}" > <ProgressBar android:id="@+id/bar" style="?android:attr/progressBarStyleHorizontal" android:layout_width="200dp" android:layout_height="wrap_content" android:visibility="gone" /> <Button android:id="@+id/startButton" android:layout_width="fill_parent" android:layout_height="wrap_content" android:text="start" /> </LinearLayout>
11.Handler:线程管理 步骤:
1
2
3
4
5
6
7
8
9
10
11
12
13
14
15
16
17
18
19
20
21
1. 申请一个Handler对象 Handler handler = new Handler(); 2. 创建一个线程 {继承Thread类或者实现Runnable这个接口} 使用Runnable创建一个内部匿名类对象updateThread(要复写run方法) 3. 使用handler的post方法将线程加入到线程队列中 handler.post(updateThread); 4. 使用handler的removeCallbacks方法移出updateThread线程 注意:如果线程从线程队列中出来被执行后,则队列中就不在有线程 因此如果线程在被执行后没有方法将其再次加入到队列中,则无需使用removeCallbacks 线程走出线程队列有两种情况: 一种是被执行,此时要执行run方法 一种是使用removeCallbacks方法,此时线程不被执行,因此不调用run 5. 使用handler的postDelayed方法延时将线程加入到队列中 handler.postDelayed(updateThread,3000)
以下代码是MainActivity.java中的代码
1
2
3
4
5
6
7
8
9
10
11
12
13
14
15
16
17
18
19
20
21
22
23
24
25
26
27
28
29
30
31
32
33
34
35
36
37
38
39
40
41
42
43
44
45
46
47
48
49
50
51
52
53
54
package com.example.handler; import android.app.Activity; import android.os.Bundle; import android.os.Handler; import android.view.View; import android.view.View.OnClickListener; import android.widget.Button; public class MainActivity extends Activity { //声明两个按钮控件 private Button StartButton = null; private Button EndButton = null; @Override protected void onCreate(Bundle savedInstanceState) { super.onCreate(savedInstanceState); setContentView(R.layout.activity_main); //根据控件的ID得到代表控件的对象,并为这两个按钮设置相应的监听器 StartButton = (Button)findViewById(R.id.StartButton); StartButton.setOnClickListener(new StartButotnListener()); EndButton = (Button)findViewById(R.id.EndButton); EndButton.setOnClickListener(new EndButtonListener()); } class StartButotnListener implements OnClickListener{ @Override public void onClick(View v) { // TODO Auto-generated method stub handler.post(updateThread); } } class EndButtonListener implements OnClickListener{ @Override public void onClick(View v) { // TODO Auto-generated method stub handler.removeCallbacks(updateThread); } } //创建一个Handler对象 Handler handler = new Handler(); //将要执行的操作下载线程对象的run方法当中 Runnable updateThread = new Runnable(){ public void run(){ System.out.println("UpdateThread"); //在run方法内部,执行postDelayed或者是post方法 handler.postDelayed(updateThread,3000); } }; }
以下代码是activity_main.xml中的代码
1
2
3
4
5
6
7
8
9
10
11
12
13
14
15
16
17
18
19
20
21
22
23
24
25
<LinearLayout xmlns:android="http://schemas.android.com/apk/res/android" xmlns:tools="http://schemas.android.com/tools" android:id="@+id/LinearLayout1" android:layout_width="fill_parent" android:layout_height="fill_parent" android:orientation="vertical" tools:context="${relativePackage}.${activityClass}" > <Button android:id="@+id/StartButton" android:layout_width="fill_parent" android:layout_height="wrap_content" android:text="Start" /> <Button android:id="@+id/EndButton" android:layout_width="fill_parent" android:layout_height="wrap_content" android:text="End" /> </LinearLayout>
以下代码是MainActivity.java中的代码
1
2
3
4
5
6
7
8
9
10
11
12
13
14
15
16
17
18
19
20
21
22
23
24
25
26
27
28
29
30
31
32
33
34
35
36
37
package com.example.handlertest; import android.app.Activity; import android.os.Bundle; import android.os.Handler; public class MainActivity extends Activity { private Handler handler = new Handler(); @Override protected void onCreate(Bundle savedInstanceState) { super.onCreate(savedInstanceState); setContentView(R.layout.activity_main); handler.post(r); //Thread t = new Thread(r); //t.start(); System.out.println("activity--->"+ Thread.currentThread().getId()); System.out.println("activityname--->"+ Thread.currentThread().getName()); } Runnable r = new Runnable(){ public void run() { System.out.println("handler--->"+ Thread.currentThread().getId()); System.out.println("handlername--->"+ Thread.currentThread().getName()); try{ Thread.sleep(10000); } catch (InterruptedException e) { e.printStackTrace(); } } }; }
以下代码是activity_main.xml中的代码
1
2
3
4
5
6
7
8
9
10
11
12
13
14
<LinearLayout xmlns:android="http://schemas.android.com/apk/res/android" xmlns:tools="http://schemas.android.com/tools" android:id="@+id/LinearLayout1" android:layout_width="match_parent" android:layout_height="match_parent" android:orientation="vertical" tools:context="${relativePackage}.${activityClass}" > <TextView android:layout_width="wrap_content" android:layout_height="wrap_content" android:text="@string/hello_world" /> </LinearLayout>
12.Download:该工程的功能是实现Download 1.该工程的功能是实现从网上的链接下载一个lrc文件和一个mp3文件
以下代码是MainActivity.java中的代码
1
2
3
4
5
6
7
8
9
10
11
12
13
14
15
16
17
18
19
20
21
22
23
24
25
26
27
28
29
30
31
32
33
34
35
36
37
38
39
40
41
42
43
package com.example.download; import com.example.utils.HttpDownloader; import android.app.Activity; import android.os.Bundle; import android.view.View; import android.view.View.OnClickListener; import android.widget.Button; public class MainActivity extends Activity { /** Called when the activity is first created. */ private Button downloadTxtButton; private Button downloadMp3Button; @Override public void onCreate(Bundle savedInstanceState) { super.onCreate(savedInstanceState); setContentView(R.layout.activity_main); downloadTxtButton = (Button)findViewById(R.id.downloadTxt); downloadTxtButton.setOnClickListener(new DownloadTxtListener()); downloadMp3Button = (Button)findViewById(R.id.downloadMp3); downloadMp3Button.setOnClickListener(new DownloadMp3Listener()); } class DownloadTxtListener implements OnClickListener{ public void onClick(View v) { HttpDownloader httpDownloader = new HttpDownloader(); int lrc = httpDownloader.downFile("http://play.baidu.com/data2/lrc/121017633/121017633.lrc", "voa/", "1201250291414036861128.lrc"); System.out.println(lrc); } } class DownloadMp3Listener implements OnClickListener{ public void onClick(View v) { // TODO Auto-generated method stub HttpDownloader httpDownloader = new HttpDownloader(); int result = httpDownloader.downFile("http://cdn.y.baidu.com/yinyueren/532bfdb43a336a584533ff61a7289503.mp3", "voa/", "江南.mp3"); System.out.println(result); } } }
以下代码是FileUtils.java中的代码
1
2
3
4
5
6
7
8
9
10
11
12
13
14
15
16
17
18
19
20
21
22
23
24
25
26
27
28
29
30
31
32
33
34
35
36
37
38
39
40
41
42
43
44
45
46
47
48
49
50
51
52
53
54
55
56
57
58
59
60
61
62
63
64
65
66
67
68
69
70
71
72
73
74
75
76
77
78
79
80
81
82
83
package com.example.utils; import java.io.File; import java.io.FileOutputStream; import java.io.IOException; import java.io.InputStream; import java.io.OutputStream; import android.os.Environment; public class FileUtils { private String SDPATH; public String getSDPATH() { return SDPATH; } public FileUtils() { //得到当前外部存储设备的目录 // /SDCARD SDPATH = Environment.getExternalStorageDirectory() + "/"; } /** * 在SD卡上创建文件 * * @throws IOException */ public File creatSDFile(String fileName) throws IOException { File file = new File(SDPATH + fileName); file.createNewFile(); return file; } /** * 在SD卡上创建目录 * * @param dirName */ public File creatSDDir(String dirName) { File dir = new File(SDPATH + dirName); dir.mkdirs(); return dir; } /** * 判断SD卡上的文件夹是否存在 */ public boolean isFileExist(String fileName){ File file = new File(SDPATH + fileName); return file.exists(); } /** * 将一个InputStream里面的数据写入到SD卡中 */ public File write2SDFromInput(String path,String fileName,InputStream input){ File file = null; OutputStream output = null; try{ creatSDDir(path); file = creatSDFile(path + fileName); output = new FileOutputStream(file); byte buffer [] = new byte[4 * 1024]; int len=-1; while((len=input.read(buffer)) != -1){ //在这里使用另一个重载,防止流写入的问题. output.write(buffer,0,len); } output.flush(); } catch(Exception e){ e.printStackTrace(); } finally{ try{ output.close(); } catch(Exception e){ e.printStackTrace(); } } return file; } }
以下代码是HttpDownloader.java中的代码
1
2
3
4
5
6
7
8
9
10
11
12
13
14
15
16
17
18
19
20
21
22
23
24
25
26
27
28
29
30
31
32
33
34
35
36
37
38
39
40
41
42
43
44
45
46
47
48
49
50
51
52
53
54
55
56
57
58
59
60
61
62
63
64
65
66
67
68
69
70
71
72
73
74
75
76
77
78
79
80
81
82
83
84
85
86
87
88
89
90
91
92
93
94
95
96
97
98
99
100
101
102
103
104
package com.example.utils; import java.io.BufferedReader; import java.io.File; import java.io.IOException; import java.io.InputStream; import java.io.InputStreamReader; import java.net.HttpURLConnection; import java.net.MalformedURLException; import java.net.URL; public class HttpDownloader { private URL url = null; /** * 根据URL下载文件,前提是这个文件当中的内容是文本,函数的返回值就是文件当中的内容 * 1.创建一个URL对象 * 2.通过URL对象,创建一个HttpURLConnection对象 * 3.得到InputStram * 4.从InputStream当中读取数据 * @param urlStr * @return */ public String download(String urlStr) { StringBuffer sb = new StringBuffer(); String line = null; BufferedReader buffer = null; try { // 创建一个URL对象 url = new URL(urlStr); // 创建一个Http连接 HttpURLConnection urlConn = (HttpURLConnection) url .openConnection(); // 使用IO流读取数据 buffer = new BufferedReader(new InputStreamReader(urlConn .getInputStream())); while ((line = buffer.readLine()) != null) { sb.append(line); } } catch (Exception e) { e.printStackTrace(); } finally { try { buffer.close(); } catch (Exception e) { e.printStackTrace(); } } return sb.toString(); } /** * 该函数返回整形 -1:代表下载文件出错 0:代表下载文件成功 1:代表文件已经存在 */ public int downFile(String urlStr, String path, String fileName) { InputStream inputStream = null; try { FileUtils fileUtils = new FileUtils(); if (fileUtils.isFileExist(path + fileName)) { return 1; } else { inputStream = getInputStreamFromUrl(urlStr); File resultFile = fileUtils.write2SDFromInput(path,fileName, inputStream); if (resultFile == null) { return -1; } } } catch (Exception e) { e.printStackTrace(); return -1; } finally { try { inputStream.close(); } catch (Exception e) { e.printStackTrace(); } } return 0; } /** * 根据URL得到输入流 * * @param urlStr * @return * @throws MalformedURLException * @throws IOException */ public InputStream getInputStreamFromUrl(String urlStr) throws MalformedURLException, IOException { url = new URL(urlStr); HttpURLConnection urlConn = (HttpURLConnection) url.openConnection(); InputStream inputStream = urlConn.getInputStream(); return inputStream; } }
以下代码是activity_main.xml中的代码
1
2
3
4
5
6
7
8
9
10
11
12
13
14
15
16
17
18
19
20
21
22
23
24
25
26
27
28
<LinearLayout xmlns:android="http://schemas.android.com/apk/res/android" xmlns:tools="http://schemas.android.com/tools" android:id="@+id/LinearLayout1" android:layout_width="fill_parent" android:layout_height="fill_parent" android:orientation="vertical" tools:context="${relativePackage}.${activityClass}" > <TextView android:layout_width="fill_parent" android:layout_height="wrap_content" android:text="@string/hello_world" /> <Button android:id="@+id/downloadTxt" android:layout_width="fill_parent" android:layout_height="wrap_content" android:text="downloadTxt" /> <Button android:id="@+id/downloadMp3" android:layout_width="fill_parent" android:layout_height="wrap_content" android:text="downloadMp3" /> </LinearLayout>
以下代码是AndroidManifest.xml中的代码
1
2
3
4
5
6
7
8
9
10
11
12
13
14
15
16
17
18
19
20
21
22
23
24
25
26
27
28
29
30
31
<?xml version="1.0" encoding="utf-8"?> <manifest xmlns:android="http://schemas.android.com/apk/res/android" package="com.example.download" android:versionCode="1" android:versionName="1.0" > <uses-sdk android:minSdkVersion="8" android:targetSdkVersion="21" /> <application android:allowBackup="true" android:icon="@drawable/ic_launcher" android:label="@string/app_name" android:theme="@style/AppTheme" > <activity android:name=".MainActivity" android:label="@string/app_name" > <intent-filter> <action android:name="android.intent.action.MAIN" /> <category android:name="android.intent.category.LAUNCHER" /> </intent-filter> </activity> </application> <uses-sdk android:minSdkVersion="8" /> <!-- 访问网络和操作SD卡 加入的两个权限配置--> <uses-permission android:name="android.permission.INTERNET"/> <uses-permission android:name="android.permission.WRITE_EXTERNAL_STORAGE"/> </manifest>
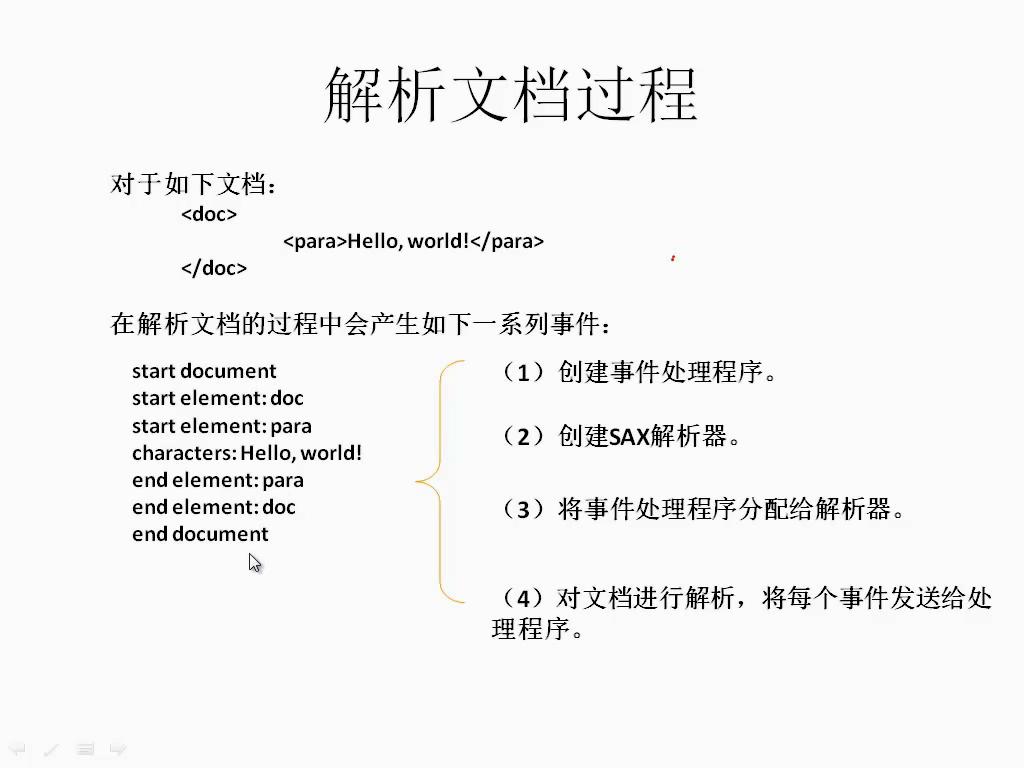
2.该工程实现下载一个xml文件,并解析
转自http://blog.csdn.net/sam_zhang1984
XML 解析主要需要进行下列步骤:
1. 创建事件处理程序
2. 创建 SAX 解析器
3. 将事件处理程序分配给解析器
4. 对文档进行解析,将每个事件发送给处理程序。
以下的代码是MainActivity.java中的代码
1
2
3
4
5
6
7
8
9
10
11
12
13
14
15
16
17
18
19
20
21
22
23
24
25
26
27
28
29
30
31
32
33
34
35
36
37
38
39
40
41
42
43
44
45
46
47
48
49
50
package com.example.xml; import java.io.StringReader; import javax.xml.parsers.SAXParserFactory; import com.example.utils.HttpDownloader; import org.xml.sax.InputSource; import org.xml.sax.XMLReader; import android.app.Activity; import android.os.Bundle; import android.view.View; import android.view.View.OnClickListener; import android.widget.Button; public class MainActivity extends Activity { /** Called when the activity is first created. */ private Button parseButton ; @Override public void onCreate(Bundle savedInstanceState) { super.onCreate(savedInstanceState); setContentView(R.layout.activity_main); parseButton = (Button)findViewById(R.id.parseButton); parseButton.setOnClickListener(new ParseButtonListener()); } class ParseButtonListener implements OnClickListener{ public void onClick(View v) { HttpDownloader hd = new HttpDownloader(); String resultStr = hd.download("http://192.168.1.107:8081/voa1500/test.xml"); System.out.println(resultStr); try{ //创建一个SAXParserFactory SAXParserFactory factory = SAXParserFactory.newInstance(); XMLReader reader = factory.newSAXParser().getXMLReader(); //为XMLReader设置内容处理器 reader.setContentHandler(new MyContentHandler()); //开始解析文件 reader.parse(new InputSource(new StringReader(resultStr))); } catch(Exception e){ e.printStackTrace(); } } } }
以下的代码是MyContentHandler.java中的代码
1
2
3
4
5
6
7
8
9
10
11
12
13
14
15
16
17
18
19
20
21
22
23
24
25
26
27
28
29
30
31
32
33
34
35
36
37
38
39
40
41
42
43
44
45
46
47
48
49
50
51
52
53
54
55
56
57
58
59
60
61
62
63
64
65
66
package com.example.xml; import org.xml.sax.Attributes; import org.xml.sax.SAXException; import org.xml.sax.helpers.DefaultHandler; public class MyContentHandler extends DefaultHandler { String hisname, address, money, sex, status; String tagName; public void startDocument() throws SAXException { System.out.println("````````begin````````"); } public void endDocument() throws SAXException { System.out.println("````````end````````"); } public void startElement(String namespaceURI, String localName, String qName, Attributes attr) throws SAXException { tagName = localName; if (localName.equals("worker")) { //获取标签的全部属性 for (int i = 0; i < attr.getLength(); i++) { System.out.println(attr.getLocalName(i) + "=" + attr.getValue(i)); } } } public void endElement(String namespaceURI, String localName, String qName) throws SAXException { //在workr标签解析完之后,会打印出所有得到的数据 tagName = ""; if (localName.equals("worker")) { this.printout(); } } public void characters(char[] ch, int start, int length) throws SAXException { if (tagName.equals("name")) hisname = new String(ch, start, length); else if (tagName.equals("sex")) sex = new String(ch, start, length); else if (tagName.equals("status")) status = new String(ch, start, length); else if (tagName.equals("address")) address = new String(ch, start, length); else if (tagName.equals("money")) money = new String(ch, start, length); } private void printout() { System.out.print("name: "); System.out.println(hisname); System.out.print("sex: "); System.out.println(sex); System.out.print("status: "); System.out.println(status); System.out.print("address: "); System.out.println(address); System.out.print("money: "); System.out.println(money); System.out.println(); } }
以下的代码是FileUtils.java中的代码
1
2
3
4
5
6
7
8
9
10
11
12
13
14
15
16
17
18
19
20
21
22
23
24
25
26
27
28
29
30
31
32
33
34
35
36
37
38
39
40
41
42
43
44
45
46
47
48
49
50
51
52
53
54
55
56
57
58
59
60
61
62
63
64
65
66
67
68
69
70
71
72
73
74
75
76
77
78
79
80
81
82
83
package com.example.utils; import java.io.File; import java.io.FileOutputStream; import java.io.IOException; import java.io.InputStream; import java.io.OutputStream; import android.os.Environment; public class FileUtils { private String SDPATH; public String getSDPATH() { return SDPATH; } public FileUtils() { //得到当前外部存储设备的目录 // /SDCARD SDPATH = Environment.getExternalStorageDirectory() + "/"; } /** * 在SD卡上创建文件 * * @throws IOException */ public File creatSDFile(String fileName) throws IOException { File file = new File(SDPATH + fileName); file.createNewFile(); return file; } /** * 在SD卡上创建目录 * * @param dirName */ public File creatSDDir(String dirName) { File dir = new File(SDPATH + dirName); dir.mkdirs(); return dir; } /** * 判断SD卡上的文件夹是否存在 */ public boolean isFileExist(String fileName){ File file = new File(SDPATH + fileName); return file.exists(); } /** * 将一个InputStream里面的数据写入到SD卡中 */ public File write2SDFromInput(String path,String fileName,InputStream input){ File file = null; OutputStream output = null; try{ creatSDDir(path); file = creatSDFile(path + fileName); output = new FileOutputStream(file); byte buffer [] = new byte[4 * 1024]; int len=-1; while((len=input.read(buffer)) != -1){ //在这里使用另一个重载,防止流写入的问题. output.write(buffer,0,len); } output.flush(); } catch(Exception e){ e.printStackTrace(); } finally{ try{ output.close(); } catch(Exception e){ e.printStackTrace(); } } return file; } }
以下的代码是HttpDownloader.java中的代码
1
2
3
4
5
6
7
8
9
10
11
12
13
14
15
16
17
18
19
20
21
22
23
24
25
26
27
28
29
30
31
32
33
34
35
36
37
38
39
40
41
42
43
44
45
46
47
48
49
50
51
52
53
54
55
56
57
58
59
60
61
62
63
64
65
66
67
68
69
70
71
72
73
74
75
76
77
78
79
80
81
82
83
84
85
86
87
88
89
90
91
92
93
94
95
96
97
98
99
100
101
102
103
104
package com.example.utils; import java.io.BufferedReader; import java.io.File; import java.io.IOException; import java.io.InputStream; import java.io.InputStreamReader; import java.net.HttpURLConnection; import java.net.MalformedURLException; import java.net.URL; public class HttpDownloader { private URL url = null; /** * 根据URL下载文件,前提是这个文件当中的内容是文本,函数的返回值就是文件当中的内容 * 1.创建一个URL对象 * 2.通过URL对象,创建一个HttpURLConnection对象 * 3.得到InputStram * 4.从InputStream当中读取数据 * @param urlStr * @return */ public String download(String urlStr) { StringBuffer sb = new StringBuffer(); String line = null; BufferedReader buffer = null; try { // 创建一个URL对象 url = new URL(urlStr); // 创建一个Http连接 HttpURLConnection urlConn = (HttpURLConnection) url .openConnection(); // 使用IO流读取数据 buffer = new BufferedReader(new InputStreamReader(urlConn .getInputStream())); while ((line = buffer.readLine()) != null) { sb.append(line); } } catch (Exception e) { e.printStackTrace(); } finally { try { buffer.close(); } catch (Exception e) { e.printStackTrace(); } } return sb.toString(); } /** * 该函数返回整形 -1:代表下载文件出错 0:代表下载文件成功 1:代表文件已经存在 */ public int downFile(String urlStr, String path, String fileName) { InputStream inputStream = null; try { FileUtils fileUtils = new FileUtils(); if (fileUtils.isFileExist(path + fileName)) { return 1; } else { inputStream = getInputStreamFromUrl(urlStr); File resultFile = fileUtils.write2SDFromInput(path,fileName, inputStream); if (resultFile == null) { return -1; } } } catch (Exception e) { e.printStackTrace(); return -1; } finally { try { inputStream.close(); } catch (Exception e) { e.printStackTrace(); } } return 0; } /** * 根据URL得到输入流 * * @param urlStr * @return * @throws MalformedURLException * @throws IOException */ public InputStream getInputStreamFromUrl(String urlStr) throws MalformedURLException, IOException { url = new URL(urlStr); HttpURLConnection urlConn = (HttpURLConnection) url.openConnection(); InputStream inputStream = urlConn.getInputStream(); return inputStream; } }
以下的代码是activity_main.xml中的代码
1
2
3
4
5
6
7
8
9
10
11
12
13
14
15
16
17
18
<?xml version="1.0" encoding="utf-8"?> <LinearLayout xmlns:android="http://schemas.android.com/apk/res/android" android:orientation="vertical" android:layout_width="fill_parent" android:layout_height="fill_parent" > <TextView android:layout_width="fill_parent" android:layout_height="wrap_content" android:text="@string/hello_world" /> <Button android:id="@+id/parseButton" android:layout_width="fill_parent" android:layout_height="wrap_content" android:text="开始解析XML"/> </LinearLayout>
12.Handler:线程管理 该工程的功能是实现关于数据库的操作,即creat、update、insert、query、delete
调试的时候请用模拟器,用真机调试的时候进入cmd-adb shell,再进入cd data/data的时候会显示permission denied
以下的代码是MainActivity.java中的代码
1
2
3
4
5
6
7
8
9
10
11
12
13
14
15
16
17
18
19
20
21
22
23
24
25
26
27
28
29
30
31
32
33
34
35
36
37
38
39
40
41
42
43
44
45
46
47
48
49
50
51
52
53
54
55
56
57
58
59
60
61
62
63
64
65
66
67
68
69
70
71
72
73
74
75
76
77
78
79
80
81
82
83
84
85
86
87
88
89
90
91
92
93
94
95
96
97
98
99
100
101
102
103
104
105
106
107
108
109
110
111
112
113
114
115
116
117
118
119
120
121
122
123
124
125
126
127
128
129
130
131
132
133
134
135
136
137
138
139
package com.example.sqlite; import com.example.sqlite.db.DataBaseHelper; import android.app.Activity; import android.content.ContentValues; import android.database.Cursor; import android.database.sqlite.SQLiteDatabase; import android.os.Bundle; import android.view.Menu; import android.view.MenuItem; import android.view.View; import android.view.View.OnClickListener; import android.widget.Button; import android.widget.EditText; import android.widget.TextView; public class MainActivity extends Activity { private Button createDBButton ; private Button insertDBButton ; private Button updateDBButton ; private Button queryDBButton ; private Button deleteDBButton ; private EditText input_id ; private EditText input_name ; private TextView test ; @Override protected void onCreate(Bundle savedInstanceState) { super.onCreate(savedInstanceState); setContentView(R.layout.activity_main); //此处为创建数据库, 通过按钮监听器来实现 createDBButton = (Button) findViewById(R.id.creatDB); createDBButton.setOnClickListener(new CreateDBListener()); //此处为插入数据到数据库中 insertDBButton = (Button) findViewById(R.id.insert); insertDBButton.setOnClickListener(new InsertListener()); //此处为更新数据表 updateDBButton = (Button) findViewById(R.id.update); updateDBButton.setOnClickListener(new updateListener()); //此处为更新数据表 queryDBButton = (Button) findViewById(R.id.query); queryDBButton.setOnClickListener(new queryListener()); //此处为删除数据内容 deleteDBButton = (Button) findViewById(R.id.delete); deleteDBButton.setOnClickListener(new deleteListener()); //此处为显示查询结果 test = (TextView) findViewById(R.id.result); test.setText("name") ; //此处为添加数据的选项 //input_id = (EditText) findViewById(R.id.input_id); //input_name = (EditText) findViewById(R.id.input_name); } class CreateDBListener implements OnClickListener{ @Override public void onClick(View v) { // 此处为调用另外一个类中的方法来创建数据库, 或者直接来创建数据库 String db_name = "test_mars_db_one" ; System.out.println("Create"); DataBaseHelper dbHelper = new DataBaseHelper(MainActivity.this, db_name) ; SQLiteDatabase db = dbHelper.getReadableDatabase() ; } } class InsertListener implements OnClickListener{ @Override public void onClick(View v) { //生成一个ContentValues对象 ContentValues values = new ContentValues() ; //想该对象当中插入键值对,其中键是列名,值是希望插入到这列的值,值必须 values.put("id", 1) ; values.put("name", "zhangsan") ; System.out.println("Insert"); DataBaseHelper dbHelper = new DataBaseHelper(MainActivity.this, "test_mars_db_one") ; SQLiteDatabase db = dbHelper.getWritableDatabase() ; //调用insert方法, 就可以将数据插入到数据库中 db.insert("user", null, values) ; } } class updateListener implements OnClickListener{ @Override public void onClick(View arg0) { // 此处为更新数据内容 System.out.println("Update"); DataBaseHelper dbHelper = new DataBaseHelper(MainActivity.this, "test_mars_db_one") ; SQLiteDatabase db = dbHelper.getWritableDatabase() ; ContentValues values = new ContentValues() ; values.put("name", "zhangsanfeng") ; //第一个参数为要更新的表名 //第二个参数为一个ContentValues对象 //第三个参数是where语句 db.update("user", values, "id=?", new String[]{"1"}) ; } } class queryListener implements OnClickListener{ @Override public void onClick(View v) { // 此处为查询数据内容, 并用到cursor来实现 System.out.println("query"); DataBaseHelper dbHelper = new DataBaseHelper(MainActivity.this, "test_mars_db_one") ; SQLiteDatabase db = dbHelper.getWritableDatabase() ; Cursor cursor = db.query("user", new String[]{"id","name"}, "id=?", new String[]{"2"},null,null,null,null) ; while(cursor.moveToNext()){ String name = cursor.getString(cursor.getColumnIndex("name")) ; System.out.print("query---> " + name) ; //name += name ; test.setText(name) ; } } } class deleteListener implements OnClickListener{ public void onClick(View v) { //此处为实现删除数据 System.out.println("delete"); DataBaseHelper dbHelper = new DataBaseHelper(MainActivity.this, "test_mars_db_one") ; SQLiteDatabase db = dbHelper.getWritableDatabase() ; //删除特定条件的数据 //db.delete("user","id=?",new String[]{"2"}); //删除所有数据 db.delete("user",null,null); } } }
以下的代码是DataBaseHelper.java中的代码
1
2
3
4
5
6
7
8
9
10
11
12
13
14
15
16
17
18
19
20
21
22
23
24
25
26
27
28
29
30
31
32
33
34
35
36
37
38
39
40
41
42
43
44
45
46
47
package com.example.sqlite.db; import android.content.Context; import android.database.sqlite.SQLiteDatabase; import android.database.sqlite.SQLiteDatabase.CursorFactory; import android.database.sqlite.SQLiteOpenHelper; //DatabaseHelper作为一个访问SQLite的助手类,提供两个方面的功能 //第一,getReadableDatabase(),getWriteableDatabase()可以获得SQLiteDatabase对象,通过该对象可以对数据库进行操作 //第二,提供了onCreate()和onUpgrade()两个回调函数,允许我们在创建和升级数据库时,进行自己的操作 public class DataBaseHelper extends SQLiteOpenHelper { private static final int VERSION = 1; //在SQLiteOpenHelper的子类当中,必须有该构造函数 public DataBaseHelper(Context context, String name, CursorFactory factory, int version) { //必须通过super调用父类当中的构造函数 super(context, name, factory, version); // TODO Auto-generated constructor stub } public DataBaseHelper(Context context,String name){ this(context,name,VERSION); } public DataBaseHelper(Context context,String name,int version){ this(context,name,null,version); } //该函数是在第一次创建数据库的时候执行,实际上是在第一次得到SQLiteDatabase对象的时候,才会调用该方法 @Override public void onCreate(SQLiteDatabase db) { // TODO Auto-generated method stub System.out.println("Create a Database"); //execSQL函数用于执行SQL语句 db.execSQL("create table user(id int,name varchar(20))"); System.out.println("Create a Database successful"); } @Override public void onUpgrade(SQLiteDatabase db, int oldVersion, int newVersion) { // TODO Auto-generated method stub System.out.println("update a DataBase"); } }
以下的代码是activity_main.xml中的代码
1
2
3
4
5
6
7
8
9
10
11
12
13
14
15
16
17
18
19
20
21
22
23
24
25
26
27
28
29
30
31
32
33
34
35
36
37
38
39
40
41
42
43
44
45
46
47
48
49
50
51
52
<LinearLayout xmlns:android="http://schemas.android.com/apk/res/android" xmlns:tools="http://schemas.android.com/tools" android:id="@+id/LinearLayout1" android:layout_width="fill_parent" android:layout_height="fill_parent" android:orientation="vertical" tools:context="${relativePackage}.${activityClass}" > <Button android:id="@+id/creatDB" android:text="creatDatabase" android:layout_width="fill_parent" android:layout_height="wrap_content" /> <Button android:id="@+id/update" android:text="updateDatabase" android:layout_width="fill_parent" android:layout_height="wrap_content" /> <Button android:id="@+id/insert" android:text="Insert" android:layout_width="fill_parent" android:layout_height="wrap_content" /> <Button android:id="@+id/query" android:text="query" android:layout_width="fill_parent" android:layout_height="wrap_content" /> <Button android:id="@+id/delete" android:text="delete" android:layout_width="fill_parent" android:layout_height="wrap_content" /> <TextView android:id="@+id/result" android:layout_width="fill_parent" android:layout_height="wrap_content" android:text="@string/hello_world" /> </LinearLayout>
利用adb shell管理虚拟机的数据库
Google Android操作系统内核基于Linux,其数据库采用了sqlite。sqlite是一个开源的小巧的大小小于500KB的微型数据库系统。
Android Debug Bridge(adb)是Android下的一个让你管理手机或者手机虚拟机的多功能工具。
本文主要介绍如何在虚拟机上操作sqlite数据库。
Google的Android的开发包内有个虚拟机,启动虚拟机后,在window命令行窗口内输入adb shell 即可登入设备,我们就拥有了一个Linux环境。
图1:Android虚拟机
图2:adbshell登入Linux系统
Android把数据都存放在data/data目录下。
我们使用cd命令转到data/data目录下:
cd /data/data
ls显示所有数据
你会看到像我目录一样有个mars.sqlite3文件夹。
cd mars.sqlite3/databases进入mars.sqlite3/databases目录
ls 命令你会看到test_mars_db,这就是我们的创建的测试数据库文件
在#提示符下输入以下命令sqlite3 test_mars_db;登入数据库
图3:登入sqlite3数据库
这个命令会打开test_mars_db数据库,若test_mars_db数据库不存在,则会新建一个名为
test_mars_db的数据库。(注意数据库名大小写有区别)
在sqlite>提示符下输入
.help 这个命令让我们看到许多命令
.tables 查看所有表,例如我的系统里有android_metadata和user两个表
查询表user数据内容,我们输入
Select * from user;我们查出三条数据。
图4:显示查询结果
这个数据库的显示方式让我们习惯了Oralce,看得很不舒服,输入
以下两个命令,让我们改变这种显示模式。
.mode column
.header on
再输入select * from user;我们看着舒服多了。
图5:改变数据显示模式
.exit 命令退出sqlite,返回到#提示符。
在#提示符下输入exit退出Linux。