tonglin0325的个人主页

Ubuntu16.04安装Consul

1.下载安装包

1
2
3
https://www.consul.io/downloads.html
wget https://releases.hashicorp.com/consul/1.5.3/consul_1.5.3_linux_amd64.zip

2.解压

1
2
unzip consul_1.5.3_linux_amd64.zip

3.mv

1
2
sudo mv consul /usr/local/bin/consul

4.启动

参考:https://blog.csdn.net/u010046908/article/details/61916389

-dev 开发模式启动的时候,数据是存储在内存中,重启之后数据将丢失

1
2
consul agent -dev

-server 生成模式启动的时候,如果是server的话需要指定-server,如果是client的话,需要指定-client,比如

1
2
consul agent -ui -server -bootstrap-expect 1 -data-dir /tmp/consul -node=consul-server -bind=192.168.1.100 -client=192.168.1.100

-bootstrap-expect 1 通知consul server我们现在准备加入的server节点个数,该参数是为了延迟日志复制的启动直到我们指定数量的server节点成功的加入后启动

-data-dir /tmp/consul 数据持久的路径

-node=consul-server 指定节点在集群中的名称

-bind=192.168.1.100 该地址用来在集群内部的通讯,集群内的所有节点到地址都必须是可达的,默认是0.0.0.0,这意味着Consulo会使用第一个可用的私有IP地址,Consul可以使用TCP和UDP并且可以使用共同的端口,如果存在防火墙,这两者协议必须是允许的

-client 指定节点为client,指定客户端接口的绑定地址,包括:HTTP、DNS、RPC,默认是127.0.0.1只允许回环接口访问,也就是本机访问,如果要想同一局域网内的其他机器访问,需要修改成自己的内网ip

server节点,指定client等于内网ip,统一局域网的机器可以访问,指定client=0.0.0.0,外网机器可以访问

1
2
nohup ./consul agent -ui -server -bootstrap-expect 1 -data-dir /home/worker/projects/consul-1.5.3/consul-data -node=xxx -client=xxx >> ./logs/consul.log 2>&1 &

client节点,不指定client的话,只能本机访问client节点,指定client=0.0.0.0,外网机器可以访问

1
2
nohup ./consul agent -ui -data-dir /home/worker/projects/consul-1.5.3/consul-data -node=xxx -bind=xxxx -client=xxx >> ./logs/consul.log 2>&1 &

join

1
2
./consul join server的ip

当3台分布式部署的时候,需要如下部署

参考:https://blog.csdn.net/chenchong08/article/details/77885989

1
2
3
4
5
6
nohup ./consul agent -ui -server -bootstrap-expect 3 -data-dir /home/worker/projects/consul-1.5.3/consul-data -node=host1 -client=0.0.0.0 -bind=ip1 >> ./logs/consul.log 2>&1 &
nohup ./consul agent -ui -server -bootstrap-expect 3 -data-dir /home/worker/projects/consul-1.5.3/consul-data -node=host2 -client=0.0.0.0 -bind=ip2 >> ./logs/consul.log 2>&1 &
./consul join host1
nohup ./consul agent -ui -server -bootstrap-expect 3 -data-dir /home/worker/projects/consul-1.5.3/consul-data -node=host3 -client=0.0.0.0 -bind=ip3 >> ./logs/consul.log 2>&1 &
./consul join host2

全文 >>

kerberos相关

1.Kerberos介绍

Kerberos是一种计算机网络授权协议,用来在非安全网络中,对个人通信以安全的手段进行身份认证。这个词又指麻省理工学院为这个协议开发的一套计算机软件。软件设计上采用客户端/服务器结构,并且能够进行相互认证,即客户端和服务器端均可对对方进行身份认证。可以用于防止窃听、防止重放攻击、保护数据完整性等场合,是一种应用对称密钥体制进行密钥管理的系统。

全文 >>

Airflow使用指南

1.只执行单个任务

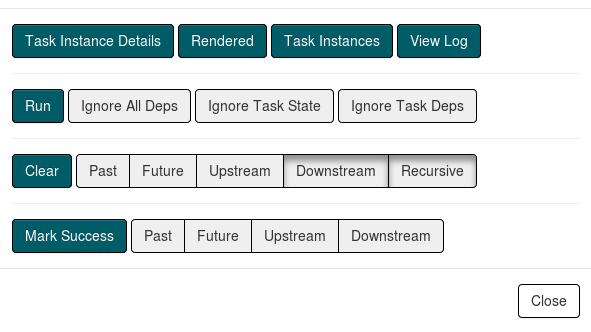
将downstream和recursive按钮的点击状态取消,然后点击clear,最后选择Ignore All Deps,然后点击run

2.从一个任务开始,执行它以及它的下游任务

将downstream和recursive按钮的点击状态取消,然后点击clear,最后选择Ignore Task Deps,然后点击run

其他:调度工具airflow的介绍和使用示例

3.airflow命令行

1
2
https://airflow.apache.org/docs/apache-airflow/stable/cli-and-env-variables-ref.html#dags

1.第一次登录创建airflow用户

1
airflow users create --username airflow --role Admin --password airflow --email airflow@xxx.com --lastname airflow --firstname airflow 

2.根据dag id删除一个dag

1
2
airflow dags delete {dag_id}

3.触发一个airflow dag

1
2
3
4
5
6
7
8
9
10
11
12
13
14
15
16
17
18
19
20
21
22
airflow dags trigger --help
usage: airflow dags trigger [-h] [-c CONF] [-e EXEC_DATE] [-r RUN_ID]
[-S SUBDIR]
dag_id

Trigger a DAG run

positional arguments:
dag_id The id of the dag

optional arguments:
-h, --help show this help message and exit
-c CONF, --conf CONF JSON string that gets pickled into the DagRun's conf attribute
-e EXEC_DATE, --exec-date EXEC_DATE
The execution date of the DAG
-r RUN_ID, --run-id RUN_ID
Helps to identify this run
-S SUBDIR, --subdir SUBDIR
File location or directory from which to look for the dag. Defaults to '[AIRFLOW_HOME]/dags' where [AIRFLOW_HOME] is the value you set for 'AIRFLOW_HOME' config you set in 'airflow.cfg'

airflow dags trigger -e '2022-07-19T08:00:00' your_dag_id

注意execution_time要在start_date和end_date之间,否则会报

1
2
ValueError: The execution_date [2022-07-19T08:00:00+00:00] should be >= start_date [2022-07-20T00:00:00+00:00] from DAG's default_args

4.airflow按start_date和end_date触发backfill任务

1
2
airflow dags backfill -s 2022-01-01 -e 2022-01-10 DAG_ID

执行的任务是从2022-01-01到2022-01-09,包含startr_date,不包含end_date  

5.测试airflow task

4.airflow会的connection配置参数

1
2
3
4
from airflow.hooks.base import BaseHook

connection = BaseHook.get_connection("username_connection")
password = connection.password

5.在airflow界面上触发特定execution date的任务

点击DAG Runs

全文 >>

Superset配置hive数据源

1.在uri中配置 hive://localhost:10000/default

2.查询

3.如果你的hive集群是带有kerberos认证的,hive数据源需要这样配置

1
2
hive://xxx:xxx/default?auth=KERBEROS&kerberos_service_name=hive

如果在连接的时候报了如下的错

1
2
Could not start SASL: b'Error in sasl_client_start (-1) SASL(-1): generic failure: GSSAPI Error: Unspecified GSS failure

那就就是你没有用keytab进行认证

1
2
kinit -kt xxx.keytab xxx@XXXX

全文 >>

Superset配置mysql数据源

1.添加mysql数据源

测试连接的时候遇到

1
2
No module named 'MySQLdb'"

安装mysqlclient

1
2
pip install mysqlclient

如果遇到

1
2
ERROR: /bin/sh: 1: mysql_config: not found

安装

1
2
sudo apt-get install libmysqlclient-dev python3-dev

添加mysql的url

1
2
mysql://root:xxxx@localhost/mysql?charset=utf8

测试ok

全文 >>

Hadoop学习笔记——HDFS

1.查看hdfs文件的block信息

不正常的文件

1
2
3
4
5
6
7
8
9
10
11
12
13
14
15
16
17
18
19
20
21
hdfs fsck /logs/xxx/xxxx.gz.gz -files -blocks -locations
Connecting to namenode via http://xxx-01:50070/fsck?ugi=xxx&files=1&blocks=1&locations=1&path=%2Flogs%2Fxxx%2Fxxx%2F401294%2Fds%3Dxxxx-07-14%2Fxxx.gz.gz
FSCK started by xxxx (auth:KERBEROS_SSL) from /10.90.1.91 for path xxxxx.gz.gz at Mon Jul 15 11:44:13 CST 2019
Status: HEALTHY
Total size: 0 B (Total open files size: 194 B)
Total dirs: 0
Total files: 0
Total symlinks: 0 (Files currently being written: 1)
Total blocks (validated): 0 (Total open file blocks (not validated): 1)
Minimally replicated blocks: 0
Over-replicated blocks: 0
Under-replicated blocks: 0
Mis-replicated blocks: 0
Default replication factor: 3
Average block replication: 0.0
Corrupt blocks: 0
Missing replicas: 0
Number of data-nodes: 99
Number of racks: 3
FSCK ended at Mon Jul 15 11:44:13 CST 2019 in 0 milliseconds

全文 >>

Ubuntu16.04安装Superset

**Superset **是Airbnb 开源的大数据可视化平台

其支持的datasource

1
2
https://superset.incubator.apache.org/index.html?highlight=datasource

类似的开源项目Zeppelin所支持的datasource

1
2
https://zeppelin.apache.org/docs/0.8.0/quickstart/sql_with_zeppelin.html

全文 >>

Ubuntu16.04安装CDH 5.16.2

CDH安装官方参考文档:

1
2
https://www.cloudera.com/documentation/enterprise/5-16-x/topics/configure_cm_repo.html

如果是在生产环境进行安装,建议查看cloudera官方提供的机型建议

1
2
https://docs.cloudera.com/documentation/enterprise/release-notes/topics/hardware_requirements_guide.html

同时还在CDH的角色分布建议,参考:如何给Hadoop集群划分角色

全文 >>