tonglin0325的个人主页
JavaWeb学习笔记——servlet身份验证
本工程的功能是实现Javaweb的servlet身份验证
go学习笔记——go-redis
官方文档
https://pkg.go.dev/github.com/go-redis/redis/v8#section-readme
添加依赖
1 | go get github.com/go-redis/redis/v8 |
初始化client
1 | client := redis.NewClient(&redis.Options{ |
set key
1 | err = rdb.Set(ctx, "key", 10, time.Hour).Err() |
get key
1 | result := client.Get(ctx, "key") |
参考:Go语言操作Redis
JavaWeb学习笔记——HelloWord Servlet
1.实现servlet打印日志
开发一个动态web资源,即开发一个Java程序向浏览器输出数据,需要完成以下2个步骤:
1.编写一个Java类,实现Servlet接口
开发一个动态web资源必须实现javax.servlet.Servlet接口,Servlet接口定义了Servlet引擎与Servlet程序之间通信的协议约定
以下是MyServlet.java文件中的代码(写的这个类的名字叫做MyServlet):
1 | package org.MyServlet.MyServlet; |
关于其中的Service方法的一些Tip:
1 | //所有客户端请求会自动调用Service方法进行处理 |
以下是web.xml文件中的代码:
//定义一个Servlet服务
//Servlet服务的名字叫做aaa
//定义一个Servlet服务的映射关系
//Servlet服务的名字叫做aaa
//请求的路径是/myServlet.do
//1.服务器启动模式加载webapps下面所有的应用,加载web应用的时候会读取每个应用的web。xml文件
//2.客户单发送请求http://127.0.0.1:8080/MyServlet/myServlet.do
//3.请求就找到http://127.0.0.1:8080,找到MyServlet(Context)
//去mapping里面查找/myServlet.do,如果找到,定位到
//4.去Servlet的定义里面查找Servlet-name是aaa的Servlet服务
//然后定位到org.MyServlet.MyServlet.MyServlet,执行该class的service方法
然后在浏览器中输入
1 | http://127.0.0.1:8080/MyServlet/myServlet.do |
便可以在Tomcat中看到
1 | 执行 MyServlet 的 service() 方法。。。。。 |
2.把开发好的Java类部署到web服务器中
代理前端请求到本地服务
在开发过程中,有时候我们需要将前端的请求(当然也可以是部分请求)代理到我们的本地开发环境的服务中进行调试,下面借助whistle+SwitchyOmega来实现这个功能
1.安装whistle#
1 | npm install whistle -g --registry=https://registry.npmmirror.com |
启动
1 | w2 start |
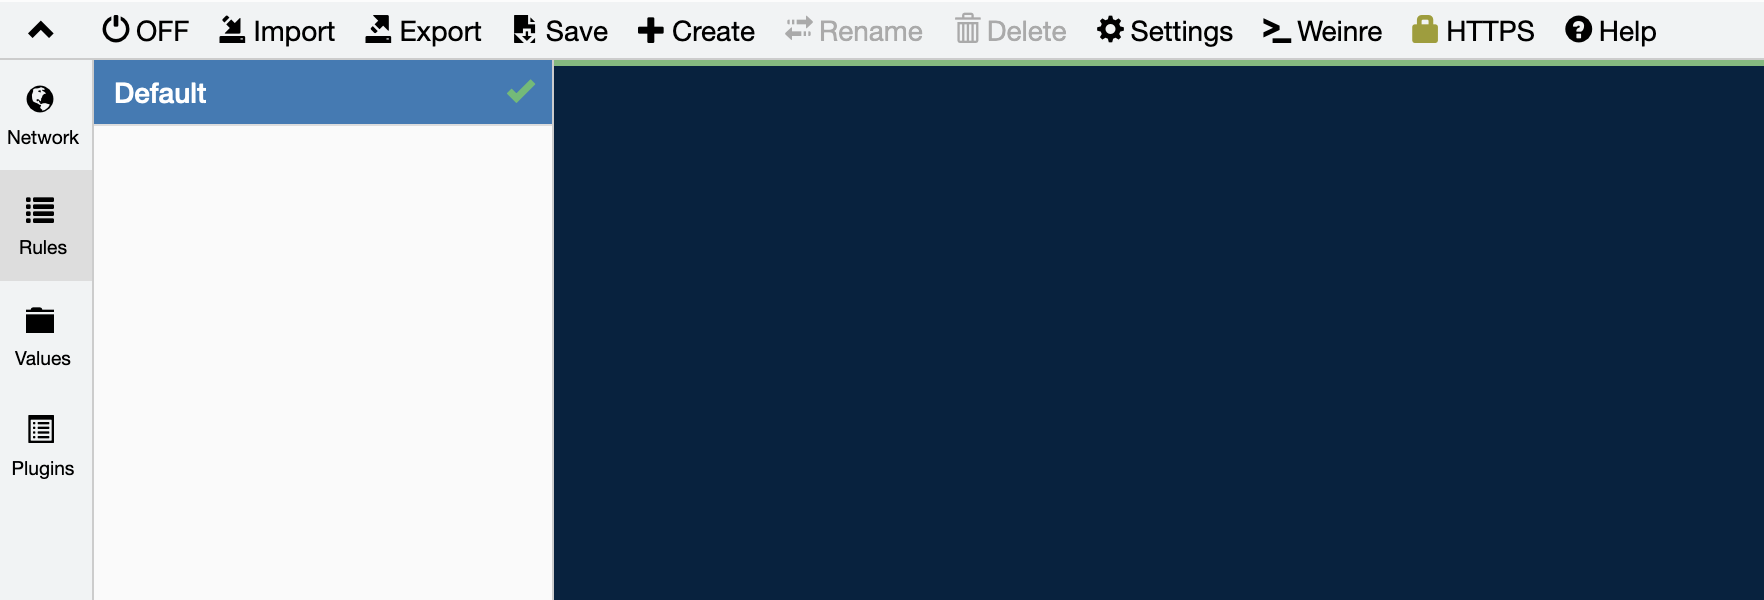
启动后访问http://127.0.0.1:8899/界面如下
2.浏览器安装#
将proxy设置成代理到whistle的8899端口,并将127.0.0.1的本地代理限制删掉
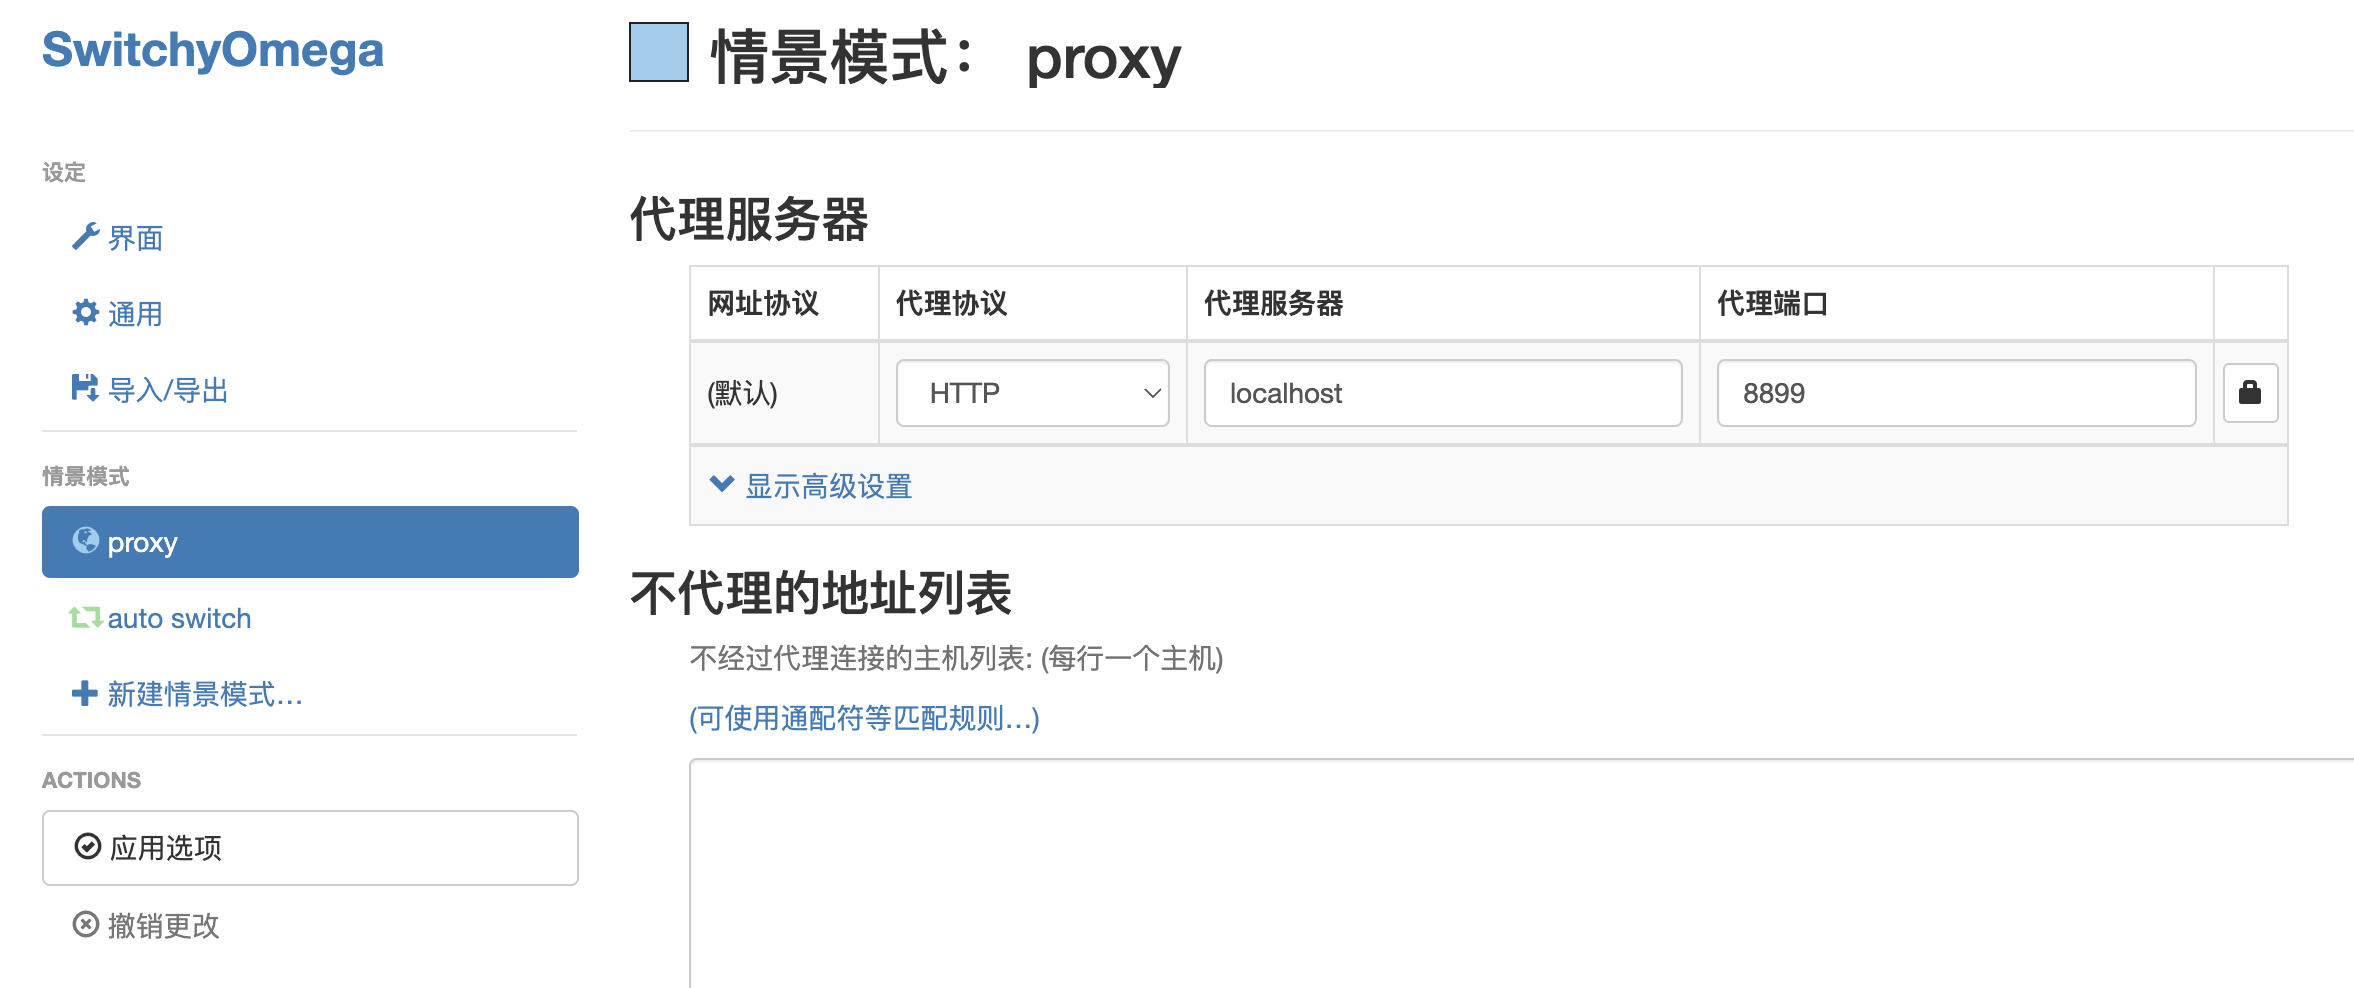
并将改proxy启动
3.代理前端请求#
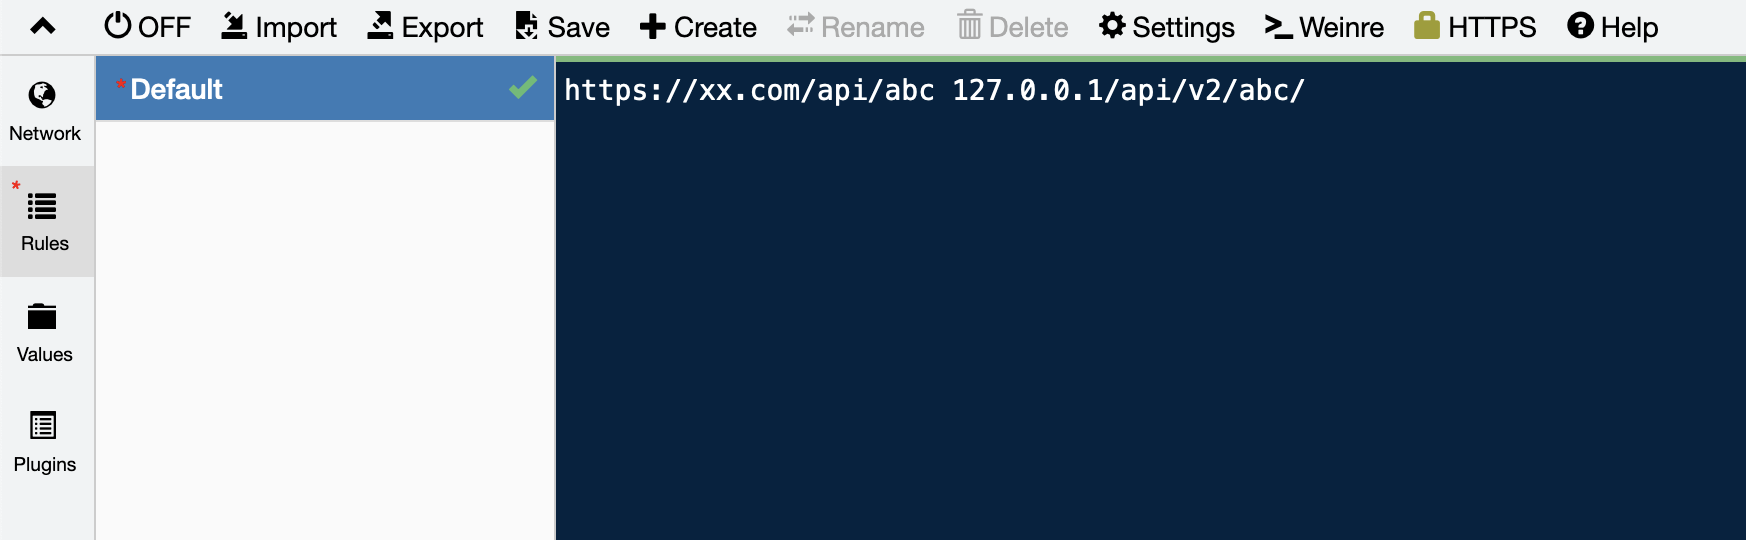
比如我们要代理https://xx.com/api/abc的接口代理到我们本地的http://127.0.0.1/api/v2/abc的服务上,这时我们应该如下配置
1 | https://xx.com/api/abc 127.0.0.1/api/v2/abc/ |
如果是http协议,在启动点击OFF来启动whistle就可以实现代理功能了
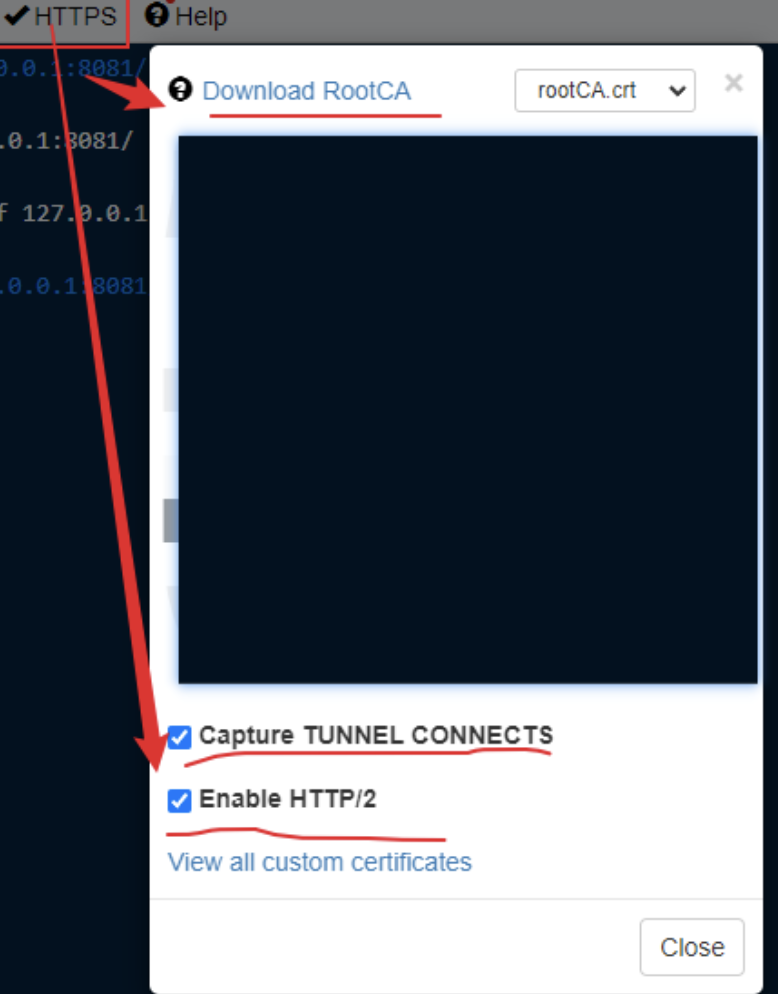
如果是https协议,所以我们还需要点击HTTPS来添加HTTPS证书和勾选相关选项
MySQL学习笔记——SQL注入
1.常见SQL注入的方法#
假设我们使用goland的GORM框架写了以下面SQL
1 | err := u.data.db.Raw("select id, username, email from user where username = '" + s + "'").Scan(&user).Error |
如果正常的查询参数的值为test123,请求如下接口传入该值
1 | http://localhost:8080/api/v1/user?username=test123 |
接口输出的结果为
1 | { |
但是使用字符串拼接来实现查询逻辑的话,很容易被人使用SQL注入的方法进行攻击
1.Error-based#
基于错误的SQL注入主要是用于获得数据的相关信息,方便进行后序的攻击,比如输入单引号 ‘
1 | http://localhost:8080/api/v1/user?username=' |
此时从接口的返回值中就可以知道使用的是MySQL数据库
1 | { |
2.数字型#
比如使用数组id来请求用户信息的接口
1 | http://localhost:8080/api/v1/user/1 |
如果使用3-2可以查询到id=1的用户信息,表示可以使用数字型SQL注入
1 | http://localhost:8080/api/v1/user/3-2 |
3.布尔型#
可以通过布尔表达式来判断猜测的数据是否最正确
1 | <原SQL語法> and length(database())>=1-- |
4.Union-based#
基于union的SQL注入可以通过拼接上UNION语句来实现SQL注入,比如输入’ union all select 123,system_user(),user()%23,其中%23是#
1 | http://localhost:8080/api/v1/user?username=' union all select 123,system_user(),user()%23 |
最终执行的SQL是
1 | select id, username, email from user where username = '' union all select 123,system_user(),user()#' |
此时从接口的返回值中可以查询到数据库的用户名
1 | { |
5.Time-based#
基于sleep函数的SQL注入可以通过拼接上sleep函数来实现sql注入,配合上IF语句可以通过sleep函数是否执行来判断IF条件是否正确(例如在没有权限使用database()等函数的情况下猜测库名表名等),
比如输入test123’ and sleep(5)%23,其中%23是#
1 | http://localhost:8080/api/v1/user?username=test123' and sleep(5)%23 |
最终执行的SQL是
1 | select id, username, email from user where username = 'test123' and sleep(5)#' |
注入成功的话,请求会延时5秒之后再返回
参考:SQL注入-时间盲注整理
6.堆叠型#
1 | <原SQL語法>;DROP DATABASE 資料庫名 |
2.防范SQL注入的方法#
1.使用参数化#
不使用字符串拼接的方式
1 | err := dao.User.Where(dao.User.Username.Eq(s)).Scan(&user) |
2.输入过滤#
通过检查SQL中有某些特殊意思的字符来防止SQL注入,比如
1 | \ |
JavaWeb学习笔记——Tomcat相关
Mybatis学习笔记——mybatis-generator
通用mabatis-generator可以由mysql表自动生成model类,mapper映射文件和mapper接口,参考:MyBatis通用Mapper和PageHelper
1.依赖
1 | <!-- mybatis --> |
2.插件
1 | <!-- mybatis-generator --> |
3.在application.properties中配置数据库相关参数
1 | # mysql |
4.配置generator-config.xml,其中通用MyMapper参考:Mybatis学习笔记——通用mapper
1 | <?xml version="1.0" encoding="UTF-8"?> |
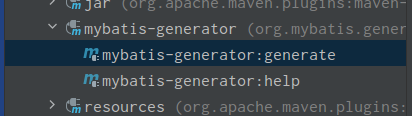
5.生成,点击plugin中的mabatis-generator:generate
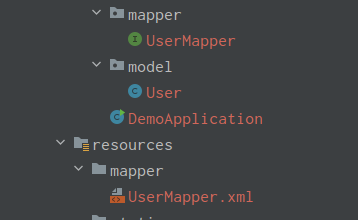
6.自动生成model,mapper和xml
7.添加
SpringBoot学习笔记——kaptcha
kaptcha是一个java验证码生成框架,可以和spring集成用于验证码服务
和spring集成的官方文档
1 | https://code.google.com/archive/p/kaptcha/wikis/SpringUsage.wiki |
1.依赖
1 | <dependency> |
2.kaptcha生成验证码的配置类
1 | import com.google.code.kaptcha.Constants; |
配置的含义参考
1 | https://code.google.com/archive/p/kaptcha/wikis/ConfigParameters.wiki |
验证码图片生成接口
1 | import com.google.code.kaptcha.Constants; |
验证码校验和参数含义参考:Google-kaptcha验证码使用步骤(基于springboot/使用redis存储)
1 | kaptcha.border | Border around kaptcha. Legal values are yes or no. | yes |
效果
校验的原理:
生成验证码的时候返回一个uuid给浏览器,同时将uuid作为key,验证码作为value存在服务器session当中,比如redis,前端提交验证码的时候将uuid带上,查询redis进行验证
数据仓库建模的一些理论
1.数据分层#
数据明细层:DWD(Data Warehouse Detail)
数据中间层:DWM(Data WareHouse Middle)
数据服务层:DWS(Data WareHouse Servce)
数据应用层:ADS(Application Data Service)
2.数仓建模方法#
在数据仓库模型中,星型模型和雪花型模型是两个常用的设计模式。参考:数据仓库系列:星型模型和雪花型模型
1.星型模型#
星型模型是一种简单的数据仓库模型,也是最常见的模型之一。在星型模型中,中心表(称为业务事实表)连接到几个维度表(称为业务维度表)。维度表中包含了业务的各个特征,如时间、区域、产品等。
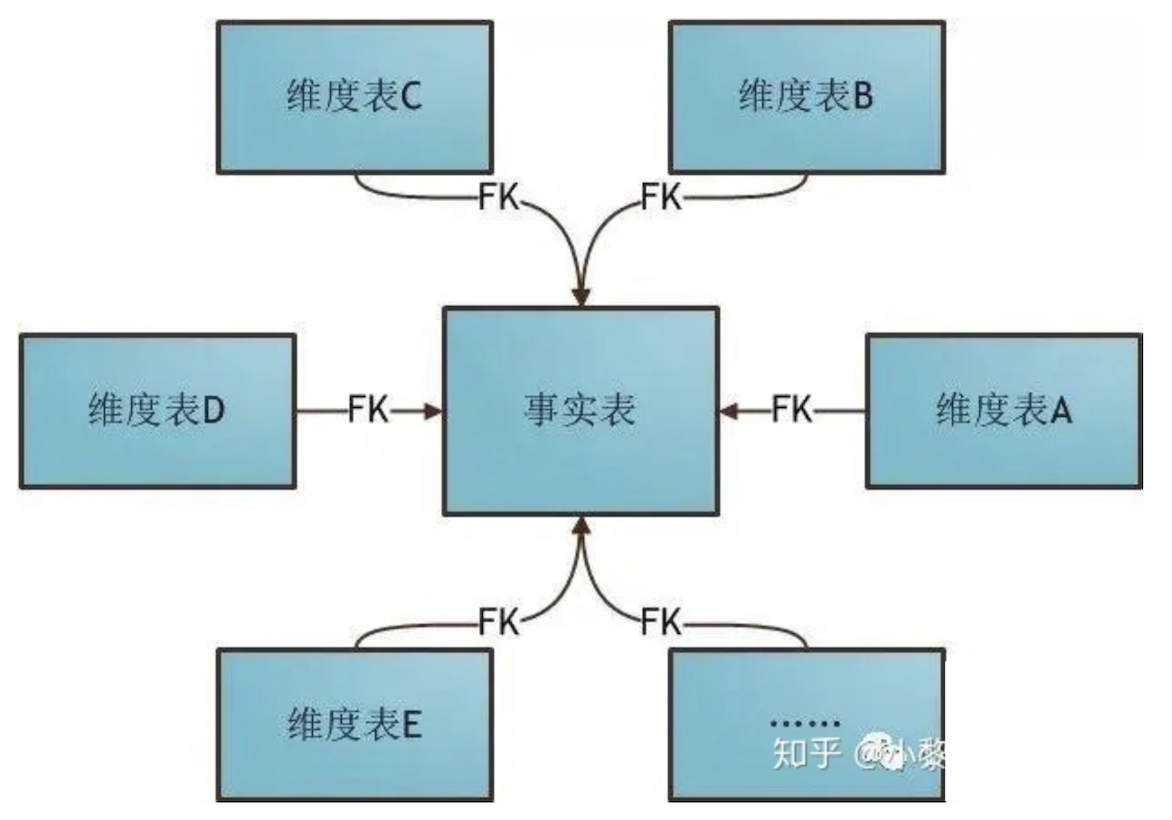
在 SQL 中,我们可以使用以下语句来创建一个星型模型:
1 | CREATE TABLE fact_sales ( # 都是key |
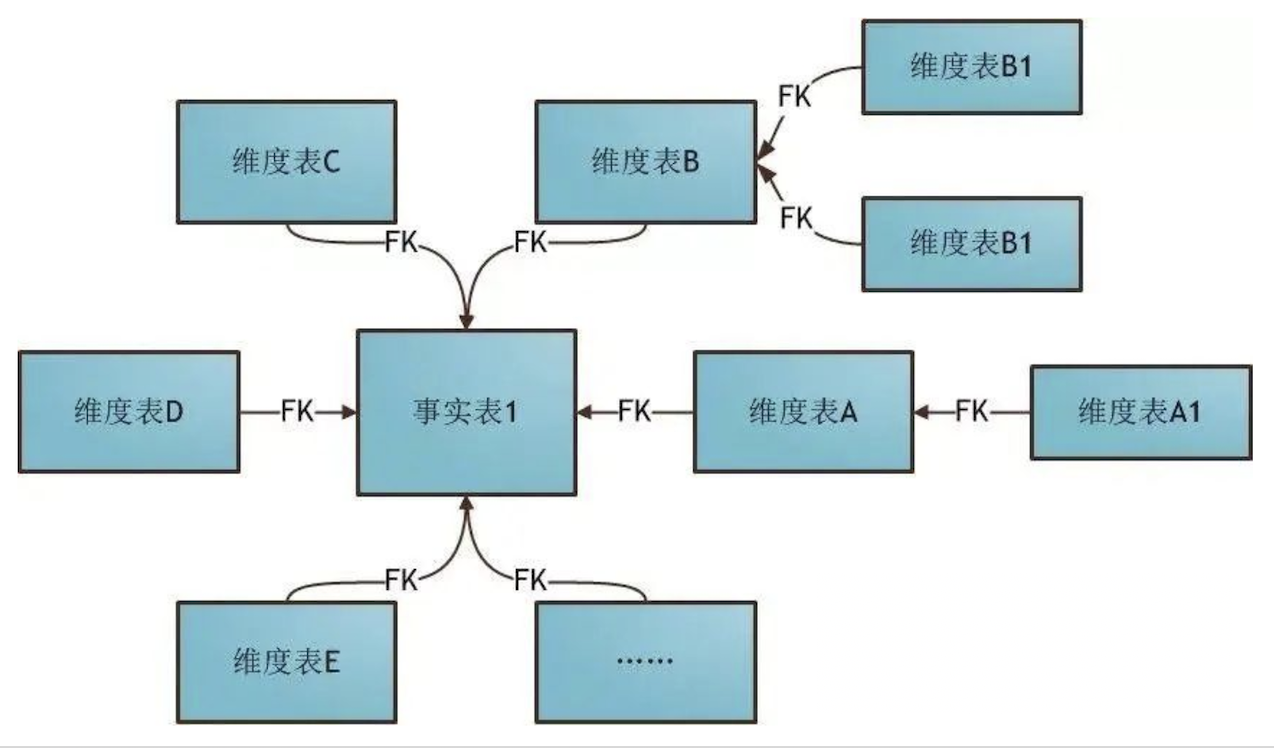
2.雪花型模型#
雪花型模型是在星型模型基础上的扩展,因其形似雪花而得名。这种模型在星型模型的基础上,将维度表拆分成更小的表形式,形成多层表的结构。
雪花型模型:当有一个或多个维表没有直接连接到事实表上,而是通过其他维表连接到事实表上时,其图解就像多个雪花连接在一起,故称雪花模型。雪花模型是对星型模型的扩展。它对星型模型的维表进一步层次化,原有的各维表可能被扩展为小的事实表,形成一些局部的 “层次 “ 区域,这些被分解的表都连接到主维度表而不是事实表。
雪花型模型通过最大限度地减少数据存储量以及联合较小的维表来改善查询性能。雪花型结构去除了数据冗余。
星型模型对比雪花模型#
1、查询性能角度来看
在OLAP(Hive)建议用星型模型,Hive表通过大量的冗余来提升查询效率,星型模型对OLAP的分析引擎支持比较友好;而雪花型要做多个表联接,性能会低于星型架构
在OLTP(MySQL)建议用雪花模型,由于雪花型架构更有利于度量值的聚合,因此性能要高于星型架构,所以雪花模型在关系型数据库中如MySQL,Oracle中非常常见
2、模型复杂度角度
星型架构更简单方便处理
3、层次结构角度
雪花型架构更加贴近OLTP系统的结构,比较符合业务逻辑,层次比较清晰。
4、存储角度
雪花型架构具有关系数据模型的所有优点,不会产生冗余数据,而相比之下星型架构会产生数据冗余。
3.Data Vault 模型#
Data Vault 是另一种数据仓库建模方法,是 Dan Linstedt 在 20 世纪 90 年代提出的,主要用于企业级的数据仓库建模。
Data Vault 模型由中心表(Hub)、链接表(Link)、附属表(Satellite)三个主要组成部分。其中,中心表是核心,用于存储业务主键,链接表记录业务关系,附属表记录业务描述。
(1)中心表
中心表用来存储企业每个业务实体的业务主键,业务主键唯一标识某个业务实体。中心表和源系统是相互独立的,即无论业务主键是否用于多个业务系统,它在 Data Vault 中只保留一份,其他的组件都链接到这一个业务主键上。
出于设计上的考虑,中心表一般由主键、业务主键、装载时间戳、数据来源系统四个字段组成。其中主键是系统生成的代理键,仅供内部使用。
(2)链接表
链接表是不同中心表的链接。一个链接表一般在两个或多个中心表之间有关联。一个链接表通常是一个外键,表示一种业务关系,比如:交易表、客户关联账户等。
链接表主要包括主键、外键1、……、外键n、装载时间戳、数据来源系统等字段构成,其中主键对应多个外键的唯一组合,一般是与业务无关的序列数值。
(3)附属表
附属表用来保存中心表和链接表的描述属性,包含所有历史变化数据,附属表有且仅有一个唯一外键关联到中心表或链接表。
附属表主要包括主键、外键、属性1、……、属性n、装载时间、失效时间、数据来源系统,主键用于唯一标识附属表中的一行记录,一般是与业务无关的序列数值。
参考:数据仓库进阶之路
tonglin0325