kafka connect是kafka提供的一个用于在kafka和其他数据系统之间传输数据的工具
1 | https://kafka.apache.org/documentation/#connect |
1.Kafka Connect组件#
1 | https://docs.confluent.io/platform/current/connect/concepts.html |
- Connectors – the high level abstraction that coordinates data streaming by managing tasks
Connectors定义了数据是如何拷贝进kafka以及如何复制出kafka的
包含2种形式的connector,source connector和sink connector
- Source connector – Ingests entire databases and streams table updates to Kafka topics. A source connector can also collect metrics from all your application servers and store these in Kafka topics, making the data available for stream processing with low latency.
- Sink connector – Delivers data from Kafka topics into secondary indexes such as Elasticsearch, or batch systems such as Hadoop for offline analysis.
confluent公司提供了很多现成的connector,常用的包括
1 | https://www.confluent.io/product/connectors/ |
source connector:
1 | https://docs.confluent.io/kafka-connect-spooldir/current/ |
sink connector:
1 | https://docs.confluent.io/kafka-connect-http/current/connector_config.html |
- Tasks – the implementation of how data is copied to or from Kafka
Tasks是 Connect 的数据模型中的主要执行组件。每个连接器实例协调一组实际复制数据的任务。通过允许连接器将单个作业分解为许多任务,Kafka Connect 提供了对并行性和可扩展数据复制的内置支持,且只需很少的配置。
这些任务中没有存储任何状态。任务状态存储在 Kafka 的特殊topic config.storage.topic 和 status.storage.topic 中,并由关联的连接器管理。因此,可以随时启动、停止或重新启动任务,以提供弹性、可缩放的数据管道。
Workers – the running processes that execute connectors and tasks
Converters – the code used to translate data between Connect and the system sending or receiving data
Transforms – simple logic to alter each message produced by or sent to a connector
Dead Letter Queue – how Connect handles connector errors
kafka connect配置,kafka connect使用的唯一前置条件就是需要有一些kafka brokers,broker的版本不一定要相同
1 | https://docs.confluent.io/home/connect/self-managed/userguide.html# |
同时,kafka connect还可以和schema registry集成,以支持avro,protobuf和JSON schema
1 | https://docs.confluent.io/platform/current/schema-registry/connect.html |
以及
1 | https://docs.confluent.io/home/connect/self-managed/userguide.html#connect-configuring-converters |
2.Kafka Connect部署——Standalone单机模式#
kafka connet的worker有2种运行模式:Standalone 和 Distributed Mode
单机模式可以用于收集web日志到kafka
Standalone部署文档:Kafka Connect的部署和使用详解1(安装配置、基本用法) 和 Kafka Connect的部署和使用详解2(添加connector)
部署步骤:
去kafka官网
1 | https://kafka.apache.org/downloads.html |
下载kafka安装包
1 | wget https://dlcdn.apache.org/kafka/3.2.0/kafka_2.12-3.2.0.tgz |
kafka自带2个source和2个sink,用于文件和终端数据的生产和消费
1 | ➜ /Users/lintong/software/kafka_2.12-3.2.0/config $ ls | grep sink |
1.kafka2file,消费kafka写文件#
修改 conf/connect-standalone.properties 配置文件,添加kafka集群的地址参数 bootstrap.servers 等配置
1 | # 如果消费的时候报 If you are trying to deserialize plain JSON data, set schemas.enable=false in your converter configuration,添加如下配置 |
修改 conf/connect-file-sink.properties 配置文件,如下
1 | name=local-file-sink |
使用connect-file-sink.properties配置来启动一个kafka connect单机的worker
1 | ./bin/connect-standalone.sh config/connect-standalone.properties config/connect-file-sink.properties |
就会在kafka manager上看到名为 connect-local-file-sink 的消费者
2.file2kafka,采集文件发送到kafka#
修改 conf/connect-standalone.properties 配置文件,添加kafka集群的地址参数 bootstrap.servers 等配置,同上
修改 conf/connect-file-source.properties 配置文件,如下
1 | name=local-file-source |
使用connect-file-source.properties配置来启动一个kafka connect的单机的worker
1 | ./bin/connect-standalone.sh config/connect-standalone.properties config/connect-file-source.properties |
文件中的数据就采集并发送到kafka topic当中
1 | echo "123" >> /Users/lintong/Downloads/test1.txt |
当前采集文件的offset将会默认记录在 /tmp/connect.offsets 文件中
1 | cat /tmp/connect.offsets |
3.kafka connect REST API#
connect默认的端口为8083,也可以添加rest.port=8083配置进行修改
1.查看运行的connect任务
1 | curl localhost:8083/connectors |
2.获得指定connect任务的信息
1 | curl localhost:8083/connectors/local-file-source | jq |
3.获得运行connect任务的配置
1 | curl localhost:8083/connectors/local-file-source/config | jq |
4.获得运行connect任务的状态
1 | curl localhost:8083/connectors/local-file-source/status | jq |
5.获得运行的connect任务的task
1 | curl localhost:8083/connectors/local-file-source/tasks | jq |
6.获得运行的connect任务的某个task的运行状态
1 | curl localhost:8083/connectors/local-file-source/tasks/0/status | jq |
7.暂停一个connect任务
1 | curl -X PUT localhost:8083/connectors/local-file-source/pause |
8.恢复一个被暂停的 connector 任务
1 | curl -X PUT localhost:8083/connectors/local-file-source/resume |
9.重启connect任务,一般在任务失败的时候会重启
1 | curl -X POST localhost:8083/connectors/local-file-source/restart |
10.重启connect任务的task,一般在task失败的时候会重启
1 | curl -X POST localhost:8083/connectors/local-file-source/tasks/0/restart |
11.删除一个connect任务
1 | curl -X DELETE localhost:8083/connectors/local-file-source |
12.创建一个connect任务,需要2个字段,一个是name,一个是config
1 | curl -X POST localhost:8083/connectors -H 'Content-Type: application/json' -d '{"name": "local-file-source","config": {"connector.class": "FileStreamSource","file": "/Users/lintong/Downloads/test1.txt","tasks.max": "1","topic": "lintong_test"}}' |
13.更新一个connect任务的配置
1 | curl -X PUT localhost:8083/connectors/local-file-source/config -H 'Content-Type: application/json' -d '{"connector.class": "FileStreamSource","file": "/Users/lintong/Downloads/test.txt","tasks.max": "1","topic": "lintong_test"}' |
14.查看当前的插件
1 | curl localhost:8083/connector-plugins | jq |
3.Kafka Connect部署——Distributed Mode分布式模式#
运行Connect集群上将有更高的容错性,添加添加和删除节点。分布式的Connect集群可以运行在Kubernetes, Apache Mesos, Docker Swarm, or Yarn上面
1.Docker部署方式#
可以参考文档,confleunt公司提供了现成的docker镜像用于构建kafka connect集群
Docker镜像地址:cp-kafka-connect-base 或者 cp-kafka-connect ,两者几乎是相同的,区别是在confluentic 6.0之前cp-kafka-connect预装了几个connect
官方Docker安装文档:Kafka Connect configuration
使用docker run来启动kafka connect服务
1 | docker run -d \ |
如果想要自行添加connector的话,需要自行编写Dockerfile,如下
1 | FROM confluentinc/cp-kafka-connect-base:7.1.1 as base |
build
1 | docker build -f ./Dockerfile . -t xx:0.0.1 |
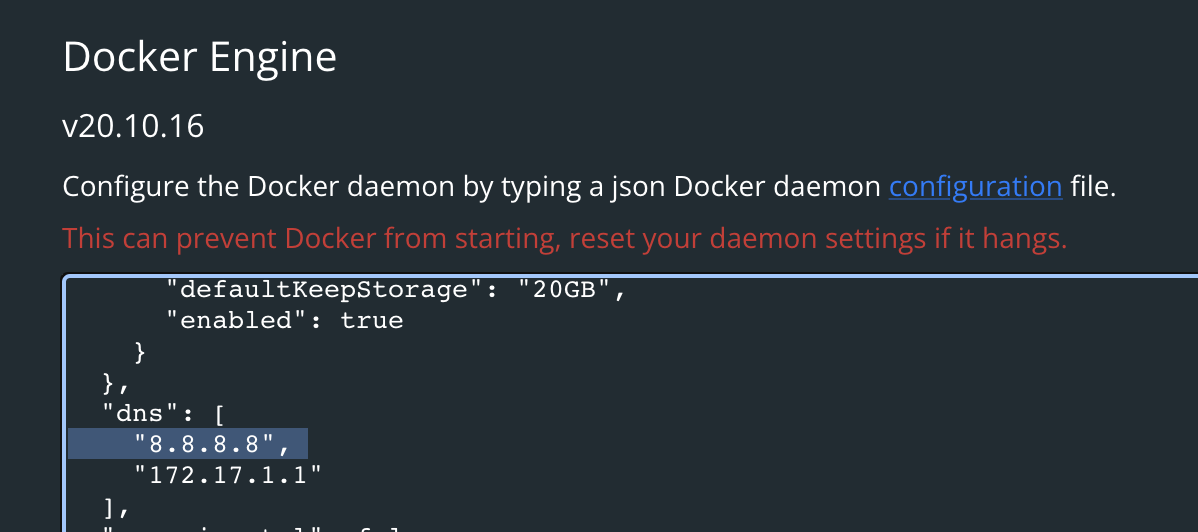
如果遇到 java.net.unknownhostexception: api.hub.confluent.io
可以通过在DNS中添加8.8.8.8来解决,如下
2.K8S部署方式#
可以参考文档
1 | https://docs.confluent.io/operator/current/overview.html |
3.Kafka Connect配置#
4.Kafka Connect异常处理#
参考:https://www.confluent.io/blog/kafka-connect-deep-dive-error-handling-dead-letter-queues/